


25
PREP
ARING THE
APPLIANCE
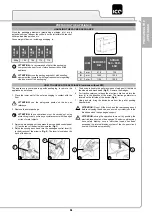
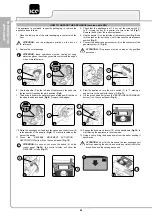
CONNECTING BATTERIES TO THE SYSTEM OF THE APPLIANCE
The batteries should be connected so as to obtain a total
voltage of 24V.
ATTENTION:
it is recommended that all installation and
maintenance operations be carried out by expert personnel,
trained at the specialised assistance centre.
ATTENTION:
to prevent an accidental short circuit use
insulated tools to connect the batteries, and do not place or
drop metal objects on the battery. Remove rings, watches and
any clothing with metal parts that may come into contact with
the battery terminals.
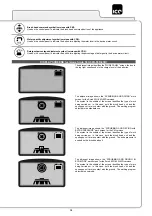
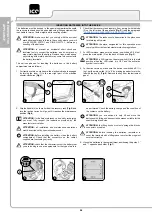
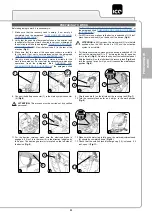
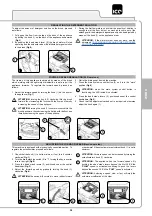
The various phases for inserting the batteries in the battery
compartment are as follows:
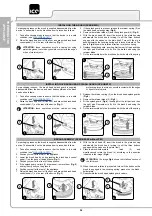
1. Using the jumper cable supplied (1), connect the “+” and “-“ poles
of the batteries in series (
Fig.1
).
2. Connect the battery connector cable (2) to the “+” and “-“ poles to
obtain a voltage of 24V on the terminals (
Fig.2
).
3. Connect the battery connector (2) to the electric system
connector (3) (
Fig.3
).
RECHARGING THE BATTERIES (versions without built-in battery charger)
The battery must be charged prior to the first use, and when it doesn't
provide enough power for tasks that could formerly be performed
without difficulty.
ATTENTION:
to avoid any permanent damage to the
batteries, it is essential to avoid their complete discharge;
begin recharging them within a few minutes of noting the
"discharged batteries" signal.
ATTENTION:
never leave the batteries completely
discharged, even if the device is not being used.
To recharge the batteries without the built-in battery charger, proceed
as follows:
1. Bring the appliance to the zone where the batteries are charged.
2. Take all necessary steps to ensure that the device is in a safe
’”).
ATTENTION:
park the appliance in an enclosed place, on a
flat surface; near the appliance there must be no objects that
could either damage it, or be damaged through contact with it.
ATTENTION:
the room used to recharge the batteries must
be adequately ventilated to prevent the accumulation of gases
that leak from batteries.
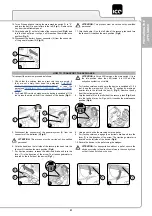
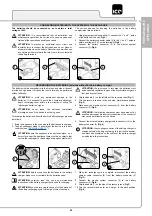
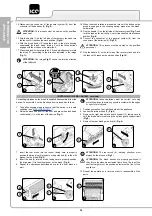
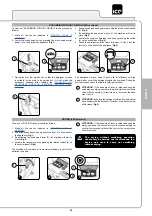
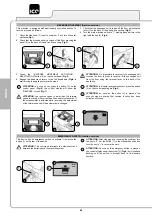
3. Grip the handle (1) on the left side of the recovery tank (
Fig.1
).
4. Turn the recovery tank up to the end stop, maintenance position
(
Fig.2
).
5. Disconnect the electric system connector (3) from the battery
connector (2) (
Fig.3
).
ATTENTION:
the following operations must be carried out by
qualified personnel. An incorrect connection of the connector
may cause a malfunction of the device.
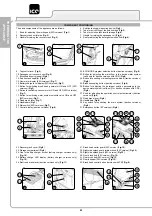
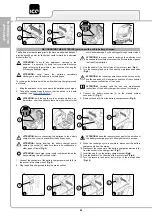
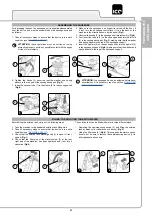
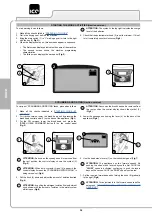
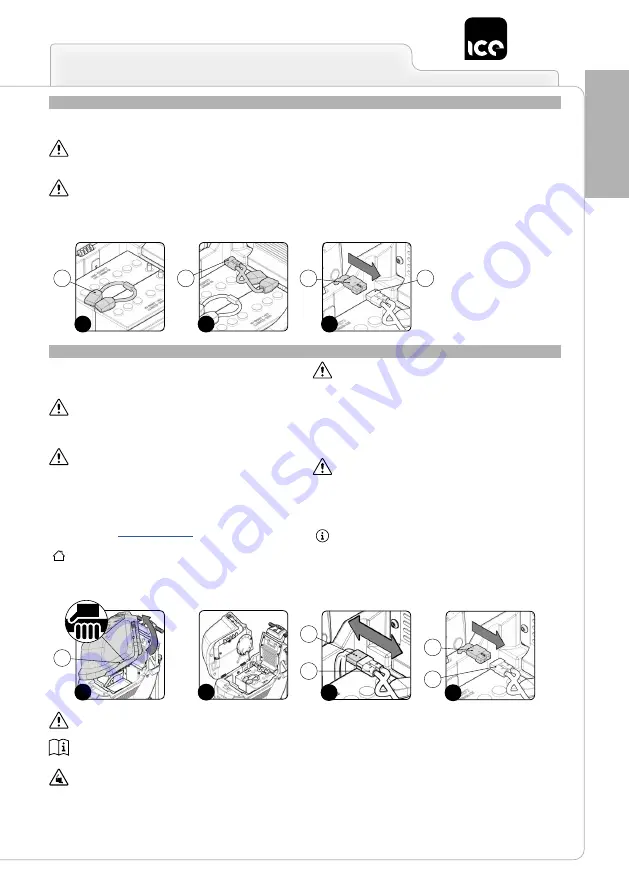
6. Connect the external battery charger cable connector (4) to the
battery connector (2) (
Fig.4
).
ATTENTION:
the coupling connector of the battery charger is
consigned inside the bag containing this instruction booklet,
and must be assembled on the cables of the battery charger
as indicated in the instructions.
ATTENTION:
before connecting the batteries to the battery
charger, make sure it is suitable for the batteries used.
ATTENTION:
carefully read the use and maintenance
instructions of the battery charger that is used for charging.
ATTENTION:
keep the recovery tank open for the duration of
the battery recharging cycle to allow gas fumes to escape.
7. When the recharge cycle is complete, disconnect the battery
charger cable connector (4) from the battery connector (2)
(
Fig.5
).
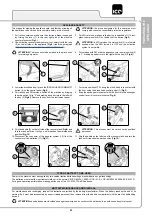
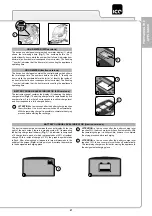
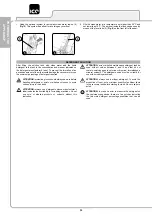
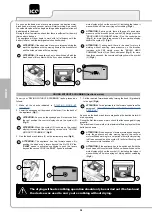
8. Connect the electric system connector (3) to the battery
connector (2) (
Fig.6
).
9. Grip the handle (1) on the side of the recovery tank (
Fig.7
).
10. Turn the recovery tank as far as it will go, to the work position
(
Fig.8
).
3
1
2
3
2
2
1
1
4
2
3
2
2
4
1
3


