DRAINING THE RECOVERY TANK
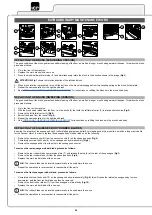
Proceed as follows to empty the recovery tank:
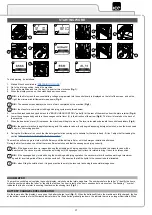
1. Release the recovery tank drainage tube (12) (at the back of the machine) from the retainers (
Fig.12
).
2. Bend the end of the drainage tube, so as to create a choke and prevent the contents from coming out, put the tube on the discharge
surface, unscrew the cap and gradually release the tube.
N.B.:
The place this operation is carried out should comply with current environmental protection regulations.
3. Repeat the operations in reverse order to reassemble all the parts.
CLEANING THE RECOVERY TANK FILTERS
To clean the recovery tank (without the optional tank cleaning kit), proceed as follows:
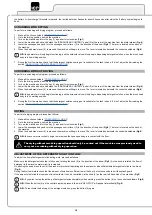
1. Grip the handle (13) on the left-hand side of the recovery tank (
Fig.13
) and turn the tank cover as far as it will go, until it reaches the
maintenance position.
2.
Remove the dirty water basket/filter (14) from the support (
Fig.14
).
3.
Remove the basket cover and clean the basket/filter and the basket cover (15) under a jet of running water.
N.B.:
Use a spatula or brush to eliminate any dirt that is particularly difficult to remove.
4.
Use a cloth to dry the basket/filter and basket cover, and place them back inside the recovery tank.
5.
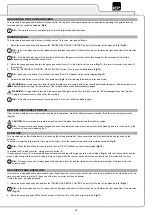
Remove the filter protection cup (16), turning it in the direction of the arrow (
Fig.15
).
6.
Remove the vacuum motor filter (17), taking care not to lose the support tie (18) inside the recovery tank (
Fig.16
).
7.
Rinse both the cup and the filter carefully under running water.
N.B.:
Use a spatula or brush to eliminate any dirt that is particularly difficult to remove.
8.
Rinse the inside of the recovery tank with a jet of water. If necessary, use a spatula to remove any sludge that may have accumulated at the
bottom of the tank.
9. Repeat the operations in reverse order to reassemble all the parts.
7. See “
INSTALLING THE BRUSH (SWEEPING VERSION)
” for instructions on refitting the brushes in the brush head body.
N.B.:
Check that the bristles are not worn; in the event of excessive wear, replace the brush (the bristles should be at least 10 mm long).
REPLACING THE BRUSH (SWEEPING VERSION)
" to replace the brush.
EMPTYING THE SOLUTION TANK
Proceed as follows to empty the solution tank:
1. Unscrew the cap (19) for the solution tank dumping system (
Fig.18
); the cap is located at the rear of the machine.
2.
With the solution tank empty, rinse the inside of the solution tank with a jet of running water.
CLEANING THE VACUUM TUBE
Careful cleaning of the vacuum hose guarantees better cleaning of the floor as well as a longer vacuum motor life. Proceed as follows to clean
the vacuum hose:
1. Grip the handle (13) on the left-hand side of the recovery tank (
Fig.13
) and turn the tank cover as far as it will go, until it reaches the
maintenance position.
2.
Remove the dirty water basket/filter (14) from the support (
Fig.14
).
3.
Rinse the inside of the vacuum tube with a jet of running water (
Fig.17
).
4. Repeat the operations in reverse order to reassemble all the parts.
CLEANING THE WATER SYSTEM FILTER
In order to clean the water system's filter, do the following:
1.
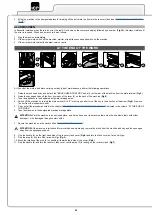
Block the tap outflow, rotating the knob (20) in the direction of the arrow (
Fig.19
).
2.
Go to the left-hand side of the machine and loosen the detergent solution filter cap (21) (
Fig.20
).
3.
Remove the filter cartridge and rinse under a jet of water, using a brush to eliminate any impurities if necessary.
4.
Once the filter cartridge is clean, repeat the operations in the opposite order to reassemble all the parts.
23


