background image

Transportation and Handling

For safe lifting, tilt the appliance backwards by no more than 45 degrees, hold the 
base and rear corners of cabinet. Lift the refrigerator carefully. Never use the door 
handles for lifting. To move the refrigerator on a flat level surface, tilt it slightly 
backwards and push backwards.

This unit is heavy and could cause injury – ensure there are adequate people 
present to move the appliance.

Installing and Switching on Your Appliance

Operating voltage for your appliance is 220-240V at 50Hz.

Before plugging in the power supply, ensure that the voltage on the rating label
corresponds to the working voltage of your electrical system in your home.

Insert the plug into an efficient Ground (Earth) connection. If the socket has no
Ground (Earth) contact or the plug does not match, we suggest you call an authorised
electrician for assistance.

Place your appliance in an area that is not exposed to direct sunlight.

Your appliance should be placed at least 10cm away from stoves, ovens and other
heating cores.

This appliance should never be used outdoors or left in the rain.

When your appliance is placed next to a chest freezer or freezer, there should be at
least 10cms between them to prevent humidity on the outer surface.

The appliance must be used in the vertical position and on a flat surface.

To level the appliance, use the adjustable feet on the appliance.

Do not place your appliance on a carpeted surface as this will prevent adequate
ventilation.

Keep ventilation openings in the appliance enclosure or in the built in structure clear of
obstruction

This appliance should only be placed on a flat, firm surface.

It is recommended the appliance is installed by a qualified kitchen fitter or joiner.

5

Summary of Contents for BU100.E

Page 1: ...this appliance It is advisable to keep these instructions in a safe place for future reference Rated Built Under Larder Fridge BU100 E Iceking Henry John House Northway Industrial Estate Northway Lan...

Page 2: ...receipts with these instructions in a safe place for future reference Included is some important safety information in addition to guidelines and recommendations that will enable you to take full adv...

Page 3: ...ur Appliance Before Switching On Product Overview Unit Spare Parts Usage Temperature Selection Installation Fitting the Plinth Door Reversal Replacing the Light Energy Saving Advice Maintenance Cleani...

Page 4: ...e the defrosting process such as a heater or a hair dryer Do not use electrical appliances in the refrigerator compartment of the appliance If this appliance is to replace an old refrigerator with a l...

Page 5: ...ing transportation to prevent damage to them Electrical Safety THIS APPLIANCE MUST BE PLUGGED INTO AN EARTHED SOCKET Before switching on make sure that the voltage of your electricity supply is the sa...

Page 6: ...th contact or the plug does not match we suggest you call an authorised electrician for assistance Place your appliance in an area that is not exposed to direct sunlight Your appliance should be place...

Page 7: ...Connect to the electrical socket but do not switch the power to the refrigerator on for at least 3 hours The coolant within the product needs time to settle after it has been transported and put in t...

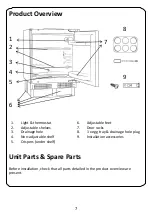
Page 8: ...ed in the product overview are present 7 Product Overview 1 Light thermostat 2 Adjustable shelves 3 Drainage hole 4 Non adjustable shelf 5 Crispers under shelf 6 Adjustable feet 7 Door racks 8 1 x egg...

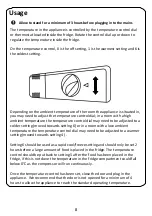
Page 9: ...th a low ambient temperature the temperature control dial may need to be adjusted to a warmer setting moved towards setting 4 Setting 6 should be used as a rapid cool freeze setting and should only be...

Page 10: ...The standard operating temperature for the fridge compartment should be between 0 C and 4 C Note The temperature of the freshly stored food and how often the door is opened affects the temperature in...

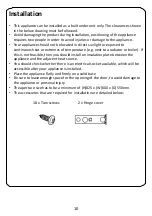
Page 11: ...ext to a radiator or boiler If this is not feasible then you should install an insulation plate between the appliance and the adjacent heat source You should check whether there is an electrical socke...

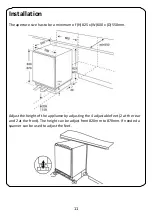
Page 12: ...a minimum of H 825 x W 600 x D 550mm Adjust the height of the appliance by adjusting the 4 adjustable feet 2 at the rear and 2 at the front The height can be adjust from 820mm to 870mm If needed a sp...

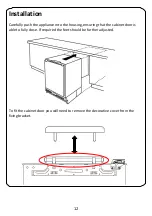
Page 13: ...the appliance into the housing ensuring that the cabinet door is able to fully close If required the feet should be further adjusted To fit the cabinet door you will need to remove the decorative cove...

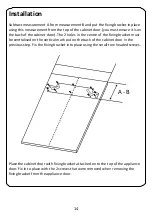
Page 14: ...ket Measurement B measure from the underside of the kitchen unit to the top of a kitchen cabinet door on a adjacent kitchen unit door Remove the 2 screws that fix the fixing bracket to the appliance d...

Page 15: ...es in the centre of the fixing bracket must be centralised on the vertical mark put on the back of the cabinet door in the previous step Fix the fixing bracket into place using the small torx headed s...

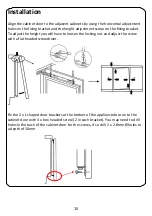
Page 16: ...To adjust the height you will have to loosen the locking nut and adjust the screw with a flat headed screwdriver Fix the 2 x L shaped door brackets at the bottom of the appliance door on to the cabin...

Page 17: ...or and the appliance door can open and close fully before finally tightening all screws Now fix the appliance to the worktop with screws To do this you may need to drill holes in the underside of the...

Page 18: ...ance door If the height of the appliance is 820mm then a plinth that is 90mm in height can be fitted without any modification However if the height of the plinth is greater than 90mm then a cut out th...

Page 19: ...own safety a minimum of 2 people should lift or tilt this product Tools Required Torx headed screwdriver flat headed screwdriver and hexagonal spanner or a socket driver 1 Remove the 4 screw hole cov...

Page 20: ...oor away ensuring you don t damage the hinges or the door 4 Remove the 4 screw hole covers on the cabinet of the appliance at the top and the bottom on the opposite side of where the hinges are curren...

Page 21: ...e top hinge by 180 and fix it in place on the diagonally opposite corner of the appliance cabinet 7 Repeat the previous step with the bottom hinge and then replace the screw hole covers on the opposit...

Page 22: ...on all sides before finally tightening 9 Replace the 4 screw hole covers on the cabinet of the appliance at the top and the bottom on the opposite side of where the hinges are now fixed Replacing the...

Page 23: ...nsure there are no obstructions preventing the doors from closing properly Ensure that the door seals are clean and there are no tears or splits Keep the most perishable foods those with a short shelf...

Page 24: ...eaning reconnect the plug with dry hands External Cleaning Wash the outer cabinet with warm soapy water Do NOT use abrasive products There are sharp edges on the underside of the product so care shoul...

Page 25: ...n limits of the appliance Are the doors of the appliance opened frequently Once the door is opened the humidity found in the air in the room enters the appliance especially if the humidity levels in t...

Page 26: ...place to catch the flow of water The doors do not close properly Ensure there are no obstructions preventing door closure Check the door compartments and shelves are correctly in place Check the door...

Page 27: ...ed as follows The GREEN YELLOW wire is the EARTH and must be connected to the terminal which is marked with the letter E or by the earth symbol or coloured GREEN or GREEN YELLOW The BLUE wire is the N...

Page 28: ...27 Technical Specification Model number Rated Voltage 220V 240V 50Hz Capacity 135L External Dimensions HxWxD 820mm x 596mm x 550mm...

Page 29: ...e possibility of danger to children The flammable foaming needs to be disposed of by a professional company person or your local council Declaration of Conformity The manufacturers of the product s de...

Page 30: ...uch as but not exclusively cleaning of filters or defrosting Cost of Call out for work required to correct the alignment of doors following door reversal procedures carried out by you Use of the appli...

Page 31: ...96 EC on Waste Electrical and Electronic Equipment WEEE By ensuring this product is disposed of correctly you will help prevent potential negative consequences for the environment and human health wh...

Reviews: