background image

21

21

21

21

Wasser, trocknen Sie die Außenseite mit einem Handtuch ab, und öffnen Sie dann das Gehäuse.
Falls die gesamte Innenseite trocken ist, ist das Gehäuse sicher für den Betrieb unter Wasser.

Stellen Sie den Modus-Schalter vor dem Einsetzen in das Gehäuse auf die gewünschte Position.

Auf dem wasserfesten Gehäuse befindet sich kein externer Modus-Schalter.

Nach dem Gebrauch in Salzwasser muss das Gehäuse mit nicht salzhaltigem Wasser abgespült

und anschließend abgetrocknet werden. Anderenfalls kann sich auf dem Scharnierstift und auf der
Dichtung Salz ablagern, was wiederum Funktionsstörungen verursachen könnte.

Um die Dichtung zu reinigen, spülen Sie diese unter frischem Wasser ab und schütteln sie dann

trocken (nicht mit einem Lappen abtrocknen, da anderenfalls Fusseln zurückbleiben könnten).
Installieren Sie die Dichtung in den Kerben an der rückseitigen Abdeckung des Gehäuses.

Technische

Technische

Technische

Technische

Technische

Technische

Technische

Technische

Daten

Daten

Daten

Daten

Daten

Daten

Daten

Daten

Bildsensor

5 Megapixel (CMOS)

Funktionsmodus

Videoaufnahme, Bild, Wechselspeichergerät

Kameralinse

F3.1

f=2.9mm

Digitaler Zoom

4x

Shutter

Elektronischer Shutter

LCD-Display

2.4 Zoll Touch Screen

Bildauflösung

12M (4000 × 3000), 10M (3648x2736), 8M (3264x2448), 5M (2560×1920)

Summary of Contents for ISC-3000HD

Page 1: ...ISC 3000HD ISC 3000HD ISC 3000HD ISC 3000HD USER USER USER USER MANUAL MANUAL MANUAL MANUAL...

Page 2: ...is user s manual for the purpose of introducing details of this digital camera in a more specific and direct way Difference may arise between these displays and illustrations and the digital camera ac...

Page 3: ...d on the video camera or on its lens use soft clean and dry rag to wipe it away gently If the video camera or its lens is stained with sand particles blow them away gently Do not use cloth to wipe arb...

Page 4: ...y when this camera or computer is connected to the memory card i e during reading writing and formatting 6 Touching the metal contact surface of the memory card with fingers or metal materials 7 The s...

Page 5: ...e 12M 10M 8M and 5M Support high speed USB2 0 It supports a Micro SD card with a capacity expansion up to 32GB This product supports video output and live playback functions Videos can be output to hi...

Page 6: ...Vista 7 CPU Intel Pentium III of more than 800MHz or other CPU with equivalent performance Internal Memory Larger than 512MB Sound Card and Display Card The sound card and video card shall support Di...

Page 7: ...Introduction Introduction to to to to Appearance Appearance Appearance Appearance and and and and Keypad Keypad Keypad Keypad TFT LCD Screen off light switch Screen off light Infrared light Camera len...

Page 8: ...7 Micro SD slot HDMI interface Tripod nut Power key key Shutter Key Reset key Microphone USB interface...

Page 9: ...battery battery To charge the camera connect it to the computer Then the charge indicator light red will be on After the camera is fully charged the charge indicator light will be off In general it c...

Page 10: ...ring beside the slot of memory card till it is completely inserted 2 To take out the Micro SD card gently press the end of the memory card inward and it will pop up Note No memory is built in in this...

Page 11: ...ey once under idle condition and the camera will be shut down 3 3 Auto Screen off When the idle time of the camera reaches the automatic screen off time it will automatically turn off the screen to sa...

Page 12: ...by clicking the icon in the upper left corner of the LCD display after startup Video recording mode Photo mode Vehicle mode Playback mode 5 5 5 5 5 5 5 5 Indicator Indicator Indicator Indicator Indica...

Page 13: ...w level the camera will also automatically stop video recording 1 Mode icon indicating currently in the AVI mode 2 Video size available in FHD HD 60FPS HD 30FPS VGA 3 Recording time indicating the len...

Page 14: ...10M 12M 3 Counter Indicating the number of photos to be taken 4 Indicating the face detection function is activated 5 Icon for setting the time and date 6 Battery icon indicating the current capacity...

Page 15: ...g time and date 5 click this icon the camera can be flipped 180 degrees to take video normally 6 Battery icon indicating the current capacity of the battery 7 Playback icon to activate the correspondi...

Page 16: ...er turning on the camera and enabling the Preview state press the Playback icon in the lower right corner of the LCD display to activate the menu Click the to switch to the file list mode Then you can...

Page 17: ...nd Click STOP to exit the playback mode to return to the list mode 9 3 Playback photos After turning on the camera and enabling the Preview state press the Playback icon in the lower right corner of t...

Page 18: ...7 9 4 File deletion After clicking the Delete File icon the screen will appear as shown in the right figure Click YES to delete the current file immediately or click NO to cancel the deletion operatio...

Page 19: ...finition high definition high definition TV TV TV TV Connect the camera to a high definition TV with a HD cable as shown below Then video signals from the camera will be automatically output to the hi...

Page 20: ...indow of my computer The photos you have taken can be saved in the removable disk under the file folder I jpg I is the removable disk of the camera Your video files will be saved under the folder of I...

Page 21: ...essing the corresponding buttons Waterproof Waterproof Waterproof Waterproof Case Case Case Case Using Using Using Using Notice Notice Notice Notice Before sealing the waterproof case keep the camera...

Page 22: ...a cloth may cause lint to compromise the seal Re install the seal into the grooves in the backdoor of the housing Technical Technical Technical Technical Technical Technical Technical Technical param...

Page 23: ...SB interface High speed USB 2 0 interface Power Supply Built in 3 7V rechargeable lithium Dimension length width height 74 52 33mm Weight Approx 72g Standard Standard Standard Standard Standard Standa...

Page 24: ...min Belgium 02 6200115 Local charges France 0170480005 Local charges The helpdesk is accessible from Monday to Friday from 9 AM till 6 PM In case your device needs repair our helpdesk will redirect yo...

Page 25: ...ional use In case of professional use all warranty obligations of the manufacturer will be voided SSS If at any time in the future you should need to dispose of this product please note that Waste ele...

Page 26: ...ISC 3000HD ISC 3000HD ISC 3000HD ISC 3000HD BENUTZERHANDBUCH BENUTZERHANDBUCH BENUTZERHANDBUCH BENUTZERHANDBUCH...

Page 27: ...ltig durch und bewahren Sie es f r ein sp teres Nachschlagen gut auf Dieses Handbuch st tzt sich auf die w hrend der Erstellung verf gbaren Informationen Abbildungen des Displays und des Produkts soll...

Page 28: ...Materialien Bewahren Sie die Kamera an einem k hlen trockenen und gut bel fteten Ort auf Legen Sie die Kamera nicht an sehr warme feuchte oder staubige Orte um Funktionsst rungen der Kamera zu vermei...

Page 29: ...Sie die Karte Die externe SD Speicherkarte besteht aus elektronischen Pr zisionskomponenten In den folgenden Situationen k nnen Datenverluste verursacht werden 1 Unsachgem er Gebrauch der Speicherkar...

Page 30: ...Lage sogar bei sehr schlechter Beleuchtung High Definition Videos mit hervorragender Kontinuit t dynamischer Bilder aufzunehmen Die Kamera unterst tzt das H 264 HD Videoformat Es werden vier Videomod...

Page 31: ...PU Intel Pentium III von mehr als 800MHz oder andere CPU mit hnlicher Leistung Interner Speicher Mehr als 512 MB Soundkarte und Display Karte Die Sound und Videokarte unterst tzen DirectX8 oder h here...

Page 32: ...6 6 6 6 bersicht bersicht bersicht bersicht des des des des Ger Ger Ger Ger ts ts ts ts Anzeigelampe Bildschirm aus TFT LCD Schalter Bildschirm aus Infrarotlicht Besetztanzeige Ladeanzeige Kameralinse...

Page 33: ...7 7 7 7 Micro SD Kartenschlitz HDMI Anschluss Tripod Anschluss Betriebstaste Shutter Taste R ckstellung Mikrofon USB Port...

Page 34: ...mbatterie Lithiumbatterie Lithiumbatterie Lithiumbatterie auf auf auf auf Schlie en Sie die Kamera zum Aufladen an einen Computer an Die Ladeanzeige leuchtet dann rot Nach dem vollst ndigen Aufladen d...

Page 35: ...n Sie dabei die Markierungen neben dem Kartenschlitz 2 Um die Speicherkarte herauszunehmen dr cken Sie die Karte zun chst vorsichtig nach innen bis die Karte von allein herausspringt Hinweis Diese Vid...

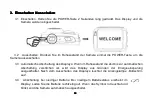
Page 36: ...ken Sie im Ruhezustand der Kamera einmal die POWER Taste um die Kamera auszuschalten 3 3 Automatische Abschaltung des Displays Wenn im Ruhezustand die Zeit bis zur automatischen Abschaltung verstriche...

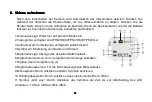
Page 37: ...der Kamera den Modus wechseln Videos aufnehmen Bilder machen Fahrt Wiedergabe 5 5 5 5 5 5 5 5 Anzeigelampen Anzeigelampen Anzeigelampen Anzeigelampen Anzeigelampen Anzeigelampen Anzeigelampen Anzeige...

Page 38: ...ufnahme automatisch 1 Modus Anzeige Weist hier auf den AVI Modus hin 2 Videogr e verf gbar sind FHD HD 60FPS HD 30FPS VGA 3 Aufnahmezeit Verbleibende verf gbare Aufnahmezeit 4 Symbol zur Einstellung v...

Page 39: ...Bildgr e verf gbar sind 5M 8M 10M 12M 3 Z hler Anzeige der noch verf gbaren Bilder 4 Weist darauf hin dass die Gesichtserkennung aktiviert ist 5 Symbol zur Einstellung von Datum und Uhrzeit 6 Batterie...

Page 40: ...bol um die Kamera um 180 Grad zu drehen und normale Videos aufzunehmen 6 Batterieanzeige Anzeige des aktuellen Batteriestatus 7 Wiedergabesymbol Durch Anklicken das entsprechende Men ffnen 8 Symbol LC...

Page 41: ...e nach dem Einschalten der Kamera und der Aktivierung der Vorschau das Wiedergabesymbol unten rechts im LCD Display um das Men aufzurufen Klicken Sie auf um die Dateiliste zu ffnen Klicken Sie dann f...

Page 42: ...pp Taste um die Wiedergabe zu beenden und zur Dateiliste zur ckzukehren 9 3 Bilder anzeigen Dr cken Sie nach dem Einschalten der Kamera und der Aktivierung der Vorschau das Wiedergabesymbol unten rech...

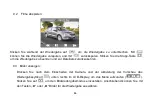
Page 43: ...4 Dateien l schen Klicken Sie auf das L schen Symbol und folgende Abbildung erscheint Klicken Sie auf YES um die aktuelle Datei umgehend zu l schen oder klicken Sie auf NO um den L schvorgang abzubre...

Page 44: ...nition Fernseher Fernseher Fernseher Fernseher Schlie en Sie die Kamera mit einem HD Kabel an einen High Definition Fernseher an siehe Abbildung unten Videosignale der Kamera werden automatisch ber de...

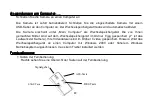
Page 45: ...Computer als Wechselspeicherger t Die von Ihnen gemachten Bilder sind auf dem Wechselspeicherger t im Ordner I jpg gespeichert I ist das Laufwerk der Kamera Ihre Videodateien sind im Ordner I video g...

Page 46: ...oder die Kamera ausschalten Hinweis Hinweis Hinweis Hinweis zum zum zum zum wasserfesten wasserfesten wasserfesten wasserfesten Geh Geh Geh Geh use use use use Vergewissern Sie sich vor dem Schlie en...

Page 47: ...r Dichtung Salz ablagern was wiederum Funktionsst rungen verursachen k nnte Um die Dichtung zu reinigen sp len Sie diese unter frischem Wasser ab und sch tteln sie dann trocken nicht mit einem Lappen...

Page 48: ...ild JPEG Speichermedium Micro SD Speicherkarte bis zu 32GB ohne integrierten Speicher USB Port High Speed USB 2 0 Port Stromversorgung Integrierte 3 7V wiederaufladbare Lithiumbatterie Abmessungen L n...

Page 49: ...00 23553626 Ortsgebundener Tarif 1ct p min Belgien 02 6200115 Ortsgebundener Tarif Frankreich 0170480005 Ortsgebundener Tarif Die Hotline erreichen Sie montags bis freitags von 9 bis 18 Uhr Falls Ihr...

Page 50: ...cht f r professionelle Zwecke geeignet Falls das Ger t f r professionelle Zwecke eingesetzt wird erl schen alle Garantieverpflichtungen seitens des Herstellers Beachten Sie bei der Entsorgung dieses P...

Page 51: ...ISC ISC ISC ISC 300 300 300 3000HD 0HD 0HD 0HD MANUAL MANUAL MANUAL MANUAL DEL DEL DEL DEL USUARIO USUARIO USUARIO USUARIO...

Page 52: ...a pantalla y las ilustraciones empleadas en este manual del usuario tienen como finalidad introducir detalles de esta c mara digital de un modo m s espec fico y directo No obstante podr an darse difer...

Page 53: ...ongado de almacenamiento Por favor compruebe si la c mara puede funcionar con normalidad antes del uso Si manchas o suciedad se acumularan en la v deo c mara o en su lente use un pa o suave seco y lim...

Page 54: ...La tarjeta de memoria ha sido da ada se ha ca do o golpeado 3 Ha sido sometida a altas temperaturas ambientes h medos o expuesta a la luz solar directa 4 Existe la presencia de campos electrost ticos...

Page 55: ...m genes din micas Acepta el formato de v deo HD H 264 El modo de v deo incluye cuatro opciones VGA 120FPS HD 60FPS HD 30FPS y FHD 1920x1080 30FPS El modo foto incluye cuatro tama os 12M 10M 8M y 5M So...

Page 56: ...0 XP Vista 7 CPU Intel Pentium III o m s de 800MHz u otro CPU de potencia similar Memoria interna M s de 512MB Tarjeta de sonido y tarjeta gr fica Las tarjetas de sonido y la tarjeta gr fica aceptan l...

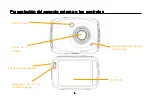
Page 57: ...el aspecto aspecto aspecto aspecto externo externo externo externo y y y y los los los los controles controles controles controles Luz de pantalla apagada LCD TFT Interruptor de luz de pantalla apagad...

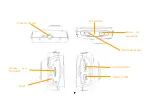
Page 58: ...7 7 7 7 Ranura para MicroSD Interfaz HDMI Toma de tr pode Bot n de encendido Bot n de disparo Reset Micr fono Interfaz USB...

Page 59: ...argable recargable Para cargar la c mara con ctela al ordenador Despu s la luz indicadora de carga roja se encender Cuando la c mara se haya cargado del todo la luz indicadora de carga se apagar En ge...

Page 60: ...introducci n para tarjetas de memoria hasta insertarla por completo 2 Para sacar la tarjeta Micro SD presione ligeramente el extremo de la tarjeta de memoria hacia dentro y est saldr por s sola Nota E...

Page 61: ...O en el estado inactivo y la c mara se apagar 3 3 Auto apagado de la pantalla Cuando el estado de inactividad de la c mara alcance el tiempo de apagado de la pantalla esta se apagar para ahorrar energ...

Page 62: ...uces Luces Luces Luces Luces Luces indicadoras indicadoras indicadoras indicadoras indicadoras indicadoras indicadoras indicadoras Luz indicadora de uso azul Cuando la c mara se encuentre en uso por e...

Page 63: ...S VGA 3 Tiempo de grabaci n indica la duraci n del tiempo de grabaci n restante disponible 4 Icono de ajuste de la fecha y la hora 5 Icono de la bater a indica la capacidad actual de la bater a 6 Icon...

Page 64: ...en 5M 8M 10M 12M 3 Contador indica el n mero de fotos que se pueden tomar 4 Indica que la funci n de detecci n facial est activada 5 Icono para ajustar la fecha y la hora 6 Icono de la bater a indica...

Page 65: ...e de fecha y hora 5 Toque este icono y la c mara podr girar 180 grados para tomar v deo normalmente 6 Icono de la bater a indica la capacidad actual de la bater a 7 Icono de reproducci n para activar...

Page 66: ...ncender la c mara y habilitar el estado de vista previa pulse el icono de reproducci n de la esquina inferior derecha del display LCD para activar el men Toque para seleccionar el modo de lista de arc...

Page 67: ...a gran velocidad Toque para salir del modo reproducci n y regresar al modo de lista 9 3 Reproducci n de fotos Despu s de encender la c mara y habilitar el estado de vista previa pulse el icono de rep...

Page 68: ...ci n de archivos Despu s de tocar el icono de eliminaci n de archivo la pantalla se mostrar como se muestra en la imagen de la derecha Toque YES para eliminar inmediatamente el archivo actual o NO par...

Page 69: ...ici definici definici definici n n n n Conecte la c mara a un TV de alta definici n con un cable HD como se muestra debajo Entonces la se ales de v deo de la c mara ser n transmitidas autom ticamente...

Page 70: ...r guardar la fotos que usted haya tomado en el disco extra ble en la carpeta de archivos I jpg I es el disco extra ble de la c mara Sus archivos de v deo se guardar n en la carpeta I video Nota si se...

Page 71: ...fotos o apagar la c mara pulsando los botones correspondientes Aviso Aviso Aviso Aviso sobre sobre sobre sobre el el el el uso uso uso uso de de de de la la la la carcasa carcasa carcasa carcasa sume...

Page 72: ...rno para el interruptor de modo Cada vez que haya usado la c mara en agua salada ser preciso aclarar el exterior con agua dulce y despu s secarla De no hacerlo podr a llegar a causar corrosi n del eje...

Page 73: ...isual LCD T ctil de 2 4 pulgadas Resoluci n de imagen 12M 4000 3000 10M 3648x2736 8 M 3264x2448 5M 2560 1920 Resoluci n de v deo VGA 640x480 120 fotogramas seg HD 1280x720 60 fotogramas seg HD 1280x72...

Page 74: ...nido Contenido Contenido Contenido Contenido est est est est est est est est ndar ndar ndar ndar ndar ndar ndar ndar de de de de de de de de la la la la la la la la caja caja caja caja caja caja caja...

Page 75: ...Tarifa local El tel fono de asistencia est disponible de lunes a jueves de 9 de la ma ana a 6 de la tarde ICES ofrece servicio y garant a en cumplimiento de la ley de la Uni n Europea lo cual implica...

Page 76: ...o usted tuviera que deshacerse de este producto por favor tenga en cuenta que los productos el ctricos usados no deben ser depositados junto con los desechos del hogar Por favor recicle all donde se d...

Page 77: ...ISC 3000HD ISC 3000HD ISC 3000HD ISC 3000HD MANUEL MANUEL MANUEL MANUEL DE DE DE DE L L L L UTILISATEUR UTILISATEUR UTILISATEUR UTILISATEUR...

Page 78: ...r daction L affichage de l cran et les illustrations utilis es dans ce manuel de l utilisateur ne sont pr sent es qu afin de pr senter les d tails de cette cam ra digitale de mani re plus sp cifique...

Page 79: ...ssurez vous d utiliser la cam ra r guli rement lorsque vous la ranger pendant une p riode prolong e V rifiez si la cam ra peut fonctionner normalement avant de l utiliser Si de la salet ou des taches...

Page 80: ...tilisation incorrecte de la carte m moire 2 La carte m moire est courb e fendue ou br ch e 3 Condition de temp rature extr me ou d environnement humide ou exposition directe la lumi re du soleil 4 Exi...

Page 81: ...e avec une faible luminosit et supporte le format vid o H 264 HD Le mode vid o supporte quatre modes savoir VGA 120IPS HD 60IPS HD 30IPS et FHD 1920x1080 30IPS Le mode photo supporte quatre tailles sa...

Page 82: ...XP Vista 7 CPU Intel Pentium III de plus de 800MHz ou autre CPU de performance quivalente M moire interne Sup rieure 512 MB Carte son et carte graphique La carte son et la carte graphique sont compati...

Page 83: ...de de de l l l l apparence apparence apparence apparence et et et et clavier clavier clavier clavier Indicateur d cran teint Lumi re infrarouge Objectif de la cam ra Indicateur d tat occup indicateur...

Page 84: ...7 7 7 7 Fente carte micro SD Interface HDMI crou du tr pied Touche M A M A Touche Obturateur Touche de r initialisation Microphone Interface USB...

Page 85: ...nectez la sur l ordinateur Alors l indicateur lumineux de chargement s allume rouge Une fois la cam ra compl tement charg e l indicateur de chargement s teindra En g n ral l appareil peut se charger c...

Page 86: ...fente pour carte m moire jusqu ce qu elle soit compl tement ins r e 2 Pour sortir la carte TF appuyez doucement sur l extr mit de la carte m moire vers l int rieur et elle s jectera Remarque Aucune m...

Page 87: ...inactive et la cam ra s teindra 3 3 Extinction automatique de l cran Lorsque la cam ra reste longtemps sans fonctionnement l cran passe en veille automatique et s teint pour conomiser de l nergie Une...

Page 88: ...ans le coin en haut gauche de l cran apr s le d marrage Mode d enregistrement vid o Mode photo Mode v hicule Mode lecture 5 5 5 5 5 5 5 5 Indicateur Indicateur Indicateur Indicateur Indicateur Indicat...

Page 89: ...presque vide la cam ra cesse automatiquement d enregistrer de la vid o 1 Mode ic ne indique que le mode AVI est en cours 2 Taille de vid o disponible en FHD HD 60IPS HD 30IPS VGA 3 Temps d enregistrem...

Page 90: ...n cours 2 Taille de photo disponible en 5M 8M 10M 12M 3 Compteur Indique le nombre de photos prendre 4 Indique que la fonction de d tection de visage est activ e 5 Ic ne de r glage du mode et de la da...

Page 91: ...pour prendre une vid o normalement 6 Ic ne de batterie repr sente le niveau actuel de la batterie 7 Ic ne de lecture Active le menu correspondant en cliquant dessus 8 Ic ne d cran teint permet de choi...

Page 92: ...t activ le mode de pr visualisation appuyez sur l ic ne de lecture dans le coin inf rieur droit de l cran LCD pour activer le menu Cliquez sur pour passer en mode de liste de fichier Alors vous pouvez...

Page 93: ...mbobiner Cliquez sur STOP pour quitter le mode de lecture et revenir en mode liste 9 3 afficher des photos Apr s avoir allum la cam ra et activ le mode de pr visualisation appuyez sur l ic ne de lectu...

Page 94: ...r des fichiers Apr s avoir cliqu sur l ic ne d effacement de fichiers l cran apparaitra comme sur l image droite Appuyez sur YES pour effacer le fichier actuel imm diatement ou sur NO pour annuler l o...

Page 95: ...e d haute d finition finition finition finition Connectez la cam ra sur un t l viseur haute d finition avec un c ble HD comme indiqu ci dessous Alors les signaux vid o de la cam ra seront automatiquem...

Page 96: ...egard es dans le disque amovile dans le dossier I jpg I est le disque amovible de la cam ra Vos fichiers vid o seront sauvegard s sous le dossier vid o I video Si la fonction de disque amovible est ut...

Page 97: ...egistrer des vid os prendre des photos ou teindre la cam ra en appuyant sur les touches correspondantes Notice Notice Notice Notice d utilisation d utilisation d utilisation d utilisation du du du du...

Page 98: ...ainsi peut termes provoquer la corrosion de la broche de charni re et l accumulation de sel dans le joint qui peut provoquer une panne Pour nettoyer le joint rincez aec de l eau douce et ventez pour...

Page 99: ...d o AVI Photo JPEG Moyen de stockage Carte Micro SD prend en charge jusqu 32 GB sans m moire flash interne Interface USB Interface USB 2 0 haut d bit Alimentation Batterie lithium 3 7V rechargeable in...

Page 100: ...l 1ct P min Belgique 02 6200115 appel local France 0170480005 appel local Le service d assistance est joignable du lundi au vendredi entre 9 heures et 18 heures Au cas o votre appareil aurait besoin d...

Page 101: ...pareil ne convient pas pour une utilisation professionnelle En cas d utilisation professionnelle les obligations de garantie du fabricant seront annul es Si vous devez vous d barrasser de ce produit l...

Page 102: ...ISC 3000HD ISC 3000HD ISC 3000HD ISC 3000HD HANDLEIDING HANDLEIDING HANDLEIDING HANDLEIDING...

Page 103: ...samenstellen De schermafbeeldingen en illustraties die worden gebruikt in deze handleiding hebben als doel om details van deze digitale camera op een directere en specifiekere manier te introduceren...

Page 104: ...gebruik of de videocamera normaal kan worden gebruikt Als er vuil of vlekken op de camera of de lens komen gebruik dan een zachte schone en droge doek om het zacht weg te vegen Als de videocamera of...

Page 105: ...kaart is gebogen gevallen of gebotst 3 De geheugenkaart is in een hete of vochtige omgeving gelegd of blootgesteld aan direct zonlicht 4 Er bestaat een elektrostatisch of elektromagnetisch veld rond d...

Page 106: ...s onder omstandigheden met weinig licht en de camera biedt ondersteuning aan het H 264 HD videoformaat De videomodus ondersteunt vier modi nl VGA 120FPS HD 60FPS HD 30FPS en FHD 1920x1080 30FPS De fot...

Page 107: ...l Pentium III of meer dan 800MHz of andere CPU met prestaties van hetzelfde niveau Intern geheugen Meer dan 512MB Geluidskaart en videokaart De geluidskaart en videokaart moeten ondersteuning bieden a...

Page 108: ...e Introductie Introductie uiterlijk uiterlijk uiterlijk uiterlijk en en en en toetsen toetsen toetsen toetsen Scherm uit indicator lampje TFT LCD Scherm uit indicator schakelaar Infraroodlicht Cameral...

Page 109: ...7 7 7 7 MicroSD slot HDMI aansluiting Moer voor statief Power knop Sluiter knop Reset knop Microfoon USB poort...

Page 110: ...pladen opladen opladen Sluit de camera aan op een computer om de camera op te laden De oplaad indicator rood zal oplichten Als de camera volledig is opgeladen dan zal de oplaadindicator uitschakelen D...

Page 111: ...rt er volledig is ingedrukt 2 Als u de MicroSD kaart wilt uitnemen druk het uiteinde van de kaart dan zachtjes naar binnen tot de kaart naar buiten schiet Opmerking Er zit geen ingebouwde geheugen in...

Page 112: ...OWER als de camera stationair is en de camera wordt uitgeschakeld 3 3 Scherm automatisch uitschakelen Als de camera niet wordt gebruikt en de automatische uitschakeltijd wordt bereikt dan zal het sche...

Page 113: ...peelmodus Er kan tussen deze modi worden geschakeld door in het icoontje in de linkerbovenhoek te drukken na het opstarten Videomodus Fotomodus Voertuigmodus Afspeelmodus 5 5 5 5 5 5 5 5 Indicator Ind...

Page 114: ...eeg is dan zal de camera ook automatisch stoppen met het opnemen van video 1 Modusicoontje geeft aan dat de camera nu in de AVI modus is 2 Videogrootte FHD HD 60FPS HD 30FPS VGA 3 Opnametijd Geeft de...

Page 115: ...tomodus is 2 Fotogrootte beschikbaar in 5M 8M 10M 12M 3 Teller Geeft het aantal foto s dat genomen kan worden weer 4 Geeft aan dat gezichtsdetectie is ingeschakeld 5 Icoontje voor het instellen van ti...

Page 116: ...era kan 180 graden worden gedraaid om normaal video op te nemen 6 Batterij icoontje geeft de huidige capaciteit van de batterij weer 7 Afspeelicoontje om het bijbehorende menu te activeren 8 LCD uit i...

Page 117: ...het inschakelen van de camera en het openen van de previews op het afspeelicoontje in de rechteronderhoek van het LCD display om het menu te activeren Druk op om te schakelen naar de bestandslijst Daa...

Page 118: ...e afspeelmodus te verlaten en terug te keren naar de bestandslijst 9 3 Afspelen foto s Druk na het inschakelen van de camera en het openen van de preview staat op het afspeelicoontje in de rechteronde...

Page 119: ...den verwijderen Nadat u op het verwijdericoontje heeft gedrukt zal het scherm dat aan de rechterkant wordt getoond verschijnen Druk op YES om het huidige bestand te verwijderen of druk op NO om het ve...

Page 120: ...h definition high definition TV TV TV TV Sluit de camera aan op een high definition TV met een HD kabel zoals hieronder getoond Daarna zullen videobestanden automatisch van de camera uitgang naar de h...

Page 121: ...o s die u heeft genomen met de camera worden opgeslagen in de map I jpg I is de verwijderbare schijf van de camera Uw videobestanden worden opgeslagen in de map I video Opmerking als u gebruik maakt v...

Page 122: ...kunt u video s opnemen foto s nemen of de camera afsluiten door op de bijbehorende toetsen te drukken Opmerkingen Opmerkingen Opmerkingen Opmerkingen gebruik gebruik gebruik gebruik waterdichte waterd...

Page 123: ...doet dan kan dit uiteindelijk leiden tot corrosie op de scharnierpen en zoutopbouw in de afdichting Dit kan leiden tot gebreken Als u de afdichting wilt reinigen spoel deze dan schoon met zoet water...

Page 124: ...VI Foto JPEG Opslagmedium MicroSD kaart ondersteuning tot 32GB zonder ingebouwd flash geheugen USB poort High speed USB 2 0 poort Voeding Ingebouwde 3 7V oplaadbare lithium accu Afmetingen lengte bree...

Page 125: ...ijk 0170480005 Lokaal tarief De helpdesk is beschikbaar van maandag t m vrijdag van 9 00 uur tot 18 00 uur Indien uw apparaat een reparatie dient te ondergaan zal onze helpdesk u doorsturen naar uw lo...

Page 126: ...at is niet geschikt voor professioneel gebruik In geval van professioneel gebruikt vervalt de garantieverplichting van de fabrikant in alle opzichten Mocht u in de toekomst dit apparaat willen verwijd...

Reviews: