background image

IR-PAD SERIES USER MANUAL

16

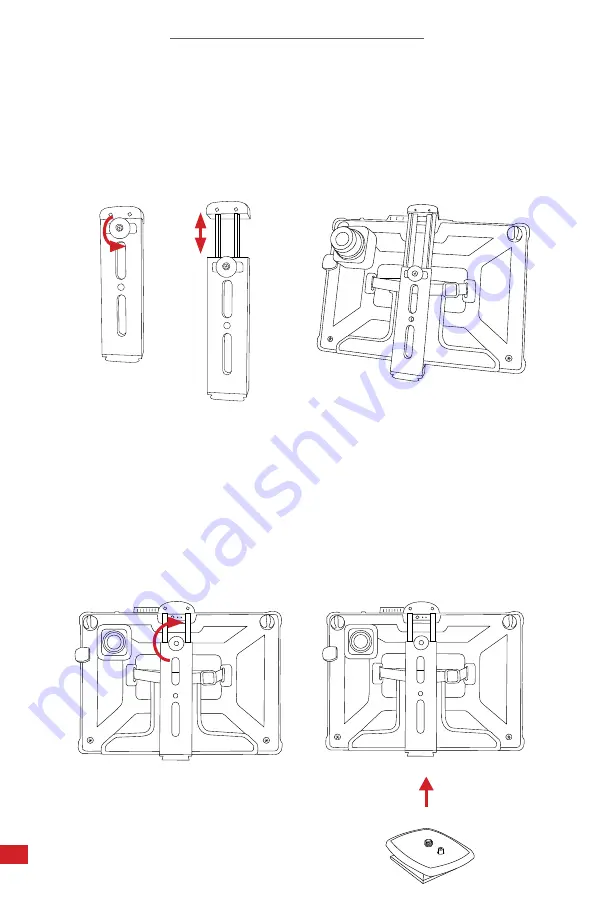
7-2     Tripod Setup

A

B.

Loosen mounting bracket by 

turning dial to the left.

Place mounting bracket securely 

on back of the device.*

YOU  CAN  LEAVE  THE  TYPE  COVER  ATTACHED,  OR  REMOVE  IT.  EITHER 

OPTION FITS WITH THE MOUNTING BRACKET.

D.

C.

Mount the mounting bracket to a 

tripod using the ¼”-20 mount.

Tighten mounting bracket by 

turning the dial to the right.

Summary of Contents for IR-PAD Series

Page 1: ...ON IMPORTANT SAFETY INFORMATION INSIDE 2105 W Cardinal Dr Beaumont TX 77705 ICI cameras fall under US Federal Law and Export Control For more information contact us 409 861 0788 sales infraredcameras...

Page 2: ...IR PAD SERIES USER MANUAL 2 Revision History 11 2020 001 10 2022 001 Document created Radiometry section added and technical errors fixed...

Page 3: ...tions Standard 11 Structure 13 5 1 Appearance and Definitions of Housing Interface 13 Package Includes 14 Quick Start Instructions 15 7 1 Neckstrap Handheld Setup 15 7 2 Tripod Setup 16 7 3 Charging I...

Page 4: ...ace 27 10 3 Device Calibration 27 10 4 Storage 27 Troubleshooting 28 11 1 Camera s not showing camera s lagging or software crashing 28 11 2 The attached camera shuts off unexpectedly 28 11 3 No therm...

Page 5: ...permission of Infrared Cameras Inc The documentation must not in whole or part be copied photocopied reproduced translated or transmitted to any electronic medium or machine readable form without prio...

Page 6: ...he crossed out wheeled bin symbol indicates that waste electrical and electronic equipment should not be discarded together with unseparated household waste but must be collected separately All local...

Page 7: ...a Create projects view galleries and generate reports with the built in software Environment of use industrial and petrochemical buildings electrical plants security rooms science labs animal reserves...

Page 8: ...IR PAD SERIES USER MANUAL 8 2 9 Training To read about infrared training visit https infraredtraininginstitute com...

Page 9: ...cycle of the battery Do not continue to charge the device if it does not become charged in the specified charging time If you continue to charge the device the battery can become hot and cause an expl...

Page 10: ...color changes shape or is in an unusual condition Speak with a sales office if one or more of these problems occurs Clean the case with a damp cloth and a weak soap solution Do not use abrasives isop...

Page 11: ...o 14 m Thermal Sensitivity NETD 20 mK 0 02 C at 30 C 86 F Frame Rate 30 Hz P Series or 7 5 Hz S Series 60 Hz P Series or 7 5 Hz S Series Humidity 10 to 95 non condensing Dynamic Range 14 bit Pixel Ope...

Page 12: ...cing 5 MP at 2560 x 1920 Central Hot Cold Spot Measurements Yes Point Line Area Measurements Yes Wi Fi Wi Fi 802 11ax ac n g b a Bluetooth Wireless 5 0 Stereo microphone and stereo speakers w Dolby Au...

Page 13: ...ANUAL 13 5 Structure 1 Neckstrap connection points 2 Visible camera 3 Infrared camera 4 Hand strap 5 Desktop stand 6 Hard case 7 Screen 8 Charging port 5 1 Appearance and Definitions of Housing Interf...

Page 14: ...MANUAL 14 ENSURE ALL SYSTEM EQUIPMENT AND COMPONENT ITEMS ARE PRESENT BEFORE BEGINNING INSTALLATION 6 Package Includes Mounting Bracket IR Pad Camera Power Cord Power Adapter Software USB Drive Necks...

Page 15: ...ENVIRONMENTAL CONDITIONS IT IS BEST TO WAIT A MINIMUM OF 10 MINUTES FOR THE DEVICE TO COMPLETELY WARM UP D Launch IR Flash software by double clicking the associated desktop icon C Power on device A...

Page 16: ...ial to the left Place mounting bracket securely on back of the device YOU CAN LEAVE THE TYPE COVER ATTACHED OR REMOVE IT EITHER OPTION FITS WITH THE MOUNTING BRACKET D C Mount the mounting bracket to...

Page 17: ...ON A FLAT AND STABLE DESK OR TABLE WHILE CHARGING ENSURE THE IMAGER IS NEAR ROOM TEMPERATURE BEFORE CHARGING THE DEVICE DO NOT CHARGE IN EXTREMELY HOT OR COLD AREAS THE BATTERY CAPACITY MAY BE DECREAS...

Page 18: ...E IN EXTREMELY HOT OR COLD AREAS THE BATTERY CAPACITY MAY BE DECREASED IF CHARGED IN AN EXTREME TEMPERATURE ENVIRONMENT THE THERMAL IMAGER NEEDS SUFFICIENT WARM UP TIME FOR THE MOST ACCURATE TEMPERATU...

Page 19: ...i5 or above Quad Core or better RAM 4 GB or above OS Windows 8 8 1 10 Hard Drive 256 GB or above Resolution 1920 x 1080 8 3 Date and Time Settings Users can change the date and time settings of the d...

Page 20: ...5 Display Brightness Settings Instructions may vary for different versions of the device Below is a general set of steps to change the brightness settings 1 Click Start 2 Click Settings 3 Click Syste...

Page 21: ...on may help with remote access troubleshooting and repair options Instructions may vary for different versions of the device Below is a general set of steps to see device Information 1 Click Start 2 C...

Page 22: ...r service if there is an issue IF YOUR PACKAGE INCLUDES ADDITIONAL LENSES A SEPARATE CALIBRATION IS REQUIRED FOR EACH LENS CONTACT CUSTOMER SERVICE IS THERE IS AN ISSUE 9 2 Radiometry Correction The a...

Page 23: ...curately measure materials with a low emissivity an emissivity correction is necessary Adjusting the emissivity setting will allow the imager to calculate a more accurate estimate of the actual temper...

Page 24: ...ITY THE GREATER POTENTIAL FOR ERROR WITHIN THE DEVICE S CALCULATIONS ERRORS MAY STILL OCCUR EVEN WHEN ADJUSTMENTS ARE PERFORMED PROPERLY 9 3 Non uniformity Correction NUC Non uniformity correction NUC...

Page 25: ...affect the temperatures measured by the software it can be helpful to know the distance to the target location Generally the further away the IR sensor is from the target background area the less the...

Page 26: ...particles a part of its energy is absorbed and a part is scattered Therefore the electromagnetic wave is attenuated Users can correct for atmospheric attenuation due to humidity by defining the value...

Page 27: ...place the cloth and repeat the wiping process 10 2 Disinfecting the Camera Surface Do not use corrosive cleaning solutions on the optical glass components It is recommended to disinfect the camera sur...

Page 28: ...e that camera has been powered on for a few minutes Restart computer Verify that correct software is installed Uninstall reinstall software running as administrator Verify that firewall is not blockin...

Page 29: ...in focus Adjust emissivity Adjust humidity Adjust for ambient temperature Wait for or perform a manual NUC operation Send the device in for recalibration 11 5 Attached camera is out of focus For FMX...

Page 30: ...neers scientists inspectors and operators in space power companies medical pulp and paper food industry research and development and various process industries You can see our products and services us...

Reviews: