background image

The top tether is located at the top of the seat back. Extend the 
length by squeezing the tension indicating adjustor. Locate the 
vehicle attachment point which may be found on the parcel 
shelf, back of the seat or the rear boot area and hook on. 
Tighten the tether strap (B-7) until the adjustor indicator shows 
green (B-8). 

THREE RECLINING POSITIONS(A) 

Three reclining positions:

 
By pulling the red recline lever up, 
you can choose from the following 
positions for your child: 

• 1.  Upright
• 2. Mid-Recline
• 3. Full Recline

9

Summary of Contents for Solar

Page 1: ...Solar Car Seat User Guide ECE R44 04 GROUP 1 2 3 9 36kg ...

Page 2: ......

Page 3: ......

Page 4: ...ttachments STORAGE OF THE USER GUIDE It is very important that these instructions remain with the car seat at all times You can store these instructions in the pocket provided on the back of your car seat 2 Please read this instruction manual carefully before use When installing with lsofix refer to your vehicle s handbook CAR SEAT FEATURES 5 6 FITTING SIDE IMPACT PROTECTION CUSHIONS 7 GROUP 1 FIT...

Page 5: ...for your child s protec tion There should not be more than two fingers width between the harness and your child Toxic cleaning fluids can cause illness Never use bleach do not iron do not machine wash do not tumble dry as this could damage the cover and require replacing The buckle of the vehicle belt must not come above the lap belt guide of the child seat Contact our customer service department ...

Page 6: ...s causing injury to your child Do not leave your child unattended when in the car seat and in the vehicle Make sure there is no loose luggage or other large objects that are likely to cause injuries in the event of an accident These may cause injury to other occupants Always secure loose items The car seat may acquire some wear and tear over the years which may result in parts requiring replacemen...

Page 7: ...ld correctly and familiarise yourself with the features and functions of the seat Please take the time to read and understand these instructions fully This is best done with the seat in front of you Please always read the safety warnings Before using the seat in your vehicle you should prepare the seat for your child by setting the harness correctly 4 ...

Page 8: ...5 ...

Page 9: ...3 Lap Belt Guide for 15 25kg children 14 Belt Slots 15 lsofix Point Release Buttons x2 16 lsofix Connection Indicators 17 Headrest 18 Belt Slots 19 Harness Shoulder Straps 20 Buckle Pad Reversible 21 Harness Adjustment Button 22 Adjustment Patch Strap 23 Headrest Cushion Reversible 24 Harness Pads x2 25 Seat Cushion Reversible 26 Harness Adjustment Strap 27 Recline Lever 28 lsofix System Regulator...

Page 10: ...ption to only fit the side closest to the vehicle door GROUP 1 FITTING INSTRUCTIONS 9 18kg WARNING ALWAYS GIVE PREFERENCE TO USING THE REAR SEATS OF YOUR VEHICLE EVEN IF YOUR HIGHWAY CODE PERMITS THE USE OF THE FRONT SEAT CHECK YOUR HIGHWAY CODE AS THIS REGULATION MAY VARY CHECK YOUR VEHICLE MANUAL FOR ADVICE ON FITTING YOUR CAR SEAT IN THE FRONT OF THE VEHICLE AIRBAGS CAN CAUSE INJURY DO NOT USE ...

Page 11: ...he panel B 3 Hook the top tether strap on the anchor bracket and fasten the belt tightly B 4 Place the car seat on the vehicle seat and connect the lsofix connectors to the vehicle Isofix attachments B 5 There will be an indicator visible on the connector Attach the Isofix connectors until the Isofix connection indicators 16 turn from red to green and a click is heard B 6 This will mean the seat i...

Page 12: ... which may be found on the parcel shelf back of the seat or the rear boot area and hook on Tighten the tether strap B 7 until the adjustor indicator shows green B 8 THREE RECLINING POSITIONS A Three reclining positions By pulling the red recline lever up you can choose from the following positions for your child 1 Upright 2 Mid Recline 3 Full Recline 9 ...
Page 13: ...10 ...

Page 14: ...t the child s shoulders Also make sure that the top of the child s head does not exceed the top of the headrest Open the harness buckle by pressing firmly on the red button in the centre of the buckle F 5 Spread apart the shoulder straps to buckle retainers l0 to enable the child to be placed F 6 Place the child into the car seat ensuring that they are seated upright against the backrest Pass the ...

Page 15: ...12 ...

Page 16: ...y again 5 If you are not able to fasten the harness belt properly or pull it tight contact your supplier immediately Under no circum stances use the product SAFETY HARNESS SETTING AND ADJUSTMENT The car seat harness must be set to the size of the child The harness is five point with shoulder lap and crotch straps The shoulder straps 25 have individual shoulder pads 20 The harness shoulder straps f...

Page 17: ...ing and removing the jointshaft from the joint between the base and the backrest G 2 Unhook the shoulder harness from the metal hooks which sits between the backrest and base G 3 Take off the cover of the headrest unscrew the cap at the back of the headrest see fig G 4 Then uninstall the slide and harness shoulder belt shaft G 5 The headrest can now extend futher 14 ...

Page 18: ...rness System pull the straps through the shell and cover to the front of the restraint G 6 Remove the Crotch Strap and feed the metal plate found under the base through the slot G 7 Uninstall the Harness Buckle G 8 15 ...

Page 19: ... armrest on both sides of the seat Ensure the lap belt is low down on the child s lap and firmly engaging with the pelvis Fasten the adult seat belt connector to the seat belt buckle H 2 Locate the upper portion of the diagonal section of the adult belt into the diagonal shoulder belt guide located on the top corner of the back rest H 1 8 Make sure the seat belt is not twisted and remove the slack...

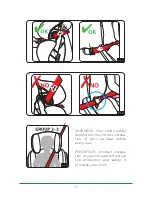
Page 20: ...G Your child s safety depends on the correct installa tion of your car seat before every use IMPORTANT Incorrect installa tion of your car seat will reduce the protection and safety it provides your child 17 ...

Page 21: ... bleach do not iron do not machine wash do not tumble dry as this could damage the cover and require replacing ADJUSTING THE REVERSIBLE MATERIALS To remove the Headrest Cushion Seat Cushion and Buckle Pad for reversing begin by uninstalling the harness system using the steps detailed in pages 13 and 14 Once the harness has been detached the sections will be free to be removed turned over and reins...

Page 22: ...retractable lap and diagonal seat belts approved to ECE Rl6 and with lsofix anchorages approved to ECE Rl4 This child restraint is likely to fit if the vehicle manufacturer states that the vehicle approval specifies suitability for Universal child restraint systems Class A B Bl This restraint system is classified as Universal in accordance with the strictest approval criteria whereas earlier model...

Page 23: ...for any future claim If you register within 28 days of purchase we will extend your standard warranty to 4 years from the date of purchase at no extra cost THE WARRANTY IS NOT VALID IN THE FOLLOWING CASES 1 In the case of a use or purpose other than described in the manual 2 If the product is submitted for repair through a dealer that is not authorised by us 3 If the product is not supplied to the...

Page 24: ...Keep this instruction manual for future use T 01554 707022 E contact icklebubba com www icklebubba com ...

Reviews: