–
3
–
–
2
–
D
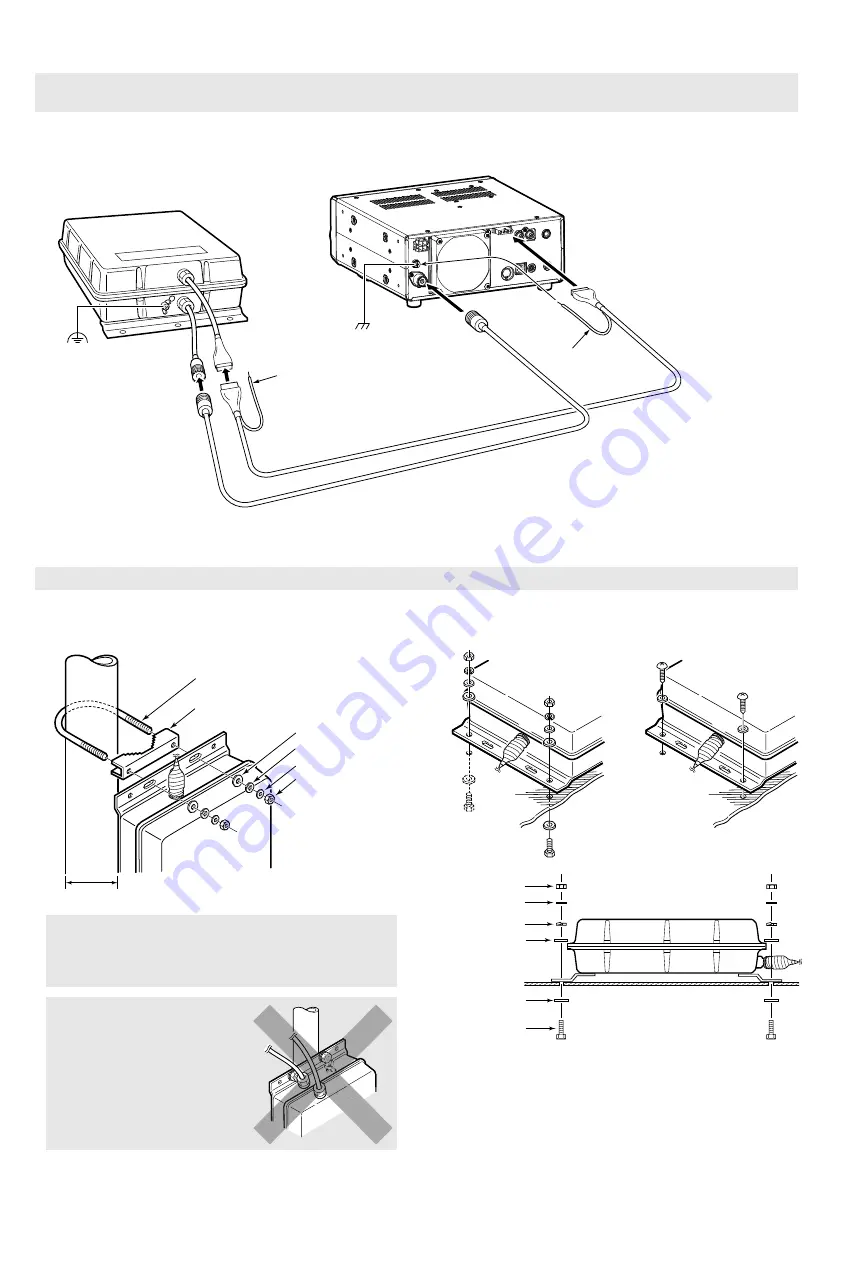
Cable connections
NOTE:
Connect a user supplied coaxial cable to the appropriate antenna connector if the transceiver has more than one. See
your transceiver’s instruction manual for details.
Example: IC-7300
D
Ground connections
The ground wire of the antenna tuner is used as an antenna
element. The transceiver and antenna tuner must have
an adequate ground connection. Otherwise, the overall
efficiency of the transceiver and antenna tuner installation
will be reduced. Interference, RF feedback, and electrical
shocks from other equipment could also occur.
For best results, use the heaviest gauge wire or strap
available, and make the connection as short as possible, as
shown below.
L
A long wire connected to the GND terminal as a counterpoise is
also acceptable.
To the AH-730 GND terminal
Copper pipe
Metal object
Copper screen
D
Mounting the AH-730
CAUTION:
Mount the AH-730 in a horizontal position or a vertical position with the antenna terminal up.
•
Mounting on an antenna pole
Using the supplied U-bolts
32 ~ 60 mm
U-bolt plate
Spring washer
U-bolt
Flat washer (L)
Flat washer (S)
Nut
R
WARNING!
Mount the AH-730 securely with the
supplied nuts and bolts. Otherwise, vibrations and
shocks could loosen the antenna tuner, making it fall,
causing personal injury.
CAUTION: DO NOT
mount the
antenna tuner upside down.
•
Mounting on a flat location
Using nuts and bolts
Using self-tapping screws
Spring washer
Flat washer (L)
Flat washer (L)
Flat washer (S)
Hex head bolt
Nut
■
Installation
D
Waterproofing the antenna connection
CAUTION:
If you skip the following steps, moisture will
get into the connector, and this could damage the antenna
tuner.
CAUTION:
•
NEVER
modify, bend, twist, pull or heat the control cable and the coaxial cable.
•
NEVER
hang something heavy on the control cable and the coaxial cable.
•
NEVER
mount the AH-730 without securing the control cable and the coaxial cable so that they cannot be pulled or
stretched.
1. Cut off just the top of the weatherproof cap, and pass
the antenna wire through the cap.
Antenna wire
Weatherproof cap
2. Insert the antenna wire into the opening of the crimp-on
wire terminal.
L
Crimp or solder the antenna wire.
Crimp
Solder
3. Put the crimp-on wire terminal, star washer, and wing
nut on the base nut, in that order, and then tighten the
wing nut.
L
Make sure the base nut is tightened firmly before you
tighten the wing nut, as shown below.
L
Carefully bend the wire terminal up after you tighten the
wing nut. (
1
)
Antenna tuner
Base nut
Crimp-on wire terminal
Star washer
Wing nut
4. Place the weatherproof cap over as much of the
insulator as possible. (
2
)
L
How far down it will go depends on the height of the wing
nut.
5. Start wrapping the rubber vulcanizing tape at the bottom
of the insulator, then the weatherproof cap, and finally
the antenna wire to prevent water seeping. (
3
)
L
Wrap user supplied electrical tape over the rubber
vulcanizing tape to secure waterproofing.
8
-
Insulator
Bend this part up
after you tighten
the wing nut.
Rubber
vulcanizing tape
Coaxial cable
(User supplied)
GND
GND
Control cable
( Supplied cable: 10 m, 32.8 ft
Optional cable: 10 m, 32.8 ft)
AH-730
IC-7300
Ground wire
L
If RF feedback occurs, connect
the control cable ground to both
the AH-730 GND and the IC-7300
GND terminals.
Ground wire
■
Disposal
The crossed-out wheeled-bin symbol on your
product, literature, or packaging reminds you
that in the European Union, all electrical and
electronic products, batteries, and accumulators
(rechargeable batteries) must be taken to
designated collection locations at the end of their working
life. Do not dispose of these products as unsorted municipal
waste. Dispose of them according to the laws in your area.
■
About CE and DOC
Hereby, Icom Inc. declares that the versions
of AH-730 which have the “CE” symbol on the
product, comply with the essential requirements
of the Radio Equipment Directive, 2014/53/EU,
and the restriction of the use of certain hazardous substances
in electrical and electronic equipment Directive, 2011/65/EU.
The full text of the EU declaration of conformity is available at
the following internet address:
https://www.icomjapan.com/support/


