background image

New2001

D


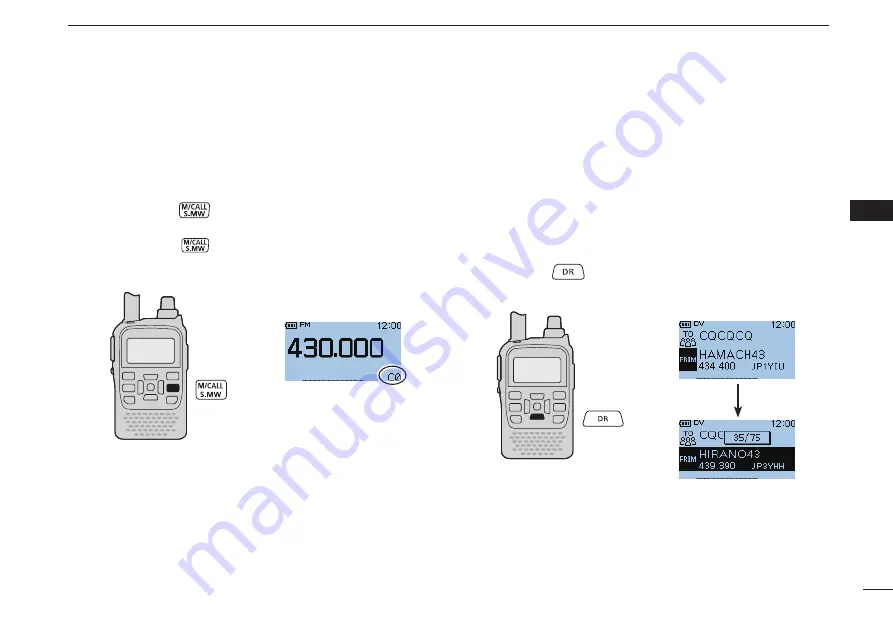
Call channels

Call  channels  are  used  for  quick  recall  of  most-often  used 
frequencies.

 Push [M/CALL]


q


 once or twice to select the call chan-

nels.

  •  Push 

[M/CALL] 

  again  to  select  the  Memory  mode. The 

Memory mode or Call channels are alternately selected.

22

5

BASIC OPERATION

1
2
3
4
5
6
7
8
9
10
11
12
13
14
15
16
17
18
19


D

DR (D-STAR Repeater) mode

The  DR  (D-STAR  Repeater)  mode  is  used  for  D-STAR  re-
peater operation. In this mode, you can easily select the pre-
programmed repeaters and UR call signs by rotating [DIAL].

D-STAR is an abbreviation for Digital Smart Technologies for 
Amateur Radio.

Hold down 


q

 for 1 seconds to select the DR mode.

• Call channel display

• DR mode display

Rotate [DIAL] to select a desired Call channel.


w

Rotate [DIAL] to select a desired access repeater.


w

Summary of Contents for D-STAR ID-31A; D-STAR ID-31E

Page 1: ...nce and 2 this device must accept any interference received including interference that may cause undesired operation WARNING MODIFICATION OF THIS DEVICE TO RECEIVE CEL LULAR RADIOTELEPHONE SERVICE SIGNALS IS PROHIBITED UNDER FCC RULES AND FEDERAL LAW INSTRUCTION MANUAL ID 31A UHF TRANSCEIVER ID 31E UHF TRANSCEIVER The photo shows the ID 31E version ...

Page 2: ...ompletely before using the transceiver SAVE THIS INSTRUCTION MANUAL This instruction manual contains important operating instructions for the ID 31A ID 31E FEATURES Built in GPS receiver GPS Logger function allows you to check your route as you move microSD card slot ready for several mem ory storage Voice recorder to records your communi cation Waterproof construction IPX7 Only when the BP 271 or...

Page 3: ...rrect the inter ference by one or more of the following measures Reorient or relocate the receiving antenna Increase the separation between the equipment and re ceiver Connect the equipment into an outlet on a circuit different from that to which the receiver is connected Consult the dealer or an experienced radio TV technician for help EXPLICIT DEFINITIONS WORD DEFINITION R DANGER Personal death ...

Page 4: ... to 10 cm 2 to 4 inches away from the lips and the transceiver is verti cal R WARNING NEVER operate the transceiver with an earphone headphones or other audio accessories at high volume levels Hearing experts advise against continuous high volume operation If you experience a ringing in your ears reduce the volume level or discontinue use R WARNING NEVER operate the transceiver while driving a veh...

Page 5: ...o avoid inadvertent use by children BE CAREFUL The transceiver meets IPX7 require ments for waterproof protection However once the trans ceiver has been dropped waterproof protection cannot be guaranteed because of possible damage to the transceiver s case or waterproof seal Only when the BP 271 or BP 272 option flexible antenna MIC SP cap DATA DC IN cap and micro SD slot cap are attached The BP 2...

Page 6: ...at will block the satel lite signals The GPS receiver may not work if used in the following loca tions 1 Tunnels or high rise buildings 2 Underground parking lots 3 Under a bridge or viaduct 4 In remote forested areas 5 Under bad weather conditions rainy or cloudy day The GPS receiver may not work if the transceiver operates near the 440 205 MHz This is made in the internal circuit and does not in...

Page 7: ... CS 31 cloning software installation and use CS 31 Installer Installer for the CS 31 cloning software Adobe Reader Installer Installer for Adobe Reader D D Starting the CD ABOUT THE SUPPLIED CD Insert the CD into the CD drive q q The Menu screen shown below is automatically displayed If it doesn t appear double click Autorun exe in the CD Click the desired button to open the file w w To close the ...

Page 8: ...A MICROSD CARD 3 4 About using a microSD card 3 Inserting the microSD card 4 Format the microSD card 4 3 PANEL DESCRIPTION 5 10 Front top and side panels 5 Function display 9 TABLE OF CONTENTS SUPPLIED ACCESSORIES The following accessories are supplied with the transceiver q Antenna 1 w Hand strap 1 e Battery charger BC 167SA SD SV 1 r Belt clip 1 t Battery pack BP 271 1 y CD 1 Not supplied or the...

Page 9: ...onitor function 20 Mode selection 21 Setting a tuning step 23 Setting a frequency 23 Operating mode selection 24 Receiving 24 Transmitting 25 Transmit power selection 26 Key Lock function 26 Scan function 27 6 MENU SCREEN OPERATION 32 49 Menu item selection 32 Menu items and default settings 33 7 RESETTING 50 Resetting 50 8 TROUBLESHOOTING 51 52 9 SPECIFICATIONS 53 10OPTIONS 54 60 Optional HM 75LS...

Page 10: ... q q q w w Even when the transceiver power is OFF a small current still flows in the radio Remove the battery pack or case from the transceiver when not using it for a long time Oth erwise the battery pack or installed batteries will become exhausted The battery protection function automatically sets trans ceiver to Low power 0 5 W when the temperature is 0 C 32 F or below In this case transmit po...

Page 11: ...ttery pack from the transceiver if it is at q q tached p 1 Lift the tab up w w q and slide the belt clip in the direction of the arrow w q w Antenna Insert the antenna connector into the antenna base and tight en the antenna base NEVER carry the transceiver by holding only the antenna For your information Third party antennas may increase transceiver perfor mance An optional AD 92SMA antenna conne...

Page 12: ...eiver It will corrupt the data or damage the card Also be careful in the following cases When using the transceiver with the BP 273 battery case and the batteries are near exhaustion When using the transceiver with an external DC power source and the battery pack is not attached then the ex ternal power is turned OFF D D Contents that can be stored onto a card The transceiver has a slot for a micr...

Page 13: ...damage the card Format the microSD card When using a preformatted brand new microSD card format ting is not necessary However we recommend you format it in the following way to get card s best performance IMPORTANT Formatting a card erases all its data Before formatting any programmed card make a backup file onto your PC Turn ON the transceiver q q Push MENU w w to enter the Menu screen Push D pad...

Page 14: ...while receiving a signal or when the squelch is open lights red while transmitting e PTT SWITCH PTT p 25 Hold down to transmit release to receive For ID 31E only Push briefly then hold down to transmit a 1750 Hz tone burst r SQUELCH KEY SQL p 20 Hold down to temporarily open the squelch and monitor the operating frequency While holding down this key rotate DIAL to adjust the squelch level t MENU L...

Page 15: ...able for low speed data communication in the DV mode or for cloning The jack is also used to con nect an external GPS receiver See the PDF type Advanced Instruction s Section 4 or Section 11 for more details 2 MEMORY CALL SELECT MEMORY WRITE KEY M CALL S MW In the VFO mode push once to enter the Memory selection mode push again to enter the Call channel mode pp 21 22 Hold down for 1 second to ente...

Page 16: ...wer OFF before connecting or discon necting optional equipment to or from the SP MIC jack 5 VOLUME CONTROL VOL Rotate to adjust the audio volume level p 19 6 CONTROL DIAL DIAL Rotate to select the operating frequency p 23 While in the Memory mode rotate to select a memory channel p 21 While scanning rotate to change the scanning direc tion p 27 Hold down SQL and rotate to select the squelch level ...

Page 17: ...uick Menu screen open push to move the value or option selector bar up p 32 DR D STAR REPEATER DOWN KEY DR Hold down 1 second to enter the DR mode p 22 While in the DR mode or with the Menu screen or Quick Menu screen open push to move the value or option selector bar down p 32 CD RX CALL RECORD LEFT KEY CD Hold down for 1 second to open the received calls record While in the DR mode or with the M...

Page 18: ...elected r PRIORITY WATCH ICON Appears when Priority Watch is in use See the PDF type Advanced Instruction s Section 9 for more details t EMR BK ICON Appears when Enhanced Monitor Request EMR or Break in BK mode is selected See the PDF type Advanced Instruction s Section 4 for more details y TONE ICONS PDF type Advanced Instruction s Section 11 While operating in FM FM N mode TONE appears while the...

Page 19: ...SKIP appears when the selected memory channel is set as a skip channel PSKIP appears when the displayed frequency is set as a skip frequency in the Memory mode PSKIP appears while the Frequency Skip Scan func tion is ON in the VFO mode 2 MEMORY CHANNEL NUMBER Displays the selected memory channel number p 21 C0 or C1 appears when the Call channel is selected p 22 3 MEMORY ICON pp 21 Appears when th...

Page 20: ...battery pack in areas with temperatures above 60 C 140 F High tempera ture buildup in the battery such as could occur near fires or stoves inside a sun heated car or in direct sunlight may cause the battery to rupture or catch fire Excessive tem peratures may also degrade battery performance or shorten battery life R DANGER DO NOT expose the battery to rain snow seawater or any other liquids Do no...

Page 21: ...afely in a cool dry place at the following temperature range 20 C 4 F to 50 C 122 F within a month 20 C 4 F to 35 C 95 F within three months 20 C 4 F to 20 C 68 F within a year D D Charging caution R DANGER NEVER charge the battery pack in areas with extremely high temperatures such as near fires or stoves inside a sun heated vehicle or in direct sunlight In such environments the safety protection...

Page 22: ...tely or will take much longer to charge External DC power is possible when using an optional CP 12L CP 19R or OPC 254L The attached battery pack is also charged simultaneously except during transmit see p 18 for more details The external DC power supply voltage must be between 10 16 V to charge the battery pack and when operating us ing an OPC 254L BC 167S CP 12L Optional OPC 254L Optional to AC o...

Page 23: ...have problems charging a new battery pack NEVER place the transceiver with the battery pack to the desktop charger when the transceiver is connected to the DC power supply This may cause the charger s malfunc tion and the charging indicator of the charger lights red In that case disconnect the AC adapter from the charger and then reconnect the AC adapter to the charger The optional CP 23L and OPC ...

Page 24: ...ne batteries w w Install only alkaline batteries Be sure to observe the correct polarity Attach the battery case p 1 e e A built in step up converter in the BP 273 increases the voltage to 5 5 V DC Approximately 100 mW of output power is possible with the BP 273 operation Also the transmit output power selec tion is disabled The batteries may seem to have low capacity when used in low temperatures...

Page 25: ...e battery terminals Never incinerate used battery cells since the internal bat tery gas may cause them to rupture Never expose a detached battery case to water If the bat tery case gets wet be sure to wipe it dry before using it Never use batteries whose insulated covering is damaged Remove the alkaline batteries when battery case is not used Otherwise the installed alkaline batteries will ex haus...

Page 26: ... icon The battery icon appears when the BP 271 or BP 272 Li ion battery pack is attached to the transceiver When the BP 273 battery case is attached to the trans ceiver the battery icon cannot display the battery capac ity of the alkaline batteries The battery icon stays and it does not reflect with the true battery capacity Without disconnecting the battery charger or external DC power the batter...

Page 27: ...9R or OPC 254L to a 24 V DC power source The voltage of the external power supply must be between 10 16 V DC when using either CP 12L CP 19R or OPC 254L otherwise use the battery pack Disconnect the power cables from the transceiver when not using it Otherwise the vehicle battery will become ex hausted The power save function is automatically deactivated when using an external DC power source BP 2...

Page 28: ...can be turned ON or OFF in the DISPLAY menu MENU DISPLAY Opening Message p 47 MENU DISPLAY Voltage Indication p 47 The beep level is adjusted in the SOUNDS menu MENU SOUNDS Beep Level p 48 Setting audio volume Rotate VOL to adjust the audio level If the squelch is closed hold down SQL while setting the audio level The display shows the volume level while adjusting VOL Volume level display Maximum ...

Page 29: ...ht squelch for strong signals AUTO indicates automatic level adjustment by a noise pulse counting system OPEN indicates a continuously open setting This option is not selectable in the DV mode Monitor function This function is used to listen to weak signals without disturb ing the squelch setting or having to open the squelch manu ally even when mute functions such as the tone squelch are in use H...

Page 30: ...mode appears when the memory mode is selected Push M CALL again to select Call channels The Memo ry mode or Call channels are alternately selected VFO mode display Memory mode display Appears What is a VFO VFO is an abbreviation of Variable Frequency Oscillator Fre quencies for both transmitting and receiving are generated and controlled by the VFO Rotate w w DIAL to select a desired memory channe...

Page 31: ... 10 11 12 13 14 15 16 17 18 19 D D DR D STAR Repeater mode The DR D STAR Repeater mode is used for D STAR re peater operation In this mode you can easily select the pre programmed repeaters and UR call signs by rotating DIAL D STAR is an abbreviation for Digital Smart Technologies for Amateur Radio Hold down q q for 1 seconds to select the DR mode Call channel display DR mode display Rotate DIAL t...

Page 32: ...ing and exit the Quick Menu screen Setting a frequency qPush V MHz to select VFO mode if necessary wRotate DIAL to select the desired frequency The frequency changes according to the selected tuning steps See the previous content to set the tuning step When VFO mode is selected push V MHz then rotate DIAL to change the frequency in 1 MHz steps Or push V MHz again for 10 MHz steps Depending on vers...

Page 33: ...he power Rotate VOL to adjust to a desired audio level p 19 w w The frequency display shows the volume level while adjusting Set the receiving frequency p 23 e e r Set the squelch level p 20 While holding down SQL rotate DIAL one click to display the squelch level LEVEL1 is loose squelch for weak signals and LEVEL9 is tight squelch for strong signals AUTO indicates automatic level adjustment by a ...

Page 34: ...sceiver radiates heat to protect itself from overheating The transceiver s chassis will become hot and may cause a burn To prevent the transceiver s overheating the default setting of the time out timer function is set to 5 minutes p 44 Be careful when the time out timer function is turned OFF or set to a long time period and you transmit for long periods DO NOT operate the transceiver in a situat...

Page 35: ...to select the output power Key Lock function Activate to prevent accidental frequency changes and unnec essary function access Hold down LOCK for 1 second to turn the Key Lock function ON or OFF While the Key Lock function is activated and the locked key or dial is pushed or rotated LOCK ON will be displayed VOL SQL PTT and LOCK are operable while the lock function is activated Either or both the ...

Page 36: ...g type D pad Ent Select ALL for full scan P LINKx for programmed link scan x 0 to 9 Pxx for programmed scan xx 0 to 24 only programmed scan edge numbers are displayed DUP for duplex scan or TONE for tone scan t Push D pad Ent to start the scan Scan pauses when a signal is received Rotate DIAL to change the scanning direction This also causes the trans ceiver to resume scanning Push CLR to cancel t...

Page 37: ...de 1 short and 1 long beep sound The memory channel number blinks r Rotate DIAL to select a desired channel Call channels C0 C1 VFO and scan edge channels 00A 00B to 24A 24B as well as regular memory channels can be programmed in this way t Hold down S MW for 1 second to program 3 beeps sound Before returning to the VFO mode the programmed memory contents are dis played for a moment Memory channel...

Page 38: ...anada and Korean versions this selection and step e are not necessary p 44 DUP or DUP appears If desired activate the subaudible tone encoder in the e e Quick Menu see next page for details TONE appears r Hold down PTT to transmit The displayed frequency automatically changes to the transmit frequency repeater input frequency If OFF BAND appears check the frequency offset and shift direction p 33 ...

Page 39: ... the DUP or DUP option r Push D pad Ent to return to the fre quency display Select the desired frequency offset p 33 D D Setting the subaudible tone q q In the VFO mode push to open the Quick Menu screen Push D pad w w E to select the TONE item then push D pad Ent D pad Ent Push D pad e e to select the TONE option r Push D pad Ent to return to the fre quency display Select the desired subaudible t...

Page 40: ...page 23 for the Tuning step selection details D D Sweep operation Push q q to open the Quick Menu screen Push D pad w w E to select Band Scope and then push D pad Ent D pad Ent Push D pad e e to select the Single Sweep or Continuous Sweep op tion r Push D pad Ent to return to the fre quency display and start sweeping Single Sweep check the specified fre quency range at once Continuous Sweep contin...

Page 41: ...o to the next level zoom in and to go back a level zoom out D D Entering the Menu screen and operation Example Set the Auto Power OFF function to 30 min q Push MENU w Push D pad to select the root item Time Set and then push D pad Ent If D pad E is continuously held down the items are sequentially highlighted D pad Ent e Push D pad to select Auto Power OFF and then push D pad Ent r Push D pad to s...

Page 42: ...ding on the version Menu items and default settings Sets the frequency offset for duplex re peater operation Selects the tone frequency used to ac cess the repeaters Selects the DTCS polarity for the DTCS squelch or the pocket beep function Selects the digital code for the Digital Code squelch function Selects the tone frequency for the Tone squelch or the pocket beep function Turns the Tone Burst...

Page 43: ...E Default is shown in bold DESCRIPTIONS NOTE The default settings shown below are for the USA version The default settings may differ depending on the version Selects the scan pause time When re ceiving signals the scan pauses accord ing to the scan pause timer Selects the scan resume time from a pause after the received signal disap pears Turns the Program Skip Scan function ON or OFF for a VFO m...

Page 44: ...e USA version The default settings may differ depending on the version DESCRIPTIONS RANGE OR VALUE Default is shown in bold Selects whether or not the squelch status affects the RX voice signal recording Turns the PTT Automatic Recording function ON or OFF Sets the Skip time to rewind or forward the recorded audio when you push the fast rewind or fast forward key during playback Selects whether or...

Page 45: ... or ddd mm ss NOTE The default settings shown below are for the USA version The default settings may differ depending on the version DESCRIPTIONS RANGE OR VALUE Default is shown in bold Selects a GPS receiver that the trans ceiver receives its position data from Selects the internal GPS receiver power save function Manually enters your current position Turns the GPS indicator ON or OFF Selects pos...

Page 46: ...epending on the version DESCRIPTIONS RANGE OR VALUE Default is shown in bold GPS Position GPS Information GPS Memory Displays the received GPS information Displays your position or other station s positions Displays memorized positions or turns the GPS alarm function ON or OFF Turns the GPS logger function ON or OFF to store your route as you move Selects the GPS Logger function record interval Se...

Page 47: ...an unproto Address Selects whether to transmit the course and speed data Selects to transmit the current UTC time as a time stamp Turns the altitude transmit option ON or OFF Selects a specified GPS A Symbol to transmit Selects the APRS call sign SSID Selects a time option for the GPS auto matic transmission function Enters a comment to transmit Data Extension Time Stamp GPS A DV A Altitude GPS A ...

Page 48: ...tory DV Memory NOTE The repeater list described on this manual may differ from your presetting Menu items and default settings Continued NOTE The default settings shown below are for the USA version The default settings may differ depending on the version 1 See the PDF type Advanced Instruction for details on the preset values DESCRIPTIONS Displays the operating call signs Sets the operating call ...

Page 49: ...V mode Cut Normal or Boost OFF or ON Cut Normal or Boost Cut Normal or Boost My Station DESCRIPTIONS RANGE OR VALUE Default is shown in bold DESCRIPTIONS RANGE OR VALUE Default is shown in bold Stores and selects Your own call signs Sets the DV mode received audio bass filter level to Cut Normal or Boost Sets the DV mode received audio treble filter level to Cut Normal or Boost Turns the DV mode r...

Page 50: ...on DESCRIPTIONS RANGE OR VALUE Default is shown in bold Selects the Automatic Reply function ON OFF or Voice Selects manually or automatically to transmit low speed data Selects the DV mode RX monitoring when SQL is held down Turns the digital repeater setting function ON or OFF Turns the RX call sign automatic write function ON or OFF Turns the repeater call sign automatic write function ON or OF...

Page 51: ...unction ON or OFF The BK function allows you to break into a conversation where the two origi nal stations are communicating with call sign squelch enabled Turns the EMR Enhanced Monitor Re ceive communication mode ON or OFF The EMR mode can be used in the DV mode and no call sign setting is neces sary When an EMR mode signal is re ceived the audio voice will be heard at the specified level even t...

Page 52: ...tems and default settings Continued NOTE The default settings shown below are for the USA version The default settings may differ depending on the version DESCRIPTIONS RANGE OR VALUE Default is shown in bold Selects the RX call sign speech function option while ON or turns it OFF Turns the RX CS Speech function ON or OFF Selects either English or Japanese as the desired speech language Selects the...

Page 53: ... The default settings shown below are for the USA version The default settings may differ depending on the version DESCRIPTIONS RANGE OR VALUE Default is shown in bold Continued on the next page Selects the Power Save options to re duce current drain and conserve battery power Selects the SQL monitor function method Turns the Auto Repeater function ON or OFF Turns the dial speed acceleration ON or...

Page 54: ...Default is shown in bold MIC Gain Internal MIC Gain External Data Speed 1 3 4 1 2 4 4800bps or 9600bps Sets the internal microphone sensitivity to suit your preference Sets the external microphone sensitivity to suit your preference Selects the data transmission speed for low speed communication or between the DATA jack and external modules like a GPS receiver and so on Turns the VOX function ON o...

Page 55: ...mal address code Sets the CI V code transfer speed Turns the CI V Transceive function ON or OFF Selects the transceiver backlight option Selects the backlight ON time period Selects the LCD backlight brightness level Sets the contrast level of the LCD Turns the TX RX indicator ON or OFF Display Backlight LCD Dimmer LCD Contrast Busy LED OFF ON Auto or Auto DC IN ON In this item set the Display opt...

Page 56: ...Call Sign or My Call Sign Slow or Fast OFF or ON OFF or ON English or Japanese DV RX Backlight RX Message OFF or ON OFF or Auto Selects to display and scroll a received message when receiving a call Turns the DV RX Backlight function ON or OFF Selects whether or not to display My or Your call sign while transmitting Selects the scrolling speed of the mes sage call sign or other text Selects whethe...

Page 57: ...cope function Selects if the time data is automatically corrected by a received GPS sentence Sets the current date and time Enters the time difference between UTC and the local time Turns the Auto power OFF function ON or OFF Sounds Beep Level Beep Vol Level Link Key Touch Beep Scan Stop Beep Scope AF Output Standby Beep 0 3 9 In this item set the Sound options OFF or ON OFF or ON OFF or ON OFF or...

Page 58: ...mount Menu items and default settings Continued DESCRIPTIONS RANGE OR VALUE Default is shown in bold 2 Be sure to insert the microSD card into the transceiver before selecting these items Unmounts the card Formats the card Loads the settings file to the trans ceiver Saves the settings as a new file Overwrites the settings to an existing file Displays the free space and remaining recording time of ...

Page 59: ...ettings menu contents without clearing the memory contents call sign memories or repeater lists All reset Reset the CPU if the internal CPU mal functions due to static electricity etc All reset clears all programming and re turns all settings to their defaults D D Partial reset q Hold down for 1 second to turn OFF power w While holding down V MHz then hold down for 1 second to turn ON power to par...

Page 60: ... set to OFF or too low The MIC Gain is too low Set the VOX Level to a suitable level Set the MIC Gain to a suitable level p 59 p 45 Contacting with another station is impossible A different tone or code is used for the tone DTCS squelch Check the tone DTCS by performing a tone scan p 27 Frequency cannot be set The Key Lock function is activated The memory mode Call channel mode or DR mode is selec...

Page 61: ...et the MY call sign Register your call sign to the D STAR Server Or con firm the registration of your call sign Ask the server s administrator about your calling sta tion s call sign After your call the repeater replies RPT and call sign of the called repeater The D STAR cannot connect to the called re peater or it s busy Wait for a while and try it again After your call the repeater replies RPT a...

Page 62: ...95 H 25 4 D mm projections not included 2 3 W 3 7 H 1 D in Weight approximately 140 g 4 94 oz without battery pack case and ant D D Transmitter Modulation system FM Variable reactance freq modulation DV GMSK reactance freq modulation Output power at 7 4 V DC High 5 0 W Mid 2 5 W Low 0 5 W Typical S Low 0 1 W Max frequency deviation 5 0 kHz FM wide approx 2 5 kHz FM narrow approx Spurious emissions...

Page 63: ...ing the transceiver from your belt etc HM 153LS HM 166LS earphone microphone Ideal for hands free operation clip the HM 153LS HM 166LS with integrated PTT switch to your lapel or breast pocket Allows you to operate in rainy condition SP 13 earphone Provides clear audio in noisy environments CP 12L cigarette lighter cable with noise filter CP 19R cigarette lighter cable with dc dc converter Allows ...

Page 64: ...re free download Use this software to program settings such as memory chan nels and Menu mode contents quickly and easily via your USB port OPC 2218LU CT 17 ci v level converter unit For remote transceiver control using a personal computer equipped with an RS 232C port You can change frequencies operating mode memory channels etc via your computer Approved Icom optional equipment is designed for o...

Page 65: ... the Call channel mode p Select memory channel 0 q Select memory channel 1 NORM 1 default A Selects the Call channel mode B Toggles the VFO mode and Memory mode p Frequency or memory channel UP q Frequency or memory channel DOWN NORM 2 A Turns the Monitor function B Toggles the VFO mode and Memory mode p Frequency or memory channel UP q Frequency or memory channel DOWN The SIMPLE mode can select o...

Page 66: ...de setting in FUNCTION menu the Remote control microphone functions on the DR mode A Enters UR call sign or link repeater selection TO B Enters Access repeater selection FROM p Selects UP on the displayed items q Selects DOWN on the displayed items LC 178 carrying case CAUTION When removing the carrying case from the transceiver slide the side parts to the direction of the arrows NEVER pull the bo...

Page 67: ... HS 95 or HS 97 and the OPC 2006LS as illustrated below OPC 2006LS HS 94 Transceiver Be sure to turn power OFF when plugging in or unplug ging the OPC 2006LS to or from the SP MIC jack D Selecting the headset type Turn ON the transceiver q q Push MENU w w to enter the Menu screen Push D pad e e to select the root item Function and then push D pad Ent to go to the next screen D pad Ent MENU FUNCTIO...

Page 68: ...in External D VOX related settings The VOX Level the VOX Delay and the VOX time out timer can be set in the Menu screen VOX Level Push MENU q q to enter the Menu screen Push D pad w w to select the root item Function and then push D pad Ent to go to the next screen D pad Ent MENU FUNCTION VOX VOX Level Refer to the menu sequence show e e directly above and push D pad E to select and then D pad Ent...

Page 69: ...you stop speaking default 0 5 MENU FUNCTION VOX VOX Delay If VOX is intermittent be sure the VOX delay is set long enough to allow normal pauses in speech turn the VOX OFF after you finish speaking VOX time out timer Sets the VOX Time Out Timer to between 1 2 3 4 5 10 and 15 minutes to prevent accidental prolonged transmission To turn the function OFF select OFF default 3 MENU FUNCTION VOX VOX Tim...

Page 70: ...Estonia Finland France Germany Greece Hungary Iceland Ireland Italy Latvia AT BE BG HR CZ CY DK EE FI FR DE GR HU IS IE IT LV 18 19 20 21 22 23 24 25 26 27 28 29 30 31 32 33 Liechtenstein Lithuania Luxembourg Malta Netherlands Norway Poland Portugal Romania Slovakia Slovenia Spain Sweden Switzerland Turkey United Kingdom LI LT LU MT NL NO PL PT RO SK SI ES SE CH TR GB ...

Page 71: ...attery pack 1 Belt clip 2 BK ICON 9 C Call channels 22 Caution 11 CD RX CALL RECORD KEY 8 Charging caution 12 Charging note 13 14 Charging period Rapid charging 14 Charging period Regular charging 13 CLEAR KEY 6 CLOCK DISPLAY 10 Contents that can be stored onto a card 3 Continuous Sweep 31 CONTROL DIAL 7 COUNTRY CODE LIST 61 CS CALL SIGN KEY 8 D DATA JACK 6 DC IN JACK 6 DIAL 7 DOWN KEY 8 D PAD 8 D...

Page 72: ...3 GPS ICON 10 H Hand strap 1 I IMPORTANT i Important notes when using the GPS receiver v Inserting the microSD card 4 K Key Lock function 26 L LC 178 carrying case 57 LEFT KEY 8 LOCK KEY 5 M MEMORY CALL SELECT MEMORY WRITE KEY 6 MEMORY CHANNEL NUMBER 10 Memory channel programming 28 MEMORY ICON 10 Memory mode 21 MEMORY NAME DISPLAY 10 Menu items and default settings 33 Menu item selection 32 MENU ...

Page 73: ...PRECAUTIONS iii PRIORITY WATCH ICON 9 PTT SWITCH 5 Q QUICK MENU KEY 6 R Rapid charging 14 Receiver 53 Receiving 24 Regular charging 13 Repeater operation 29 Resetting 50 RF METER 10 RIGHT KEY 8 RX INDICATOR 5 RXÚCS RX CALL SIGN SET KEY 8 S Scan function 27 Selecting the headset type 58 SELECT MEMORY WRITE KEY 6 Setting a frequency 23 Setting a tuning step 23 Setting audio volume 19 Setting squelch...

Page 74: ...er 53 Transmitting 25 TROUBLESHOOTING 51 Tuning step selection 23 Turning the VOX function ON or OFF 59 TX RX INDICATOR 5 U UP KEY 8 Usable microSD cards 3 V VFO MHz CLEAR OUTPUT POWER KEY 6 VFO mode 21 VOLUME CONTROL 7 VOX delay 60 VOX function 58 VOX ICON 10 VOX related settings 59 VOX time out timer 60 ...

Page 75: ...66 1 2 3 4 5 6 7 8 9 10 11 12 13 14 15 16 17 18 19 1 2 3 4 5 6 7 8 9 10 11 12 13 14 15 16 17 18 19 MEMO ...

Page 76: ...67 MEMO ...

Page 77: ...68 1 2 3 4 5 6 7 8 9 10 11 12 13 14 15 16 17 18 19 MEMO ...

Page 78: ...69 MEMO ...

Page 79: ...70 1 2 3 4 5 6 7 8 9 10 11 12 13 14 15 16 17 18 19 MEMO 1 2 3 4 5 6 7 8 9 10 11 12 13 14 15 16 17 18 19 ...

Page 80: ...BE CY CZ DK EE FI FR DE GR HU IE IT LV LT LU MT NL PL PT SK SI ES SE GB IS LI NO CH BG RO TR HR 02 Europe Intended Country of Use AT BE CY CZ DK EE FI FR DE GR HU IE IT LV LT LU MT NL PL PT SK SI ES SE GB IS LI NO CH BG RO TR HR 03 U K Intended Country of Use AT BE CY CZ DK EE FI FR DE GR HU IE IT LV LT LU MT NL PL PT SK SI ES SE GB IS LI NO CH BG RO TR HR 04 Italy ...

Reviews: