151
MAINTENANCE
4
2
3
4
5
6
7
8
9
10
11
1
ï
U���g ��h�� [MODE] bu������
If the [POWER] indicator lights orange, you can update the firmware through the
internet, using the [MODE] button.
• The VE-PG2 may be set to the default setting after updating the firmware.
• We recommend that the VE-PG2 current setting is saved to the PC before updating the
firmware.
• To use online firmware update, connect the VE-PG2 to the internet, and set the �Primary
DNS server,�� �Secondary DNS server�� and �Default gateway�� in the �Network�� menu.
q
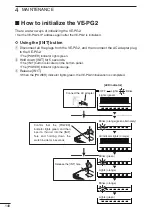
When the [POWER] indicator lights orange, hold down [MODE] for 5 seconds.
w
Release [MODE] after all the LED indicators light orange.
• When the updating is finished, the [POWER] and [LAN] indicators light green.
•
NEVER disconnect the AC adapter plug from the VE-PG2 while updating the firmware.
If you disconnect it, the VE-PG2 will be damaged.
• Depending on the update firmware, the VE-PG2’s IP address may be reset to the default
setting (192.168.0.1). In such case, set the PC’s IP address to 192.168.0.xx (example:
192.168.0.10) to open the VE-PG2 setting menu and change the VE-PG2’s IP address.
:OFF
[LED indicator]
:Lights
:Blinks
Release [MODE].
All indicators light (orange)
All indicators are OFF
Blinks (green)
Blinks (orange)
Blinks (orange)
Lights (orange)
Lights (orange)
Lights (green)
Hold down [MODE]
for 5 seconds.
POWER
VoIP
TRX1
TRX3
TRX2
LAN
EXT
POWER
VoIP
TRX1
TRX3
TRX2
LAN
EXT
POWER
VoIP
TRX1
TRX3
TRX2
LAN
EXT
POWER
VoIP
TRX1
TRX3
TRX2
LAN
EXT
POWER
VoIP
TRX1
TRX3
TRX2
LAN
EXT
POWER
VoIP
TRX1
TRX3
TRX2
LAN
EXT
POWER
VoIP
TRX1
TRX3
TRX2
LAN
EXT
POWER
VoIP
TRX1
TRX3
TRX2
LAN
EXT


