background image

I-7540D-MTCP Ethernet/ Modbus to CAN Converter Quick Start User Guide Version 1.0 ------ 3 

Step3:    Ethernet port connection:   

By  using  Ethernet  hub  device  to  connect  the  Ethernet  port  with  the 

I-7540D-MTCP  #A,  I-7540D-MTCP  #B  and  the  PC  with  standard 

network cable 

respectively

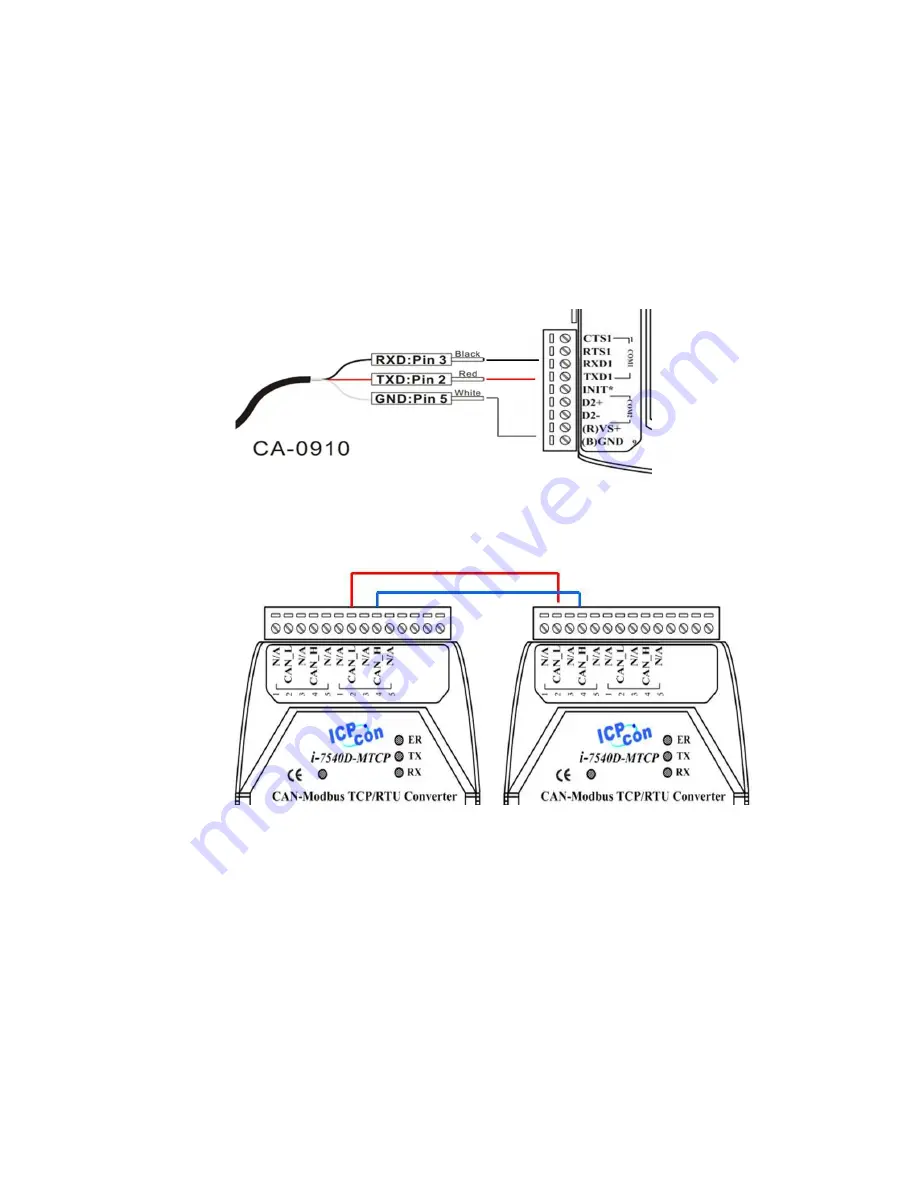
Step4:    RS-232 connection:   

Connect the RS-232 ports of the I-7530A-MR #B to the COM port of 

the PC by using the attached cable CA-0910. The wire connection is 

shown below.   


Step5:    CAN bus connection:   

Connect the CAN ports of these two I-7540D-MTCP modules to the 

CAN network by using the following structure.   


3. The I-7540D-MTCP Parameters Configuration 


Before testing the I-7540D-MTCP converter, users need to configure the 

RS-232, Ethernet and CAN parameters via the I-7540D-MTCP Utility tool. The 

details of this procedure are shown below.   

Step1:    The default network setting of the I-7540D-MTCP is shown below.   

IP: 192.168.255.1   

Mask: 255.255.0.0   

Gateway: 192.168.0.1   

Before communicating with the I-7540D-MTCP, you must change the 

Summary of Contents for I-7540D-MTCP

Page 1: ...I 7540 MTCP htm The goal of this manual is focused on helping users to quickly familiarize themselves with the I 7540D MTCP module and the CAN Modbus TCP Modbus RTU communication converter Here we use two I 7540D MTCP modules called the I 7540D MTCP_A and the I 7540D MTCP_B as the example will demonstrate how to use the I 7540D MTCP modules The architecture of this example is depicted below When t...

Page 2: ... Set up the 120Ω terminator resistor of module A and B Before going to the next step check if the JP3 is enabled or not If not it is necessary to open the cover for each I 7540D MTCP and re configure their JP3 jumpers to enable them again as shown in below figure Enable default Activate Step2 Power connection for the I 7540D MTCP A and I 7540D MTCP B Connect the R Vs and B GND pins of the I 7540D ...

Page 3: ...A 0910 The wire connection is shown below Step5 CAN bus connection Connect the CAN ports of these two I 7540D MTCP modules to the CAN network by using the following structure 3 The I 7540D MTCP Parameters Configuration Before testing the I 7540D MTCP converter users need to configure the RS 232 Ethernet and CAN parameters via the I 7540D MTCP Utility tool The details of this procedure are shown be...

Page 4: ... I 7540D MTCP Utility The I 7540D MTCP Utility tool is located in the Fieldbus_CD can converter I 7540 MTCP utility folder on the companion CD ROM or can be downloaded from the web site http www icpdas com products Remote_IO can_bus I 7540d MTCP htm Step3 Click the Connect button to connect with the I 7540D MTCP A and the I 7540D MTCP B These steps are shown in the following figure Step4 Click the...

Page 5: ... 0 5 Step5 After connecting with the I 7540D MTCP A you can modify the operation mode to Modbus TCP In the same way you can set the operation mode of I 7540D MTCP B to Modbus RTU The CAN parameters and network status of I 7540D MTCP A and I 7540D MTCP B are set as following table ...

Page 6: ...8 0 1 IP 192 168 255 2 Mask 255 255 0 0 Gateway 192 168 0 1 4 Testing the I 7540D MTCP by using the I 7540D MTCP Utility Step1 Run the I 7540D MTCP Utility I 7540D MTCP exe two times Then two I 7540D MTCP Utility windows will be displayed on the screen Assume that one is named as Utility A and the other is called Utility B Step2 Click the Connect button to open the connection dialog Key in the IP ...

Page 7: ...ssages to the ASCII command string and send it out through the PC s Ethernet port Suppose using Modbus function code 10 hex to send CAN message After the I 7540D MTCP A receives this command It will transfer the command to the CAN message So the I 7540D MTCP B will receive the CAN message transmitted from I 7540D MTCP A and store in the buffer User can use Modbus RTU command function code 04 hex t...

Page 8: ...I 7540D MTCP Ethernet Modbus to CAN Converter Quick Start User Guide Version 1 0 8 Utility I 7540D MTCP B ...

Reviews: