background image


WF-2000 Series AIO 

User’s Manual (RevB1.0, Oct./2016) ------------- 22


2.5    Jumper Settings 

2.5.1 Watchdog Timer Settings 

A  watchdog  timer  (WDT)  is  a  device  that  performs  a  specific 

operation  after  a  certain  period  of  time  if  something  goes  wrong  and  the 
system  does  not  recover  on  its  own.  A  watchdog  timer  can  perform  a 
warm boot(restarting the system) after a certain number of milliseconds. 


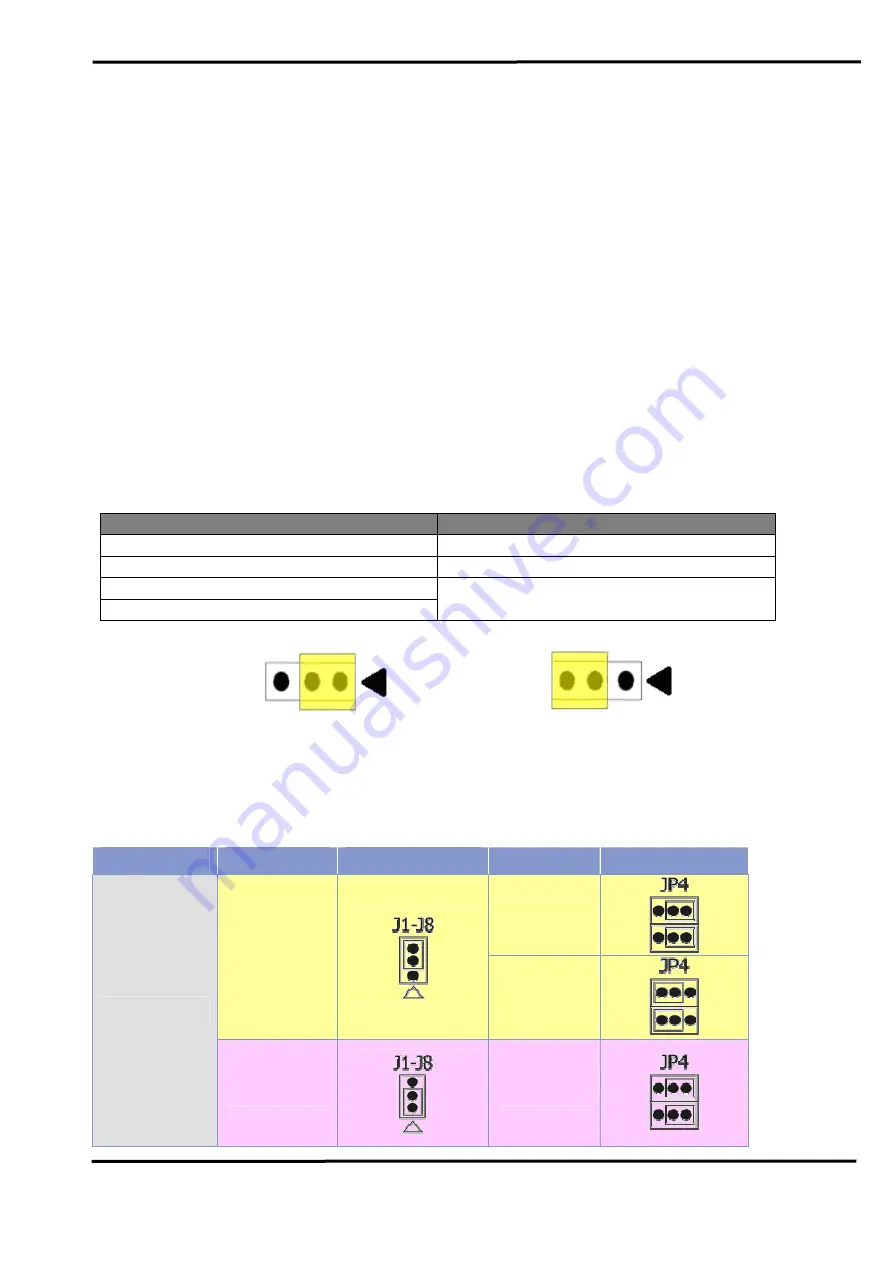
The WF-2000 series module supplies a jumper for users to active the 

watchdog timer or not. If users want to use this WDT, can open the WF-
2000 cover and use the Jumper to activate the WDT built in the module, 
as the Figure 2-13. Note that the default setting is active. 


Table 


2-4 WDT Jumper Position 

Mode 

Jumper Number 

WF-2015 

JP2 

WF-2017 

JP2 

WF-2019 

JP1 

WF-2026 

JP4 

Enable (default)                            Disable


Figure 


2-10 Watchdog timer Jumper Position 

2.5.2 AI Settings 
 
Table 


2-5 WF-2017 AI Input Type/Mode Jumper configuration 

Modules


Input Type


Jumper Position


Input Mode 

Jumper Position 

Differential 


Voltage 


Single-ended 


WF-2017 

Current 


Differential 


Summary of Contents for WF-2015

Page 1: ...WF 2000 Series AIO User s Manual RevB1 0 Oct 2016 1 AIO User Manual www icpdas com WF 2000 Series Wi Fi I O Module ...

Page 2: ...e this manual at any time without notice The information furnished by ICP DAS is believed to be accurate and reliable However no responsibility is assumed by ICP DAS for its use or for any infringements of patents or other rights of third parties resulting from its use Copyright Copyright 2016 by ICP DAS All rights are reserved Trademark The names used for identification only may be registered tra...

Page 3: ...2 2 5 1 Watchdog Timer Settings 22 2 5 2 AI Settings 22 2 6 FW OP Dip switch 23 2 6 1 Firmware Update Mode 23 2 6 2 Firmware Operation Mode 25 3 Software 27 3 1 WF IO Utility RevB1 0 or later 27 3 1 1 Main Screen 28 3 1 2 Configuration Screen 29 3 1 3 Analog Input Screen 32 4 Application Notes 40 4 1 Hardware Installation 40 4 2 WF 2000 series Configuration 41 4 2 1 WF 2000 Series Wireless Network...

Page 4: ...Mapping 52 5 3 2 WF 2017 I O Address Mapping 52 5 3 3 WF 2019 I O Address Mapping 53 5 3 4 WF 2026 I O Address Mapping 53 6 Troubleshooting 55 Appendix A 57 A 1 Analog Input Type and Data Format Table 57 A 2 Analog Output Type and Data Format Table 59 A 3 CJC cold junction compensation Definition 60 A 4 RTD Input Type and Data Format Table 60 ...

Page 5: ... configuration which makes perfect integration to SCADA software and offer easy and safe access for users from anytime and anywhere Figure 1 1 Application architecture for the WF 2000 RevB series 1 1 Wireless connection mode WF 2000 RevB series support Infrastructure and Limited AP wireless connection modes of WLAN 1 2 Features RoHS Design Compatible with IEEE 802 11b g n standards Support Infrast...

Page 6: ... directly with each other without the need for a wireless access point Infrastructure mode is the more common network configuration where all wireless hosts clients connect to the wireless network via a WAP Wireless Access Point Support WEP WPA and WPA2 wireless encryption WEP and WPA are common types of security that are used to protect wireless networks When WEP or WPA is turned on WF 2000 modul...

Page 7: ...1 System Specifications Modules WF 2015 WF 2017 WF 2019 WF 2026 Wi Fi Interface Antenna 5 dBi Omni Directional Output Power 14 dBm 11Mbps Receive Sensitivity 93 dBm 11Mbps Standard Supported IEEE 802 11b g n Wireless Mode Infrastructure Limited AP Encryption WEP WPA and WPA2 UART Interface Connector 5 pin screw terminal connector TxD RxD GND COM1 RS 232 Baud Rate bps 115200 Power Input Voltage Ran...

Page 8: ...pe Pt100 Pt1000 Ni120 Cu50 Cu100 Cu1000 Resolution 16 bit Accuracy 0 05 of FSR Zero Drift 0 5 µV C Span Drift 20 µV C Sampling Rate 12 Hz Total Overvoltage Protection 120 VDC Intra Module Isolation Field to Logic 3000 VDC Individual Channel Configuration Yes Open Wire Detection Yes 3 wire RTD Lead Resistance Elimination Yes Resistance Measurement 3 2 kΩ Max ...

Page 9: ...Selectable Resolution 16 bit Accuracy 0 1 FSR Sampling Rate 10 Hz Total Zero Drift 20 µV C Span Drift 25 ppm Common Mode Rejection 86 dB Min Normal Mode Rejection 100 dB Input Impedance 2 MΩ 1 MΩ Overvoltage protection Differential 240 Vrms Single ended 150 Vrms Intra Module Isolation Field to Logic 3000 VDC Individual Channel Configuration Yes Note Differential mode can be used for voltage input ...

Page 10: ...ired Input Type Thermocouple J K T E R S B N C Resolution 16 bit Accuracy 0 1 FSR Sampling Rate 10 Hz Total Zero Drift 20 µV C Span Drift 25 ppm Common Mode Rejection 86 dB Min Normal Mode Rejection 100 dB Input Impedance Voltage Input 400 kΩ Current Input 125 Ω Intra Module Isolation Field to Logic 3000 VDC Overvoltage protection 240 Vrms Individual Channel Configuration Yes Open Wire Detection Y...

Page 11: ...ppm C Common Mode Rejection 86 dB Min Normal Mode Rejection 100 dB Voltage 2 MΩ Input Impedance Current 140 Ω Common Voltage Protection 200 V Overvoltage Protection 240 Vrms Overcurrent Protection Yes 50 mA 110 VDC Virtual Channel to Channel Isolation Yes 400 VDC Individual Channel Configuration Yes Analog Output Channels 2 Voltage 0 5 VDC 0 10 VDC 5 VDC 10 VDC Output Range Current 0 20 mA 4 20 mA...

Page 12: ...vB1 0 Oct 2016 12 2 Hardware 2 1 Front Panel The WF 2000 AIO modules front panel contains the antenna I O connectors and LEDs Figure 2 1 Front Panel of the WF 2000 AIO modules RP SMA Connector I O Connector System Status Signal strength ...

Page 13: ...y 1 second flashes twice per 100 ms Wi Fi unable to connect error Blink per 1000 ms Wi Fi network configurations error Every 1 second flashes three times per 100 ms PWR Power failure Off Data transmission Blink Wi Fi Bus Idle Off Table 2 2 Signal Strength LED Indicator Signal Strength LED Indicator LED Status Signal strength High Medium Low Bad or No Signal 2 1 2 I O Connector 2 1 2 1 WF 2015 Figu...

Page 14: ...WF 2000 Series AIO User s Manual RevB1 0 Oct 2016 14 2 1 2 2 WF 2017 Figure 2 3 I O Connector of WF 2017 2 1 2 3 WF 2019 Figure 2 4 I O Connector of WF 2019 ...

Page 15: ...WF 2000 Series AIO User s Manual RevB1 0 Oct 2016 15 Figure 2 5 Pin Assignment of DB 1820 2 1 2 4 WF 2026 Figure 2 6 I O Connector of WF 2026 ...

Page 16: ... switch to the OP position after the upgrade is complete OP mode Firmware operation mode In the WF 2000 the switch is always in the OP position Only when updating the WF 2000 firmware the switch can be moved from the OP position to the FW position Table 2 3 Power Signal Connector Power Signal connector Pin Assignment Description F G Frame Ground Vs 10 30 VDC GND Power RS 232 GND RxD RS 232 RxD TxD...

Page 17: ...ions The diagrams below provide the dimensions of the WF 2000 to use in defining your enclosure specifications All dimensions are in millimeters Figure 2 4 Front Left Side dimension of the WF 2015 WF 2017 WF 2026 Figure 2 5 Front Left Side dimension of the WF 2019 ...

Page 18: ...2 6 Top Bottom dimension of the WF 2015 WF 2017 WF 2026 Figure 2 7 Top Bottom dimension of the WF 2019 2 4 Hardware Connection 2 4 1 Power and Serial port connection The following figures describe the Power and the COM port to a serial device via serial network ...

Page 19: ...WF 2000 Series AIO User s Manual RevB1 0 Oct 2016 19 Figure 2 8 Power and Serial port wire connection 2 4 2 I O connection 2 4 2 1 WF 2015 Figure 2 9 AI wire connection of WF 2015 ...

Page 20: ...WF 2000 Series AIO User s Manual RevB1 0 Oct 2016 20 2 4 2 2 WF 2017 Figure 2 13 AI wire connection of WF 2017 2 4 2 3 WF 2019 Figure 2 14 AI wire connection of WF 2019 ...

Page 21: ...WF 2000 Series AIO User s Manual RevB1 0 Oct 2016 21 2 4 2 4 WF 2026 Figure 2 15 AIO wire connection of WF 2026 Figure 2 16 DIO wire connection of WF 2026 ...

Page 22: ...pplies a jumper for users to active the watchdog timer or not If users want to use this WDT can open the WF 2000 cover and use the Jumper to activate the WDT built in the module as the Figure 2 13 Note that the default setting is active Table 2 4 WDT Jumper Position Mode Jumper Number WF 2015 JP2 WF 2017 JP2 WF 2019 JP1 WF 2026 JP4 Enable default Disable Figure 2 10 Watchdog timer Jumper Position ...

Page 23: ... is a dip switch used for firmware operation or firmware update of the module The following steps show how to use this dip switch 2 6 1 Firmware Update Mode Please set the dip switch to the FW position as Figure 2 7 and then the WF 2000 series will work in the Firmware Update Mode after reset the power of the module In this mode users can update the firmware of the WF 2000 module from computer s R...

Page 24: ... cable connection Users just need to execute Firmware_Update_Tool exe and follow the below steps to complete the firmware updating process 1 Choose COM interface and COM Port 2 Click Browser button to choose firmware file e g WF20xx fw 3 Click Firmware Update button to start firmware updating process ...

Page 25: ...irmware The Firmware_Update_Tool program can be downloaded from ftp ftp icpdas com pub cd usbcd napdos wifi io wf 20xx software tool 2 6 2 Firmware Operation Mode In the operation mode users need to set the dip switch to the OP position as Figure 2 22 and reset the power and the WF 2000 can run in operation mode In this mode user can use the WF 2000 series with a computer or with another WF 2000 s...

Page 26: ...WF 2000 Series AIO User s Manual RevB1 0 Oct 2016 26 Figure 2 15 OP Position of Dip Switch ...

Page 27: ...e utility The WF IO Utility RevB is designed for WF 2000 RevB series only not for WF 2000 series without RevB mark Make sure there is a RevB mark after the model name on the left cover The WF 2000 RevB and WF 2000 series are using different Wi Fi module so the Utility are not compatible with each other 3 1 WF IO Utility RevB1 0 or later The following is the main screens provided by WF IO Utility t...

Page 28: ...all of WF 2000 devices that support UDP search communication Configuration Network This function can enter the basic wireless network configuration interface as shown in Figure 3 2 Configuration Pair Connection This function can enter the basic Pair Connection configuration interface as shown in Figure 3 5 3 Search List Search list provides each item that scans from UDP and display the related inf...

Page 29: ...etwork Net ID The Unit Identifier in Modbus TCP IP application data unit Range 1 247 Default 1 DHCP Enable If a DHCP server is present on the network the WF 2000 will automatically obtain the network settings from the DHCP server when the DHCP function is enabled Limited AP mode don t support DHCP configuration IP Address WF 2000 IP setting Default 192 168 255 1 Subnet Mask WF 2000 Net Mask settin...

Page 30: ...address and Gateway should be same and created or configure to create a limited AP network Start IP Addr This DHCP server can support maximum 8 client connections with server IP as the statically configured IP address and client IP address starts from the next IP address of the configured static IP address 2 Wi Fi SSID Auto Search Auto search the broadcast SSID in the air and list SSID names in th...

Page 31: ...A2 PSK Key length must between 8 63 characters Characters of key should be in range of 0 9 or A F or a f Table 3 2 Limited AP Mode Wi Fi Mode Limited AP Limited AP mode lets WF 2000 create a Limited AP network with the specified SSID to communicate directly with each other SSID Service Set Identifier Connected devices must be with the same SSID SSID length must not exceed 20 characters WLCH 1 11 W...

Page 32: ... Transmission Interface The parameter transmission interface that provides wireless and RS 232 interface for connection Write Parameter It allows users to upload the parameters to WF 2000 series Read Parameter It allows users to download the parameters form WF 2000 series 3 1 3 Analog Input Screen In the I O page of the AI the real time value and module configuration can be read or written in this...

Page 33: ...ual RevB1 0 Oct 2016 33 Figure 3 4 WF 2015 diagnostic screen Figure 3 5 WF 2017 diagnostic screen Data Monitor Region Configuration Region Message Region Configuration Region Data Monitor Region Message Region Configuration Region ...

Page 34: ...vB1 0 Oct 2016 34 Figure 3 6 WF 2019 diagnostic screen Figure 3 7 WF 2026 diagnostic screen Data Monitor Region Configuration Region Message Region Data Monitor and Control Region Configuration Region Message Region Configuration Region ...

Page 35: ...e input type for analog input output Users can set different type for each analog input output channel For more detail for type of analog output modules please refer to Appendix A Channel CJC Offset Setting the CJC offset for the specific channel The behavior of the setting is the same as the CJC Offset but it only affects specific channel Note The CJC offset can be any in the range of 30 00 to 10...

Page 36: ... reading value of temperature type Note The CJC offset can be any in the range of 30 00 to 100 00 C Polling Interval This value is the period to poll data to the WF 2000 I O module Note The valid value is 100 5000ms Show Hex Convert the I O value from decimal to hexadecimal RSSI This area will display the signal strength information by RSSI value and LED indicator when press the Get button Table 3...

Page 37: ...on can be read or written in this page The detail of all items in this form will be introduced in this section Digital Input Monitor Region The digital input value can be read in this region Digital Output Monitor and Control Region The digital output value can be read and write in this region Power On Value of DO The power on value of DO can be Set and Get in this region It is loaded into the DO ...

Page 38: ...ch this setting Analog Output Monitor and Control Region The analog output value can be read and write in this region Power On Value of AO The power on value of AO can be Set and Get in this region It is loaded into the AO under 3 conditions power on reset by Module Watchdog reset by reset command Enable Select which channel to enable or disable this function Set Value Set the current output value...

Page 39: ...able Select which channel to enable or disable this function Set Value Set the current output value as Safe Value Get Value Get the current configuration of Safe Value Active Time ms This function is active when the communication timeout reach this setting ...

Page 40: ...application architecture 4 1 Hardware Installation Before use associated hardware configuration the steps described as follows Step 1 Checking the WF 2000 series firmware operation mode It needs to set the DIP switch to the OP position operating mode as resetting the power WF 2000 series will be in the operation mode Step 2 Serial port connection WF 2000 series supports RS 232 serial communication...

Page 41: ...re set to 192 168 255 1 03 Subnet Mask Net Mask settings Here set to 255 255 0 0 04 Gateway Gateway settings Here set to 192 168 255 254 05 DHCP Server Enable Enable DHCP Server 06 Start IP Addr The client IP address starts from the configured static IP address Here set to 192 168 255 100 07 Wi Fi Mode Wireless network connection mode settings Here set to Limited AP mode If select the Limited AP m...

Page 42: ...rite Parameter button to upload the parameters 4 2 2 PC Connection Configuration 01 TCP IP Setting a Open Network connections and entry the properties setting of wireless network connections Figure 4 3 Properties setting of wireless network connections b Select the Internet Protocol TCP IP and press the Properties button Figure 4 4 Properties setting of Internet Protocol TCP IP ...

Page 43: ...ess to it Once the wireless network connection is successful the computer will obtain an IP address as 192 168 255 100 Figure 4 5 IP address setting interface 02 Wireless network connection a View available wireless networks and you can see the WF 20xx wireless network in the list b Select the WF 20xx and press the Connect button Figure 4 6 Wireless network connection ...

Page 44: ...e there will appear connection success screen Figure 4 8 Connection successful interface 4 2 3 Access I O data 01 Connection with WF I O utility RevB1 0 or later a Open WF I O utility and click the Search button choose the network interface that connect with the WF 2000 device search list will provide each item that scan from UDP Port Figure 4 9 Choose Network Interface ...

Page 45: ...cess I O data and configure parameters Figure 4 11 I O page interface WF 2015 02 Connection with Modbus TCP utility a Open Modbus TCP utility and key in the IP address as 192 168 255 1 Port as 502 Finally click the Connect button b If the network settings are correct this will immediately establish a connection Figure 4 12 Modbus TCP utility Connection interface c The following Modbus command func...

Page 46: ... Net ID Byte 1 FC 0x01 FC 0x02 FC 0x03 FC 0x04 FC 0x0F FC 0x10 Byte 2 3 Reference number Byte 4 5 Bit count Bit count Word count Word count Bit count Word count Byte 6 N A N A N A N A Byte count B Byte count B Byte 7 B 6 N A N A N A N A Data to be written Register values d Modbus TCP request command examples Figure 4 13 Read multiple coils status 0xxxx for DO Figure 4 14 Force multiple coils 0xxxx...

Page 47: ...WF 2000 Series AIO User s Manual RevB1 0 Oct 2016 47 Figure 4 18 Write multiple registers 4xxxx for AO ...

Page 48: ...Mode Wizcon Wonderware etc 5 1 What is Modbus TCP IP Modbus is a communication protocol developed by Modicon in 1979 Different versions of Modbus used today include Modbus RTU based on serial communication like RS485 and RS232 Modbus ASCII and Modbus TCP which is the Modbus RTU protocol embedded into TCP packets Modbus TCP is an internet protocol The protocol embeds a Modbus frame into a TCP frame...

Page 49: ... 1 MODBUS Application Protocol Header Fields Length Description Transaction Identifier 2 bytes Identification of Request Response transaction Copied from request to response Protocol Identifier 2 bytes 0 Modbus protocol Length 2 bytes Number of following bytes Includes the Unit Identifier Unit Identifier 1 byte Identification of remote slave 5 2 2 Function Code The function code field of a Modbus ...

Page 50: ...ains additional information that the server uses to take the action defined by the function code This can include items like discrete and register addresses the quantity of items to be handled and the count of actual data bytes in the field The data field may be nonexistent of zero length in certain kinds of requests in this case the server does not require any additional information The function ...

Page 51: ... items This means that when a numerical quantity larger than single byte is transmitted the most significant byte MSB also called the high order byte is send first The following sub topics describe the different byte of encoding and show how the data is encoded as it is within the Modbus TCP packet 5 2 5 1 Binary A binary item is represented as a single bit within a data word All binary is packed ...

Page 52: ...Type 30001 1 6 Analog Input 32768 32767 Bipolar R Table 5 6 4xxxx AO address Begin Address Points Descriptions Range Access Type 40248 1 Reset System 1 Reset System 247 Restore to Factory Default Settings W 5 3 2 WF 2017 I O Address Mapping Table 5 7 3xxxx AI address Begin Address Points Descriptions Range Access Type 30001 1 16 Analog Input 32768 32767 Bipolar 0 65535 Unipolar R 30017 1 AI Wire S...

Page 53: ...t 32768 32767 Bipolar 0 65535 Unipolar R 30011 1 CJC data 300 1000 R Table 5 10 4xxxx AO address Begin Address Points Descriptions Range Access Type 40248 1 Reset System 1 Reset System 247 Restore to Factory Default Settings W 5 3 4 WF 2026 I O Address Mapping Table 5 11 3xxxx AI address Begin Address Points Descriptions Range Access Type 30001 1 5 Analog Input 32768 32767 Bipolar 0 65535 Unipolar...

Page 54: ...cess Type 40248 1 Reset System 1 Reset System 247 Restore to Factory Default Settings W Table 5 14 0xxxx DO address Begin Address Points Descriptions Range Access Type 00001 1 3 Digital Output 0 OFF 1 ON R W Table 5 15 1xxxx DI address Begin Address Points Descriptions Range Access Type 10001 1 2 Digital Input 0 OFF 1 ON R ...

Page 55: ...nal quality 3 TCP connection can not be established 1 Make sure WLAN connection is established successfully 2 Make sure the network configuration is good TCP IP Port Local IP Net Mask 4 How to restore factory default 1 Power on the WF 2000 series I O module 2 Change the Dip Switch position of the WF 2000 series and to complete the following steps in 5 seconds Step1 From OP to FW position Step2 Fro...

Page 56: ...T Framework v4 0 installed as well or not Users can install NET Framework v4 0 in the following website Microsoft NET Framework 4 Web Installer http www microsoft com en us download details aspx id 17851 Microsoft NET Framework 4 Standalone Installer http www microsoft com en us download details aspx id 17718 Figure 6 1 NET Framework Initialization Error Technical Support If you have problems abou...

Page 57: ...h 100 to 100 mV 2 s comp HEX 7FFF 8000 Engineering Unit 500 00 500 00 03h 500 to 500 mV 2 s comp HEX 7FFF 8000 Engineering Unit 1 0000 1 0000 04h 1 to 1 V 2 s comp HEX 7FFF 8000 Engineering Unit 2 5 000 2 5 000 05h 2 5 to 2 5 V 2 s comp HEX 7FFF 8000 Engineering Unit 20 000 20 000 06h 20 to 20 mA 2 s comp HEX 7FFF 8000 Engineering Unit 20 000 04 000 07h 4 to 20 mA 2 s comp HEX FFFF 0000 Engineerin...

Page 58: ...0 0Eh Type J Thermocouple 210 to 760 C 2 s comp HEX 7FFF DCA2 Engineering Unit 1372 0 0270 0 0Fh Type K Thermocouple 270 to 1372 C 2 s comp HEX 7FFF E6D0 Engineering Unit 400 00 270 00 10h Type T Thermocouple 270 to 400 C 2 s comp HEX 7FFF A99A Engineering Unit 1000 0 0270 0 11h Type E Thermocouple 270 to 1000 C 2 s comp HEX 7FFF DD71 Engineering Unit 1768 0 0000 0 12h Type R Thermocouple 0 to 176...

Page 59: ... all of the thermocouple type codes it means that the thermocouple wires are broken A 2 Analog Output Type and Data Format Table Type Code Input Range Data Format F S F S Engineering Unit 20 000 00 000 30h 0 to 20 mA 2 s comp HEX FFFF 0000 Engineering Unit 20 000 04 000 31h 4 to 20 mA 2 s comp HEX FFFF 0000 Engineering Unit 10 000 00 000 32h 0 to 10 V 2 s comp HEX FFFF 0000 Engineering Unit 10 000...

Page 60: ...85 0 100 C Ohm 138 50 100 00 Engineering unit 200 00 000 00 2 s comp HEX 7FFF 0000 22h Platinum 100 α 0 00385 0 200 C Ohm 175 84 100 00 Engineering unit 600 00 000 00 2 s comp HEX 7FFF 0000 23h Platinum 100 α 0 00385 0 600 C Ohm 313 59 100 00 Engineering unit 100 00 100 00 2 s comp HEX 7FFF 8000 24h Platinum 100 α 0 003916 100 100 C Ohm 139 16 059 58 Engineering unit 100 00 000 00 2 s comp HEX 7FF...

Page 61: ...EX 7FFF 0000 2Ch Cu 100 α 0 00427 0 200 C Ohm 167 75 090 34 Engineering unit 150 00 020 00 2 s comp HEX 7FFF EEEF 2Dh Cu 1000 α 0 00421 20 150 C Ohm 1631 7 0915 6 Engineering unit 200 00 200 00 2 s comp HEX 7FFF 8000 2Eh Platinum 100 α 0 00385 200 200 C Ohm 175 84 018 49 Engineering unit 200 00 200 00 2 s comp HEX 7FFF 8000 2Fh Platinum 100 α 0 003916 200 200 C Ohm 177 14 017 14 Engineering unit 6...

Reviews: