background image


GW-7238D J1939 to MBTCP Server / MBRTU Slave Gateway User’s Manual (Ver.1.0, Nov. 2011) --- 51


6.   Troubleshooting 


Item 

Trouble state 

Solution 

CAN Bus Transmission Fail  
(Power LED Blink per 100 ms) 

Make sure the CAN bus wiring is 
connected, and connected to the 
correct pin. 

CAN Bus-Off 
(Power LED Blink per 500 ms) 

Make sure the CAN bus  wiring 
does not short-circuit 

Can’t Claim Address in J1939 
Network 
(Power LED Blink per 1000 ms) 

Please configure another J1939 
network address in GW-7238D 
Utility. 

Can not transmit the output 
J1939 message 

1. Make sure the Start/Stop 

sending J1939 output 
message register (42009) is 
0x00. 

2. Make sure the Update Rate of 

J1939 output message table is 
not zero. 

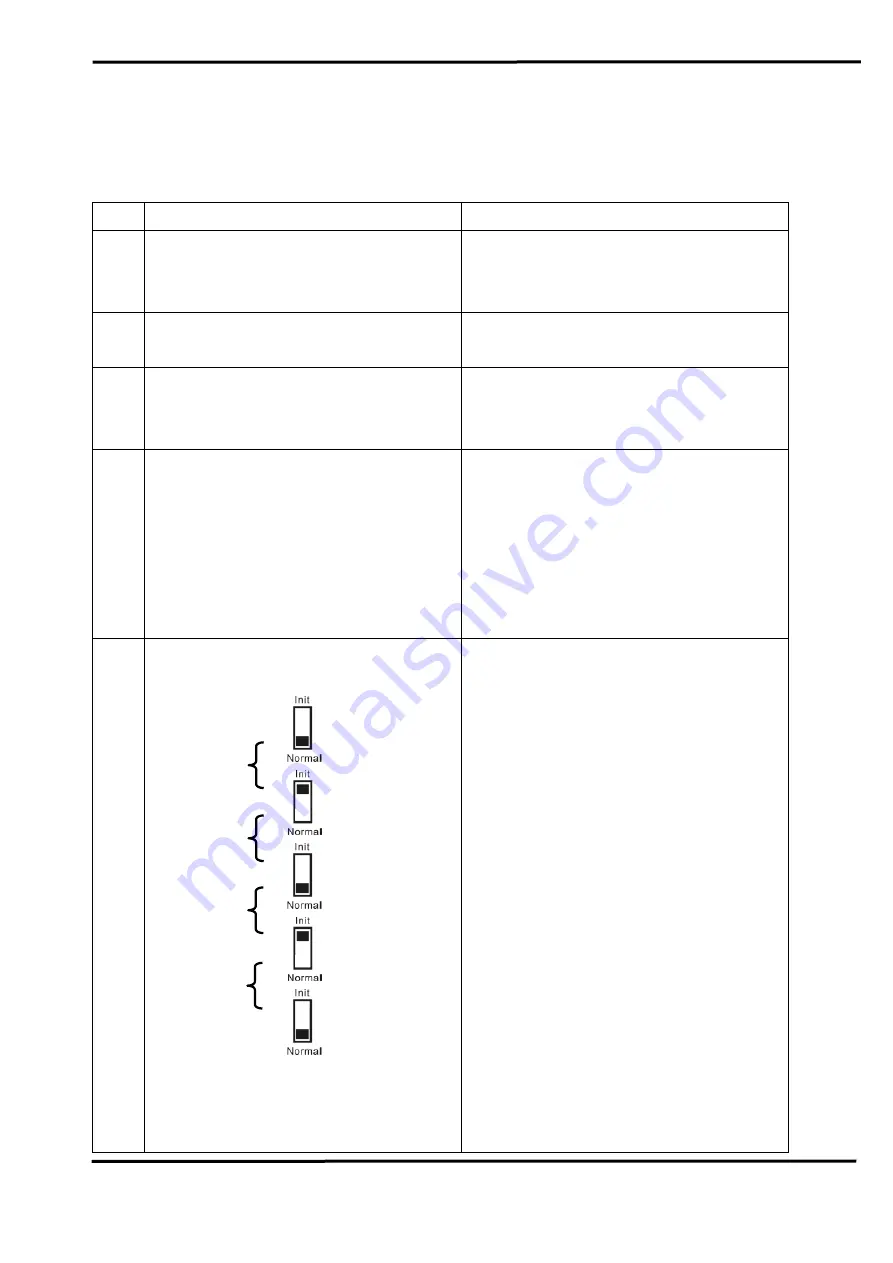
How to restore factory default 


1. Power on the GW-7238D 
2. Change the Dip-Switch 

position of the GW-7238D and 
to complete the following steps 
in 5 seconds. 
Step1. From “Normal” to “Init” 

position. 

Step2. From “Init” to “Normal” 

position. 

Step3. From “Normal” to “Init” 

position. 

Step4. From “Init” to “Normal” 

position. 

3. When the correct 

implementation of the above 
steps, the J1939/Modbus 
LEDs of the GW-7238D should 
be turn on, and that should be 
turn off after 500 ms later. 

Step1 

Step2 

Step3 

Step4 

Summary of Contents for GW-7238D

Page 1: ...GW 7238D J1939 to MBTCP Server MBRTU Slave Gateway User s Manual Ver 1 0 Nov 2011 1 User s Manual www icpdas com GW 7238D J1939 to Modbus TCP Server RTU Slave Gateway ...

Page 2: ...s the right to change this manual at any time without notice The information furnished by ICP DAS is believed to be accurate and reliable However no responsibility is assumed by ICP DAS for its use or for any infringements of patents or other rights of third parties resulting from its use Copyright Copyright 2011 by ICP DAS All rights are reserved Trademark The names used for identification only m...

Page 3: ...2 5 Init Normal Dip switch 14 2 5 1 Firmware Update Mode 14 2 5 2 Firmware Operation Mode 16 2 6 LED Indication 16 2 7 5 digits 7 segment LED Displays 18 3 Software 21 3 1 Configuration Tool GW 7238D Utility 21 3 2 GW 7238D Utility 22 3 2 1 Connection Screen 22 3 2 2 Main Screen 23 4 Communication Network 31 4 1 Modbus Network 31 4 1 1 Supported Modbus Functions 31 4 1 2 Modbus Address 31 4 2 J193...

Page 4: ...5 2 GW 7238D Utility Configuration 40 5 2 1 Modbus Network Configuration 40 5 2 2 J1939 Network Configuration 40 5 2 3 J1939 I O Configuration 41 5 2 4 Upload Parameter to the GW 7238D 43 5 3 Modbus Communication Modbus RTU 44 5 4 Modbus Communication Modbus TCP 47 6 Troubleshooting 51 ...

Page 5: ...bus TCP client RTU master Utility software is provided for users to configure J1939 and Modbus TCP RTU setting in the GW 7238D The application fields can be diesel power train applications In Vehicle networks for trucks and buses etc The following is the application architecture for the GW 7238D Figure 1 1 Application of the GW 7238D 1 1 Mode of operation The GW 7238D provides centralized data sto...

Page 6: ...slave protocol Communication support both Modbus TCP RTU to J1939 at the same time Configurable UART baud rates of 9600 19200 38400 57600 115200 bps Allow Max 5 Modbus TCP clients to access GW 7238D simultaneously Support Function Code 03 04 06 16 of Modbus functions for reading and writing J1939 Messages 1 3 Specifications UART specs COM1 RS 232 COM1 Connector 5 pin screwed terminal block TXD1 RX...

Page 7: ... LEDs PWR LED for power ERR LED for error status J1939 LED for J1939 communication MODBUS LED for Modbus communication Power specs Power supply Unregulated 10 30 VDC Protection Power reverse polarity protection Over voltage brown out protection Power Consumption 2W Software Utility Tool Provide Modbus network configuration interface Provide J1939 network configuration interface Network Address Dev...

Page 8: ...1 0 Nov 2011 8 2 Hardware Figure 2 1 Hardware externals of the GW 7238D 2 1 Block Diagram Figure 2 2 is a block diagram illustrating the functions on the GW 7238D module It provides the 1000Vrms Isolation in the CAN interface site Figure 2 2 Block diagram of the GW 7238D ...

Page 9: ...Name Description 1 CTS1 CTS pin of COM1 RS 232 2 RTS1 RTS pin of COM1 RS 232 3 RXD1 RXD pin of COM1 RS 232 4 TXD1 TXD pin of COM1 RS 232 5 INIT Initial pin for enable disable AUTOEXEC BAT 6 D2 Data pin of COM2 RS 485 7 D2 Data pin of COM2 RS 485 8 VS V of power supply 10V to 30V DC unregulated 9 GND GND of power supply Figure 2 3 COM Connector on the GW 7238D 2 2 2 CAN bus Interface In order to pr...

Page 10: ...or on the GW 7238D Note that the bypass CAN bus connector is not another CAN channel It is designed for connecting to another CAN device conveniently The structure of the inside electronic circuit is displayed as figure 2 5 Figure 2 5 Electronic circuit of CAN bus connector 2 2 3 Ethernet Connect The Ethernet 10 100 Base TX signals are routed to an RJ45 socket for easy connection using a standard ...

Page 11: ...eive Data 4 N C Not Connected 5 N C Not Connected 6 RX Receive Data 7 N C Not Connected 8 N C Not Connected 2 3 Hardware Connection The GW 7238D supports J1939 Serial Ethernet port communication it offers one CAN interface for J1939 network two serial and one Ethernet interfaces for Modbus network 2 3 1 CAN port connection The hardware connection between device and the GW 7238D is as Figure 2 7 Fi...

Page 12: ...e gateway at the same time The following figures describe the COM port Ethernet and Power connections Figure 2 8 COM Ethernet Power wire connection of GW 7238D 2 4 Terminator Resistor Settings In order to minimize reflection effects on the CAN bus line the CAN bus lines have to be terminated at both ends by two terminal resistances Based on the ISO 11898 2 spec each terminal resistance is 120Ω or ...

Page 13: ...rminal Resistance Ω 0 40 70 0 25 23AWG 0 34mm2 22AWG 124 0 1 40 300 60 0 34 22AWG 0 6mm2 20AWG 127 0 1 300 600 40 0 5 0 6mm2 20AWG 150 300 600 1K 20 0 75 0 8mm2 18AWG 150 300 Therefore the GW 7238D module supplies a jumper for users to connect the terminator resistor or not If users want to use this terminator resistor please open the GW 7238D cover and use the JP3 jumper to activate the 120Ω term...

Page 14: ...here is a dip switch used for firmware operation or firmware updating in the back of the module The following steps show how to use this dip switch 2 5 1 Firmware Update Mode Please set the dip switch to the Init Initial position as Figure 2 11 and then the GW 7238D will work in the Firmware Update Mode after reset the power of the module In this mode users can update the firmware of the GW 7238D ...

Page 15: ...Set the dip switch to the Init Initial position 3 Install the download cable between COM1 of the GW 7238D COM1 of PC 4 Power on the GW 7238D Run 7188xw EXE 5 Then press F4 button to load firmware automatically PS the firmware files are GW7238D EXE and autoexec bat These two files and the 7188xw exe must be in same directory 6 Set the dip switch to the Normal position 7 Re boot the GW 7238D 8 Press...

Page 16: ... the operation mode In this mode users can use the Modbus Master command to set get J1939 messages via COM or Ethernet interface Figure 2 14 Normal Position of Dip Switch 2 6 LED Indication The GW 7238D includes four single color LED displays to indicate the status of module The following are the illustration of these LEDs shown as Figure 2 15 1 PWR LED It is used to help users to check whether th...

Page 17: ...ll blink whenever a CAN message is sending or receiving 4 MODBUS LED It is used to show whether the GW 7238D is transmitting receiving Modbus messages The MODBUS LED will blink whenever a Modbus message is sending or receiving Figure 2 15 LED position of the GW 7238D Table 2 7 LED indication of the GW 7238D LED Name GW 7238D Status LED Status Firmware is running On PWR LED Power Failure Off No Err...

Page 18: ...of the information is divided into 4 groups These groups are displayed by turns The information is shown as the figure 2 16 Figure 2 16 The meaning of the 7 segment LED The information groups of the GW 7238D are as the following list Group ID 11111 IP information of the GW 7238D Group ID 22222 Baud rate of all ports Group ID 33333 Configuration of the GW 7238D station number Group ID 44444 Client ...

Page 19: ... by 1000 The range is from 9 6 115 2 means 9 6 kbps 115 2 kbps LED 2 Parity bit 0 no parity 1 odd parity 2 even parity LED 3 Data bit fixed at 8 LED 4 Stop bit 1 or 2 LED 5 CAN Baud rate this value needs to multiply by 1000 The value is fixed at 250 means 250 kbps The configuration of the communication is given as follows Group ID of 5 digit LED 33333 LED 1 Indicators fixed at 1 LED 2 3 fix string...

Page 20: ...ror status of the GW 7238D is given as follows LED 1 3 fix string Er LED 4 5 Error code normal is 00 The details of the error codes are shown below Table 2 8 GW 7238D error status Error Code Status 00 No Error 01 Can t Claim Address in J1939 Network 02 CAN Bus Off 03 CAN Bus Transmission Fail ...

Page 21: ...nfigure the parameters associated with the Modbus and J1939 network interfaces as well as to layout of the I O table and set up the contents GW 7238D Utility is a Microsoft Windows application that communicates with a GW 7238D over a standard RS 232 RS 485 serial link and Ethernet link by using the PC serial and Ethernet port It is compatible with Microsoft Windows 95 98 NT 2000 XP Vista and 7 The...

Page 22: ...igure 3 1 The following is the illustration for connection parameters RS 232 RS 485 1 COM The serial com port number COM1 COM32 2 Baud Rate Serial com port baud rate setting 9600 115200 bps default 115200 3 Parity Serial com port parity setting NONE ODD EVEN default NONE 4 Data Bits Serial com port data bits setting Fixed at 8 5 Stop Bits Serial com port stop bits setting 1 2 default 1 Ethernet 1 ...

Page 23: ...ure 3 1 Connection Screen of GW 7238D Utility After finish the connection setting please click Connect button to connect to the GW 7238D module 3 2 2 Main Screen Figure 3 2 GW 7238D Utility Main Screen Menus File 1 Load Configuration Load a previously saved the GW 7238D configuration file ...

Page 24: ...uration shown on the Utility s interface to the GW 7238D module Configuration 1 Connect to GW 7238D Establish a connection with the GW 7238D 2 Device Name The J1939 NAME to be used by the module in address claim messages 3 Disconnect from GW 7238D Disconnect a connection from the GW 7238D Monitor 1 Modbus Monitor the configuration of Modbus register in J1939 Input table and provide decimal and hex...

Page 25: ...scribed as Table 3 1 All modules on the network must use the same baud parity data stop bits configuration Table 3 1 Modbus Configuration Parameters Item Description Range Net ID The ID of the module on the Modbus network All modules on the network must have a unique address 1 99 Baud Rate The network baud rate 9600 115200 Parity The serial communication parity NONE ODD EVEN Data Bits The number o...

Page 26: ... Reset When Can Bus off the module will auto reset the CAN controller Enable Disable PDU1 Check Destination Address Enable Disable to check the destination address in PDU1 mode Enable Disable Swap IO Byte If this option is enabled data in the I O table would be byte swapped on 16 bit boundaries this function is easy reading the J1939 data on Modbus network Enable Disable Auto Transmission Enable o...

Page 27: ...ry Address Capable Industry Group Vehicle System Instance Vehicle System Reserved Function Function Instance ECU Instance Manufacturer Code Identity Number 1 bit 3 bit 4 bit 7 bit 1 bit 8 bit 5 bit 3 bit 11 bit 21 bit Byte 8 Byte 7 Byte 6 Byte 5 Byte 4 Byte 3 Byte 2 Byte 1 J1939 Input Output Table The J1939 Input Output table is used define the content and format of the J1939 messages The Data fro...

Page 28: ...he Modbus master Input data points are associated with data from messages that are received on the J1939 network Output Table The Output table holds data that is written by the Modbus master and will be transmitted on the J1939 network Output data points are associated with data of messages that will be transmitted on the J1939 network Figure 3 6 J1939 Input Output Configuration Table ...

Page 29: ...ter Offset Byte Modbus Output Register Word 0 1 40001 LSB MSB 2 3 40002 LSB MSB 3070 3071 41536 LSB MSB 0 1535 byte Data Length The amount of the data to be transferred between the Modbus I O table and the J1939 message data the length is in bytes 0 1785 byte PGN The J1939 PGN is associated with this data field In Input Table the data from messages received with this PGN will be transferred into t...

Page 30: ...ss is 255 any message with a matching PGN will be accepted 0 253 255 Update Rate In the input table the data will be updated within the configured Update Rate If no update is received within the configured time the module will request the data point s PGN by transmitting a Request PGN to the Source Address If the Update Rate is set to zero the PGN will never be requested In the output table the as...

Page 31: ...ble 4 1 Supported Modbus Function Codes Function Code Function Name Description 3 03 Hex Reading Holding Register Read multiple registers 4xxxx for AO 4 04 Hex Reading Input Register Read multiple input registers 3xxxx for AI 6 06 Hex Preset Single Register Write single register 4xxxx for AO 16 10 Hex Preset Multiple Registers Write multiple registers 4xxxx for AO 4 1 2 Modbus Address Only the are...

Page 32: ...sion of output J1939 messages in the GW 7238D It can use the Modbus functions code 6 06 Hex and 16 10 Hex to change the register Table 4 4 Start Stop the transmission register of J1939 output message Register Description 42009 Dec 7D8 Hex If Value 0 Start the transmission of output J1939 message If Value 1 Stop the transmission of output J1939 message The following register address is defined the ...

Page 33: ...tion specific communications use PDU1 but also the global destination address 255 There are cases where this method will require the utilization of destination specific Parameter Group Numbers for instance in the case of more than one engine A torque message for example must be sent only to the desired engine and not to both Broadcast Communications Broadcast communications use PDU2 and as the nam...

Page 34: ...939 71 Figure 4 1 Example of a parameter group definition of SAE J1939 71 4 2 3 Suspect Parameter Number SPN A Suspect Parameter Number SPN is a number assigned by the SAE to a specific parameter within a parameter group SPN that shares common characteristics are grouped into Parameter Groups PG and they will be transmitted throughout the network using the Parameter Group Number PGN To follow up o...

Page 35: ...rameter Groups and Parameter Group Numbers Figure 4 3 SPN PG and PGN structure 4 2 4 J1939 Message Transmission In the GW 7238D messages are transmitted on the J1939 network according to the J1939 output configuration table Messages are assembled from data in the output table and transmitted on a cyclic time basis Messages are transmitted automatically based on the Update Time parameter in the out...

Page 36: ... 4 2 6 Transport Protocol for Large Messages Transmission and Reception of Large Messages Messages with buffer sizes of 8 bytes or less can be directly sent and received on J1939 However messages with buffer sizes greater than 8 bytes must be fragmented transmitted and reassembled using the J1939 transport protocol Users should reference the J1939 21 specification It provides the description of wh...

Page 37: ...d through the Modbus network for the ECU to the J1939 network Figure 5 1 Network application structure 5 1 Hardware Installation Users may need to make some hardware settings before the application The detailed illustration is as below Step1 Check GW 7238D Firmware Mode In operation mode users can use the Modbus Master command to send and receive J1939 messages via the GW 7238D Users need to set t...

Page 38: ...r 1 0 Nov 2011 38 Figure 5 2 Operation mode Position of Dip Switch Step2 J1939 network CAN bus connection Connect the CAN ports with the GW 7238D modules and ECU e g engine in J1939 network using the following structure as Figure 5 3 Figure 5 3 CAN bus Wire Connection ...

Page 39: ...thernet and Power port connections Figure 5 4 COM Ethernet and Power port connections of GW 7238D Step3 Power port connection Connect the power supply to the GW 7238D module s power terminal connecter please see as Figure 5 4 Step5 Connect to GW 7238D When in the first connection the controller may run the Serial network at 115200 baud with none parity 1 stop bit and 1 Net ID or run the Ethernet n...

Page 40: ...n parameters or be on the same subnet via Ethernet communication of the Modbus network configuration The Modbus network configuration screen from the GW 7238D is shown as Figure 5 6 Figure 5 6 Modbus configuration screen 5 2 2 J1939 Network Configuration The device NAME should be set according to the application and the vendor where the module is being used based on the J1939 network specification...

Page 41: ... been enabled the data will be in the right byte orientation when accessing it via Modbus The Network Address list is set to 1 5 2 3 J1939 I O Configuration The following figure is a PGN definition about Electronic Transmission Controller when users want to receive the Transmission Output Shaft Speed from the transmission and send the Transmission Input Shaft Speed to the transmission via the GW 7...

Page 42: ...MODBUS MODBUS Address Dec Send Input Shaft Speed 61442 Dec F002 Hex 2 5 0 40001 Receive Output Shaft Speed 61442 Dec F002 Hex 2 1 0 30001 Note PGN Data Length Byte Oder in J1939 Data Field Transmission manufacturers provide the information required Byte Order in MODBUS User defined Modbus address Figure 5 9 J1939 configuration screen Byte Order In Modbus Data Length Byte PGN Dec Priority ECU s J19...

Page 43: ...rameter to the GW 7238D After the previous parameter settings users need to upload the parameters to the GW 7238D Please refer to the following figure to finish the operation Figure 5 10 Parameter upload screen Figure 5 11 Confirm Parameter upload screen Figure 5 12 Parameter upload successful screen ...

Page 44: ... Reference number Byte 4 5 Word count Byte 6 Byte count B 2 x word count Byte 7 B 6 Register values Byte B 7 B 8 Value for the CRC calculation Response Response from the GW 7238D Byte 0 Net ID Station number Byte 1 FC 10 Hex Byte 2 3 Reference number Byte 4 5 Word count Byte 6 7 Value for the CRC calculation Example In the address 40001 write the value in 0x1234 Request Command Byte0 Byte1 Byten H...

Page 45: ...ence number Byte 4 5 Word count Byte 6 7 Value for the CRC calculation Response Response from the GW 7238D Byte 0 Net ID Station number Byte 1 FC 04 Byte 2 Byte count of response B 2 x word count Byte 3 B 2 Register values Byte B 3 B 4 Value for the CRC calculation Example Read a value of one word in the address 30001 Request Byte0 Byte1 Byten Hex 01 04 00 00 00 01 31 CA GW 7238D responds a value ...

Page 46: ...te 0 Net ID Station number Byte 1 FC 06 Hex Byte 2 3 Reference number Byte 4 5 Register value Byte 6 7 Value for the CRC calculation Example Start sending J1939 output message In the address 42009 write the value in 0x00 Request Command Byte0 Byte1 Byten Hex 01 06 07 D8 00 00 08 85 GW 7238D responds the register value Response Byte0 Byte1 Byten Hex 01 06 07 D8 00 00 08 85 Example Stop sending J193...

Page 47: ...4xxxx for AO Request Request by Modbus master device Byte 0 1 Transaction Identifier Usually zero when making a request Byte 2 3 Protocol Identifier Protocol number Must be zero Byte 4 5 Length Number of following bytes upper lower byte Byte 7 Net ID Station number Byte 8 FC 10 Hex Byte 9 10 Reference number Byte 11 12 Word count Byte 13 Byte count B 2 x word count Byte 14 B 13 Register values Res...

Page 48: ...01 10 00 00 00 01 Get J1939 input data Using the Modbus command as below FC4 Read multiple input registers 3xxxx for AI Request Request by Modbus master device Byte 0 1 Transaction Identifier Usually zero when making a request Byte 2 3 Protocol Identifier Protocol number Must be zero Byte 4 5 Length Number of following bytes upper lower byte Byte 6 Net ID Station number Byte 7 FC 04 Byte 8 9 Refer...

Page 49: ...te0 Byte1 Byten Hex 00 00 00 00 00 05 01 04 02 12 34 Start or Stop sending J1939 output message Using the Modbus command as below FC6 Write single register 4xxxx for AO Request Request by Modbus master device Byte 0 1 Transaction Identifier Usually zero when making a request Byte 2 3 Protocol Identifier Protocol number Must be zero Byte 4 5 Length Number of following bytes upper lower byte Byte 6 ...

Page 50: ...06 07 D8 00 00 GW 7238D responds the register value Response Byte0 Byte1 Byten Hex 00 00 00 00 00 06 01 06 07 D8 00 00 Example Stop sending J1939 output message In the address 42009 write the value in 0x01 Request Command Byte0 Byte1 Byten Hex 00 00 00 00 00 06 01 06 07 D8 00 01 GW 7238D responds the register value Response Byte0 Byte1 Byten Hex 00 00 00 00 00 06 01 06 07 D8 00 01 Or Without have ...

Page 51: ...8D Utility 4 Can not transmit the output J1939 message 1 Make sure the Start Stop sending J1939 output message register 42009 is 0x00 2 Make sure the Update Rate of J1939 output message table is not zero 5 How to restore factory default 1 Power on the GW 7238D 2 Change the Dip Switch position of the GW 7238D and to complete the following steps in 5 seconds Step1 From Normal to Init position Step2 ...

Page 52: ...eset the power of the GW 7238D and the GW 7238D would back to factory defaults 6 Reconnect the GW 7238D by using the serial network setting as 115200 baud with none parity 1 stop bit and 1 Net ID or run the Ethernet network and set on the same subnet to connect via IP address 192 168 255 1 ...

Reviews: