background image

i

CR 3600

TM

– Service Manual

8.8

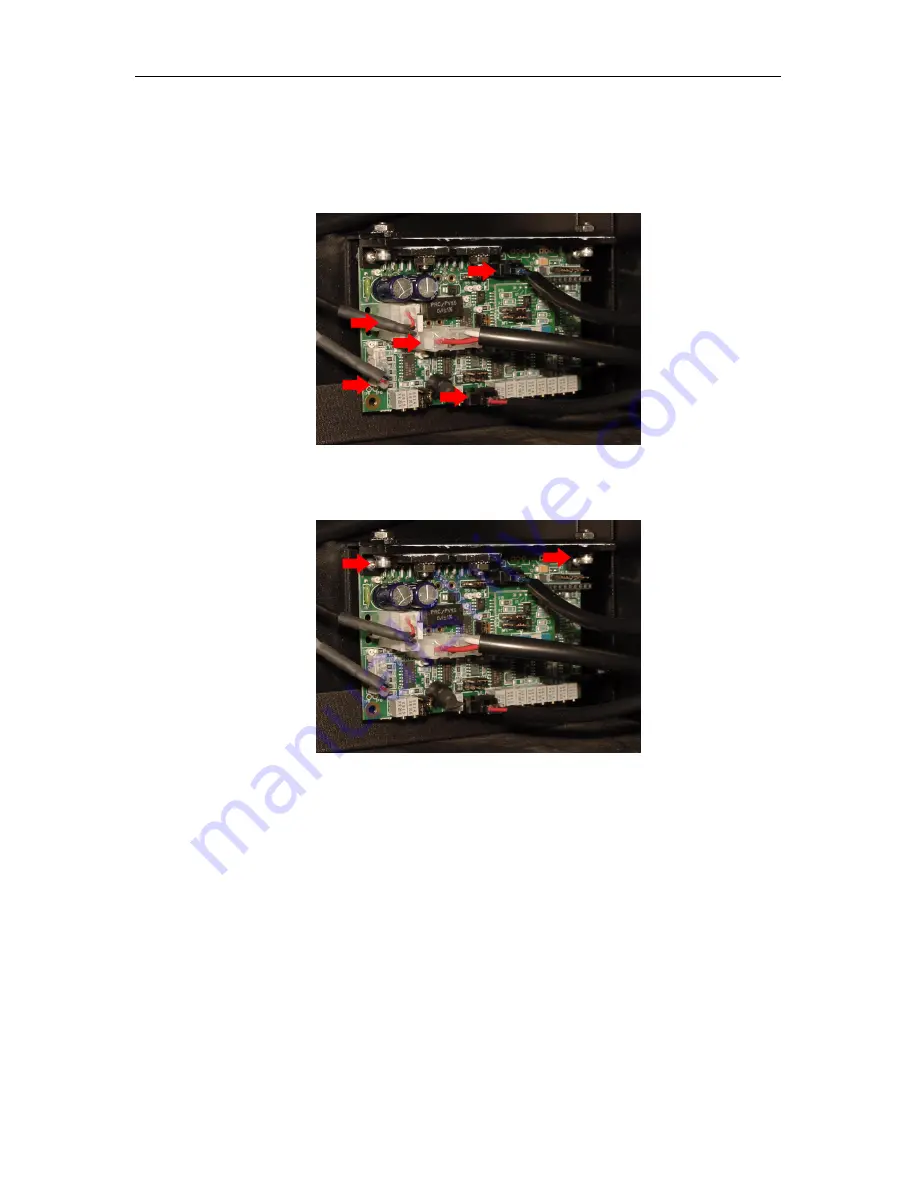
Replacing the Galvo Controller Board

1. Remove the module from the case, as covered in Section 8.5 on page 48.

2. Remove the connectors from the board.

3. Remove two (2) Allen bolts and nuts.

4. Remove two (2) screws and nuts.

5. Remove the Galvo Controller board from the CR unit.

6. Replace the Galvo Controller board, then reassemble the CR unit in the reverse order

from taking it apart.

8.9

Replacing the Power Distribution Board

1. Remove the module from the case, as covered in Section 8.5 on page 48.

2. Remove all of the connectors from the Power Distribution board (cut the zip ties

holding the cables in place if necessary).

c

2007-2009

Confidential and Proprietary
Property of

i

CRco, Inc.

54 of 61

Document # 3600-02A Rev C

March 22, 2010

Summary of Contents for iCR 3600

Page 1: ...iCR3600 SERVICE MANUAL ...

Page 2: ...R Chiro R iCR Chiro Dual R iCR 3600 R iCR 3600SF R iCR VERTX R iDR R www icrcompany com and QPC XSCAN32 are the trademarks of iCRco All other trademarks are the property of their respective owners and are hereby acknowledged Terms Any one of the following iCR products will be referred to as the CR unit throughout this document iCR 1000 R iCR 1000 Dual R iCR 2600 R iCR 2600 Dual R iCR 2600SF R iCR ...

Page 3: ...rcompany com iCRco Inc Europe Address 31a Ridlerstrasse 80339 Munich Germany Phone 49 89 2555 757 150 Email info icrcompany com Web http www icrcompany com iCR 3600 Information Please Enter the details of the iCR 3600 system here Serial Number Date Purchased Interface Type USB 2 0 c 2007 2009 Confidential and Proprietary Property of iCRco Inc ii of 61 Document 3600 02A Rev C March 22 2010 ...

Page 4: ...ed to the most extreme situations WARNING A WARNING indicates a potentially hazardous situation which if not avoided could result in death or serious injury CAUTION A CAUTION indicates a potentially hazardous situation which if not avoided may result in minor or moderate injury It may also be used to alert against unsafe practices Note A NOTE indicates important information that helps you make bet...

Page 5: ...rtified by iCRco Inc Do not connect the iCR 3600 with a damaged or sub standard power cable Do not use an extension cord with this device The iCR 3600 should be properly grounded and power connections inspected to ensure safe operation Use at least a 1300VA 780W uninterruptible power supply UPS with this device as it is sensitive to variations in power Malfunctioning Equipment If any iCRco product...

Page 6: ...nd those directly to the public low voltage pwoer supply network that supplies buildings used for domestic purposes Harmonic emissions IEC 61000 3 2 Class B Voltage fluctu ations flicker emissions IEC 61000 3 3 Complies Table 2 Electromagnetic Immunity Immunity Test IEC 60601 Test Level Compliance Level Electromagnetic Environment Guidance Electrostatic discharge ESD IEC 61000 4 2 2 4 6 kV Contact...

Page 7: ...cle 40 UT 60 dip in UT for 5 cycles 70 UT 30 dip in UT for 25 cycles 5 UT 95 dip in UT for 5 sec Mains power quality should be that of a typical commercial or hospital environment If the user of the iCR 3600 requires continued operation during power mains interruptions it is recommended that the iCR 3600 be powered from an uninterruptible pwoer supply or a battery Power frequency 50 60Hz magnetic ...

Page 8: ...z where P is the maximum output power rating of the transmitter in watts W according to the transmitter manufacturer and d is the recommended separation distance in meters m Field strengths from fixed RF transmitters as determined by an electromagnetic site surveya should be less than the compliance level in each frequency rangeb Interference may occur in the vicinity of equipment marked with the ...

Page 9: ... to new products manufactured by or for iCRco and originally purchased from iCRco or an authorized dealer of iCRco products for your own use In addition an extended warranty is available for most new and recently purchased iCRco products for an additional charge Hardware Limited Warranty iCRco warrants its hardware products to be free of defects in materials and workmanship for a period of one 1 y...

Page 10: ...gin software GoToMeeting only if the customer has access to the Internet from that PC and only if the customer agrees iCRco shall have no liability in connection with its support efforts Remote login software allows iCRco technical support to remotely access the customer s PC via the Internet for the purposes of rendering technical support Please note that this warranty including software support ...

Page 11: ...ging or damaged during shipping Additional Warranty Limitations and Extent of Warranty This warranty does not apply if the product has been damaged by accident misuse or abuse In addition warranty service does not include the repair of failures or defects caused by unauthorized attachments to any iCRco product unsuitable physical or operating environment maintenance or repair by anyone other than ...

Page 12: ...TAL DAMAGES including but not limited to damages related to the loss of use loss of recorded product the installation of replacement product or any inspection testing or redesign caused by any defect or by the repair or replacement of any product arising from a defect in any product This exclusion of damages applies even if the customer advises iCRco or an iCRco dealer of the possiblity of such da...

Page 13: ...International Power Cable 6 3 3 USB 2 0 Cable Installation 6 3 4 Computer Mounting Bracket 6 3 5 Wall Mounting Plates 8 4 Software Installation 10 4 1 USB Driver Installation 10 4 2 Installing QPC XSCAN32 10 5 System Operation 13 5 1 Power Up 13 5 2 Cassette Handling 13 5 2 1 Overview 13 5 2 2 Weight Force Applied to Cassette 13 5 2 3 Cassette Storage 13 5 2 4 Cassette Contamination 14 5 3 Cassett...

Page 14: ... Lines 30 7 3 3 Horizontal Lines in Image 30 7 3 4 Banding Top Bottom 17 Length 31 7 3 5 Up side Down Cassette 32 7 3 6 Grid Lines Moire Effect 32 7 3 7 Eraser Offset 33 7 3 8 Image Jitter 34 7 3 9 Over Exposure 34 7 3 10 Random Imaging Shifting 35 7 4 Hardware Symptoms 35 7 4 1 Failure to Initialize USB 35 7 4 2 No Motor Movement 36 7 4 3 Clicking Noise Returning to Home 37 7 4 4 Not Finding Home...

Page 15: ...r Supply 52 8 8 Replacing the Galvo Controller Board 54 8 9 Replacing the Power Distribution Board 54 8 10 Cleaning the Fan Filter 55 8 11 Cleaning the Mirrors 56 8 12 Checking the Fuses 57 8 12 1 Power Fuses 57 8 12 2 Power Distribution Board Fuses 58 8 13 Changing the Brushes 59 8 13 1 Caterpillar Brush 59 8 13 2 Brush Bar Brushes 60 c 2007 2009 Confidential and Proprietary Property of iCRco Inc...

Page 16: ...hat is converted to a DICOM 3 0 image and can be stored viewed manipulated and sent to any other storage device printer or viewing station through DICOM This document contains a basic technical overview of the CR unit including the optical systems electronic components and driving software subsystems A general description of the systems functionality and user interfaces will be described Unpacking...

Page 17: ...nstallation of the iCR 3600 near high magnetic fields may cause the iCR 3600 to malfunction The iCR 3600 should not be placed in a room with an MRI CT or any other equipment that produces high magnetic fields The room should have good ventilation Another factor to consider prior to installing the iCR 3600 is dust and particulates in the environment The iCR 3600 is designed to be resistant to dust ...

Page 18: ... iCR 3600requires a stable operating environment It is important the system is placed on a table stand or wall mount that provides adequate support 2 7 System Specifications Power Requirements Domestic 100 to 120V 50 60Hz 3 5A International 220 to 240V 50 60Hz 1 75A Temperature Conditions 32 to 105 F 0 to 40 C operating 0 to 150 F 18 to 65 C non operating Humidity 15 to 95 non condensing Pixels pe...

Page 19: ... 65 535 shades of gray Interface USB 2 0 Dimensions iCR 3600 10W x 22H x 44L inches Vibration Acceleration 3 4G Max in shipping Altitude 0 to 9 500 ft operating Weight iCR 3600 78 lbs c 2007 2009 Confidential and Proprietary Property of iCRco Inc 4 of 61 Document 3600 02A Rev C March 22 2010 ...

Page 20: ...may result in injury or damage to the unit 4 Store the box and any foam inserts somewhere safe dry so that if the iCR 3600 needs to be shipped again there are packing materials available 3 2 Installing Power Cable 1 Plug the power cable for the iCR 3600into the power switch unit 2 Plug the other end of the power switch cord into the UPS 3 Make sure the UPS is not in bypass mode 4 Plug the UPS into...

Page 21: ... USB B end of the cable end to the CR unit s USB 2 0 port 3 Plug the USB A end of the cable end into a free USB 2 0 port on the computer 3 4 Computer Mounting Bracket 1 Attach the Back Computer Mounting bracket to the Computer Mounting Bracket using four 4 6 32 x 1 4 flathead screws Figure 3 1 Figure 3 1 2 Align the computer mounting bracket on the back of the cassette tray 3 Once the screw holes ...

Page 22: ...he drive opens towards the outside of the unit Figure 3 3 5 Fasten the computer to the mounting bracket using one 1 8 32 x 3 8 truss head screws and 10 flat washer The computer s security tab should be in between the washer and the mounting bracket Figure 3 4 c 2007 2009 Confidential and Proprietary Property of iCRco Inc 7 of 61 Document 3600 02A Rev C March 22 2010 ...

Page 23: ...anual Figure 3 4 3 5 Wall Mounting Plates Notice Wall mounting plates must be installed by a licensed contractor c 2007 2009 Confidential and Proprietary Property of iCRco Inc 8 of 61 Document 3600 02A Rev C March 22 2010 ...

Page 24: ...truss head screws CAUTION Always practice proper heavy lifting procedures Improper lifting may cause injury 3 With at least two people lift the CR unit onto the large wall mounting plate so that the bottom of the small wall mounting plate rests in the top notch of the large wall mounting plate 4 Secure the bottom of the CR unit to the bottom of the large wall mounting plate with two 2 10 32 x 3 4 ...

Page 25: ...dy installed on your computer and it is running while you are trying to install the new version an error will appear in the install process Please close QPC XSCAN32 and reinstall the new version 1 Insert the media containing the QPC XSCAN32 installer into the computer Navigate to the QPC XSCAN32 folder 2 Launch the QPC XSCAN32 installer by double clicking Setup exe 3 Click Next at the welcome scre...

Page 26: ...ct Scanning Station or Reading Station depend on the use then click Next to con tinue 7 Select the appropriate modality then click Next to continue 8 Select the appropriate CR hardware profile then click Next to continue c 2007 2009 Confidential and Proprietary Property of iCRco Inc 11 of 61 Document 3600 02A Rev C March 22 2010 ...

Page 27: ... Folder name should be set to QPC XSCAN32 then click Next 11 QPC XSCAN32 will begin to install Be patient while XSCAN32 installs 12 Click Finish to complete the installation of QPC XSCAN32 The installer will exit c 2007 2009 Confidential and Proprietary Property of iCRco Inc 12 of 61 Document 3600 02A Rev C March 22 2010 ...

Page 28: ...in such a way that nothing touches the plate during the scanning or handling process 5 2 2 Weight Force Applied to Cassette Apply only minimal weight and or force to the cassette for example do not have a patient stand on the cassette for weight bearing views Use a weight bearing cap when necessary WARNING Excessive weight force may damage the cassette and may cause the CR unit to malfunction Do n...

Page 29: ...Loading 1 Before loading the cassette orient it properly with the blue side of the cassette facing towards the operator with the arrows pointing upwards 2 Locate the proper sized guide lines on the bezel of the CR unit 3 At an angle load the cassette bottom first into the scan bar CAUTION Do not use excessive force when loading the cassette The cassette will not fit if the orientation is incorrect...

Page 30: ...ge WARNING This equipment employs a laser Laser radiation may be present if the CR unit is operated without the covers in place Avoid the laser beam Direct eye exposure to laser light must be avoided Note The instructions in this section represent a typical CR workflow Every workflow varies in process c 2007 2009 Confidential and Proprietary Property of iCRco Inc 15 of 61 Document 3600 02A Rev C M...

Page 31: ...ection 5 3 3 Open QPC XSCAN32 4 Create or edit patient profile To do this click New or Edit respectively 5 If creating a new patient enter the relevant patient info or if editing a patient change the information accordingly then click Save and View 6 Click on Scan to bring up the Quality Processing Center Scan dialog if it is a patient with no images the scan dialog will automatically appear 7 The...

Page 32: ... start the scan 10 The preview window will display the image as it is scanning Once it has finished scanning it will automatically import the image into QPC XSCAN32 11 Open the scanned image by double clicking on the thumbnail 12 Rotate Flip to correct orientation using the Rotate and Flip buttons in the main tool bar c 2007 2009 Confidential and Proprietary Property of iCRco Inc 17 of 61 Document...

Page 33: ...sing ICE or ICE2 located in the Image Processing dialog 15 Window Level the image using the Window Level or Smart Box tools 16 Accept and Save the image to save the processing and W L settings by clicking the Save and Accept button in the upper left hand corner of the image c 2007 2009 Confidential and Proprietary Property of iCRco Inc 18 of 61 Document 3600 02A Rev C March 22 2010 ...

Page 34: ...own and left mouse click to select multiple patients 18 After selecting the patient s click the DICOM Send button 19 The DICOM Targets window will appear choose the desired target then click OK 20 The results of the DICOM Send will appear in the DICOM Controller window s Event log c 2007 2009 Confidential and Proprietary Property of iCRco Inc 19 of 61 Document 3600 02A Rev C March 22 2010 ...

Page 35: ... Resolution Quarterly Perform Exposure Index calibration Yearly 5 6 Periodic Cleaning Periodic cleaning of iCRco products should be done on a monthly basis 5 6 1 Cleaning the Outside of the iCR 3600 Note It is important that the covers remain on the iCR 3600 at all times The covers should only be removed for service by an iCRco authorized technician then immediately replaced CAUTION Do not clean t...

Page 36: ... the carbon fiber door from the cassette 2 Examine the imaging plate for dust or particulates 3 Using iCRco plate cleaner apply the plate cleaner to a clean lint free cloth Note If iCRco Plate Cleaner is not available please contact Technical Support at 1 310 921 9559 to obtain more 4 Gently wipe down the imaging plate with the clean lint free cloth 5 Allow the plate to air dry before sliding the ...

Page 37: ...across the plate and data is captured at a given rate Each sample is reassembled to create an image The capture sampling rate can be modified to create images with resolutions from 100 microns 250 DPI to 200 microns 120 DPI The unit can scan images up to 14 x 17 The laser spot focused to 50 microns is moved back and forth across an imaging plate as the plate is moved through the CR unit The result...

Page 38: ...er tubes by blue glass filters The collected blue light is detected by photomultiplier tubes which convert the photons into a signal This signal is then logarithmically amplified corrected for spatial variations in the system sensitivity across the width of the screen and then digitized by an A D converter 6 2 2 Galvonometer Board The Galvo Servo board contains a feedback amplifier that results in...

Page 39: ...erated by the PMT sensors and transmitted to the computer through a USBII interface cable A trigger signal generated by the laser spot is transmitted to the PMT board to trigger a line capture Image is assembled from lines of captured data that is held in registers and translated into a 16 bit raw source file There is no way to pause the data capture process Cancel will cause the machine to stop a...

Page 40: ...interface between the PMT receiving the stimulated light from the collection chamber The amplifier serves as a current to voltage converter and a log amplifier c 2007 2009 Confidential and Proprietary Property of iCRco Inc 25 of 61 Document 3600 02A Rev C March 22 2010 ...

Page 41: ...y lack of periodic maintenance and cleaning If a system is known to be behind schedule for its maintenance and cleaning at the time of the failure it is a good practice to clean and re calibrate the system before extensive troubleshooting In many cases this solves the problem or provides clues as to the cause WARNING This equipment is operated with hazardous voltages which can shock burn or cause ...

Page 42: ...he Cassette out of the unit and close the bay door 2 Open QPC XSCAN32 access the Scan interface then click the Settings button on the Scan interface 3 Enter the password earl in the dialog box 4 Click on the FOCUS tool Button along the bottom edge of the settings window 5 A new window will come up indicating the settings for the FOCUS tool Use the standard settings in the focus tool Click OK in th...

Page 43: ...become sinusoidal Wavy and move away from the zero point What can we see by looking at the digital output of the iCR 3600 1 The unit must be capturing data because there is data being captured by the PC 2 The Laser is working because the laser moving past a start scan sensor tells the unit to start capturing data 3 The Start Scan sensor is working 4 The Galvanometer is working swinging the laser b...

Page 44: ...on This indicates that the unit is not transmitting data to the PC Please see Section 7 5 for more information 7 3 Image Symptoms 7 3 1 Lint in the Scan Path Symptom Sharp white lines usually only a pixel or two in width and spanning the length of the entire image Cause Lint or other particulate matter in the scan slot Solution See Section 8 3 for instructions on accessing the scan slot Once the u...

Page 45: ... Cause Dust or lint on the mirrors Solution To clean the mirrors please see Section 8 11 for instructions 7 3 3 Horizontal Lines in Image Symptom Horizontal lines in Images Cause Bump in motion path c 2007 2009 Confidential and Proprietary Property of iCRco Inc 30 of 61 Document 3600 02A Rev C March 22 2010 ...

Page 46: ...chnical Support 7 3 4 Banding Top Bottom 17 Length Symptom Horizontal line in image Cause Unstable power supply Excessive ambient light Bad PMT board PMT sensor Bad Galvo Solution 1 Ensure that the CR unit is powered via a UPS Ensure the UPS is not in bypass mode 2 Ensure that the ambient room light is no more than 2EV Turning off or dimming the room light should be adequate 3 Unplug the network c...

Page 47: ...irst ensure that the cassette is erased then re expose the cassette with the carbon fiber side facing up then re scan 7 3 6 Grid Lines Moire Effect Symptom Grid lines Moire Effect Cause A grid with the wrong LPI or a misoriented cassette under the grid c 2007 2009 Confidential and Proprietary Property of iCRco Inc 32 of 61 Document 3600 02A Rev C March 22 2010 ...

Page 48: ...Solution 1 Open XSCAN32 2 Create edit a patient then click Save View 3 Click the Scan button if it is a patient with no images the Scan interface will auto matically open 4 Click the Settings button then enter the password earl case sensitive 5 Locate the setting for Eraser Offset 6 The user may need to adjust this setting several times before achieving the desired result Expose a couple of casset...

Page 49: ...re not serviceable in the field Please contact Technical Support for assistance with image jitter 7 3 9 Over Exposure Symptom Lines in images images look more translucent the images lack the proper contrast and density Cause Over exposure c 2007 2009 Confidential and Proprietary Property of iCRco Inc 34 of 61 Document 3600 02A Rev C March 22 2010 ...

Page 50: ...puter Make sure there are no visible cuts freys or other damage Move the USB 2 0 cable to a different USB port on the computer If the problem persists try swapping out the USB 2 0 cable for a new one 7 4 Hardware Symptoms 7 4 1 Failure to Initialize USB The Failure to Initalize USB error can be caused by several issues 1 Make sure the CR unit is powered on 2 Make sure the USB cable is firmly conne...

Page 51: ...device drivers please contact Technical Support 7 4 2 No Motor Movement Symptom When initiating a scan from the software interface no sound is heard from the CR unit Cause Bad fuses motor controller cable or motor Solution 1 Check the fuses as cover in Section 8 12 2 If the fuses are not at fault remove the back cover as covered in Section 8 2 and check that connectors J1 J2 J3 J4 J5 and J7 are fi...

Page 52: ...Check fuses as cover in Section 8 12 Check the Power Distribution board Move sensor 7 4 5 Motor Gear Slide Lines Symptom Noises while scanning Cause Bad slide misaligned motor gear Solution Listen for noises while making a test scan Leave the bay door open and watch the cassette to see if it bumps or shifts during the scan If this is the case the unit will either need to be realigned or have the s...

Page 53: ...city then decrease the current number by five 7 5 Error Message No Data Acquired 7 5 1 Failure Analysis 1 1 When turning on the CR see if there is a pop up message in the lower right hand corner of the Windows task bar stating This USB device can perform faster if it is connected to a hi speed USB 2 0 port If so make sure the CR is plugged into a USB 2 0 port Some older PCs only have USB 1 0 or 1 ...

Page 54: ...home position see if the laser turns on full beam from top to bottom The laser beam must also overlap the trigger board behind the long mirror if the laser does not turn on check if the galvo mirror oscillates if the galvo is on and the laser is not wiggle the cable coming from the laser body to see if the laser turns on follow the cable to the laser connector on the PMT board and make sure it is ...

Page 55: ...exit and the CR unit should be returned to the factory for repair Bad Power Distribution board or cabling Bad 24V Power Supply or cabling Bad Quad Power Supply or cabling If a fix has not been accomplished by this point the machine should be returned to the factory for repair 6 Turn the slide motor shaft by hand until the slide is observed to be well away from the HOME position Checks 1 If the Era...

Page 56: ...f the laser beam is not observed to OVERLAP the Trigger board STOP Possible failures Galvo AMP setting too low try increasing AMP setting Bad PMT board or cabling Bad Galvanometer Controller or cabling Beam may require re alignment This alignment is accomplished by galvo adjustment and is beyond the scope of this failure analysis Please contact Technical Support for further assistance If a fix has...

Page 57: ...he feet 4 Remove four 4 6 32 x 3 8 flathead screws from the front cover 5 Slide the top cover back then lift the cover off 6 Slide the door to the open position 7 There is a plastic release latch on the underside of the door Squeeze the latch towards the feet of the unit to release the door from the door slide then slide the rail back c 2007 2009 Confidential and Proprietary Property of iCRco Inc ...

Page 58: ...dercut screws from the back cover 3 Gently pull the back cover away from the CR unit 8 3 Accessing the Scan Slot 1 Make sure the CR unit is powered off Remove the power cord from the unit 2 Orient the CR unit on its back 3 Remove four 4 10 32 x 1 2 truss head screws from the feet c 2007 2009 Confidential and Proprietary Property of iCRco Inc 43 of 61 Document 3600 02A Rev C March 22 2010 ...

Page 59: ...lide the door to the open position 7 There is a plastic release latch on the underside of the door Squeeze the latch towards the feet of the unit to release the door from the door slide then slide the rail back removing it from the door c 2007 2009 Confidential and Proprietary Property of iCRco Inc 44 of 61 Document 3600 02A Rev C March 22 2010 ...

Page 60: ...ve two 2 6 32 x 1 4 two 2 6 32 x 1 truss head from the brush bar cover 9 The scan slot is located under the brush bar cover c 2007 2009 Confidential and Proprietary Property of iCRco Inc 45 of 61 Document 3600 02A Rev C March 22 2010 ...

Page 61: ...ine 9 6 32 x 3 8 flathead undercut screws from the back cover 3 Gently pull the back cover away from the CR unit 4 Remove two 2 6 32 x 1 4 truss head and eight 8 4 40 x 3 8 lock washer and panhead screws from the back optical cover c 2007 2009 Confidential and Proprietary Property of iCRco Inc 46 of 61 Document 3600 02A Rev C March 22 2010 ...

Page 62: ...ors from the PMT board 6 Remove six 6 4 40 x 1 2 screws from the PMT board 7 Ease the PMT board from the PMT Tube contacts 8 The PMT board is now free and can be removed c 2007 2009 Confidential and Proprietary Property of iCRco Inc 47 of 61 Document 3600 02A Rev C March 22 2010 ...

Page 63: ...ector from its external connection the power switch plugs from the main power supply and the eraser power supply and the external fan power plug 4 Orient the CR unit on its back 5 Remove four 4 10 32 x 1 2 truss head screws from the feet 6 Remove four 4 6 32 x 3 8 flathead screws from the front cover 7 Slide the top cover back then lift the cover off c 2007 2009 Confidential and Proprietary Proper...

Page 64: ...r Squeeze the latch towards the feet of the unit to release the door from the door slide then slide the rail back removing it from the door 10 Remove two 2 6 32 x 1 4 two 2 6 32 x 1 truss head from the brush bar cover c 2007 2009 Confidential and Proprietary Property of iCRco Inc 49 of 61 Document 3600 02A Rev C March 22 2010 ...

Page 65: ...10 32 x 1 2 screws from the chasis 13 With two 2 or more people lift the module out of the outer shell 8 6 Replacing the Motor Controller Board 1 Remove the module from the case as covered in Section 8 5 on page 48 c 2007 2009 Confidential and Proprietary Property of iCRco Inc 50 of 61 Document 3600 02A Rev C March 22 2010 ...

Page 66: ...otor Controller board 3 Remove the phone cord from the Motor Controller board 4 Using a pair of needle nose pliers pinch each of the four 4 fasteners freeing the Motor Controller board c 2007 2009 Confidential and Proprietary Property of iCRco Inc 51 of 61 Document 3600 02A Rev C March 22 2010 ...

Page 67: ...assemble the CR unit in the reverse order from taking it apart 8 7 Replacing the Main Power Supply 1 Remove the module from the case as covered in Section 8 5 on page 48 2 Unplug the power connectors from the board c 2007 2009 Confidential and Proprietary Property of iCRco Inc 52 of 61 Document 3600 02A Rev C March 22 2010 ...

Page 68: ...n Power Supply 4 Remove the Main Power Supply from the CR unit 5 Replace the Main Power Supply then reassemble the CR unit in the reverse order from taking it apart c 2007 2009 Confidential and Proprietary Property of iCRco Inc 53 of 61 Document 3600 02A Rev C March 22 2010 ...

Page 69: ...board from the CR unit 6 Replace the Galvo Controller board then reassemble the CR unit in the reverse order from taking it apart 8 9 Replacing the Power Distribution Board 1 Remove the module from the case as covered in Section 8 5 on page 48 2 Remove all of the connectors from the Power Distribution board cut the zip ties holding the cables in place if necessary c 2007 2009 Confidential and Prop...

Page 70: ... Power Distribution board then reassemble the CR unit in the reverse order from taking it apart 8 10 Cleaning the Fan Filter 1 With a small flathead screwdriver gently pry the fan filter housing away from the machine It should pop off with minimal force 2 Remove the fan filter c 2007 2009 Confidential and Proprietary Property of iCRco Inc 55 of 61 Document 3600 02A Rev C March 22 2010 ...

Page 71: ...R unit is powered off Remove the power cord from the unit 2 Remove the back cover as covered in Section 8 2 3 Remove two 2 6 32 x 1 4 truss head and eight 8 4 40 x 3 8 lock washer and panhead screws from the back optical cover 4 Locate the mirrors c 2007 2009 Confidential and Proprietary Property of iCRco Inc 56 of 61 Document 3600 02A Rev C March 22 2010 ...

Page 72: ...ight to make sure that there are no dust particles or smearing residue on mirrors 8 12 Checking the Fuses 8 12 1 Power Fuses 1 Make sure the CR unit is powered off Remove the power cord from the unit 2 With a small screwdriver gently pry off the protective flap 3 Gently removed the fuse housing c 2007 2009 Confidential and Proprietary Property of iCRco Inc 57 of 61 Document 3600 02A Rev C March 22...

Page 73: ...on Board Fuses 1 Make sure the CR unit is powered off Remove the power cord from the unit 2 Remove the front cover as covered in Section 8 1 3 There are five fuses located on the power distribution board Remove check them c 2007 2009 Confidential and Proprietary Property of iCRco Inc 58 of 61 Document 3600 02A Rev C March 22 2010 ...

Page 74: ...wo 2 6 32 x 1 4 two 2 6 32 x 1 truss head from the brush bar cover 4 Apply masking tape over the scan slot to minimize dust entry 5 The user now has access to the Caterpillar and Brush Bar Brushes 8 13 1 Caterpillar Brush The Caterpillar brush is located next to the eraser lights c 2007 2009 Confidential and Proprietary Property of iCRco Inc 59 of 61 Document 3600 02A Rev C March 22 2010 ...

Page 75: ...r 4 Using a finger rub away any extra adhesive from the light bar 5 Remove the double sided tape from the new Caterpillar Brush 6 Apply the new Caterpillar Brush in the same position as the old one Ensure that the brush goes on smooth as bumps in the brush may cause cassette bumps 8 13 2 Brush Bar Brushes The Brush Bar Brushes are located on the back side of the brush bar c 2007 2009 Confidential ...

Page 76: ...any stray brush hairs from the new brush using a razor blade 4 Slide the new brush into the holder 5 Apply a dab of E 6000 Goop UHU or equivalent clear gel glue non silicone adhe sive to the non bent side of the brush 6 Screw the brush holder back into the Brush Bar c 2007 2009 Confidential and Proprietary Property of iCRco Inc 61 of 61 Document 3600 02A Rev C March 22 2010 ...

Reviews: