background image


20 

ELT-KLES 

EliteSuite Eclipse LED Keypad 

User Manual | February 2014


Messages 

The EliteSuite system message handling capabilities to allow communication with a property or facility manager.   

When a new message has been sent to your system, it is announced by an audible tone and the ENTER key will 
begin flashing. It is up to you to then contact the property manager for further communication. 

1.


To clear the Message LED, log in to the Setup menu and press [MENU], 2, 

2.


To choose another menu option press the MENU key, or to exit press the CLEAR key. 


Panic Alarm 

The EliteSuite system can provide three panic alarms that immediately generate an alarm after simultaneously 
pressing and holding two specific buttons for three seconds. Based on your needs, these panic alarms can 
generate audible alarms (sirens or bells) or silent alarms and can communicate specific messages to your 
monitoring station or property manager. 


Press and hold keys [1] and [3] for the panic alarm. 


Press and hold keys [4] and [6] for a medical alarm. 


Press and hold keys [7] and [9] for a fire alarm. 


i


All Panic Alarm activations must be enabled by your property manager or installation company.   


Fire Alarm 

When a fire alarm occurs, the keypad will emit three audible tones at 2 second intervals until reset by entering a 
valid user code. If the zone is a delay fire zone, there is a delay of thirty seconds before the system contacts the 
security company or property manager. 

A delayed fire zone will prevent unnecessary reporting of false alarms allowing you to reset the fire alarm before 
a report is sent. If there is no fire condition, contact your property manager or security company immediately to 
avoid an unnecessary response. 

A delayed fire zone will automatically cancel if the smoke detector is reset within 30 seconds. Pressing any key 
on the keypad during the first 30 seconds will silence the alarm for 90 seconds. 


i


Fire Alarm functions must be enabled by your property manager or installation company. 


Summary of Contents for EliteSuite ELT-KLES

Page 1: ...ELT KLES EliteSuite Eclipse LED Keypad User Manual...

Page 2: ...d photocopied or transmitted in any form or by any means electronic or mechanical for any purpose without the express written permission of Integrated Control Technology Limited Designed and manufactu...

Page 3: ..._____________________________________________ 11 User Codes __________________________________________________________________ 12 Master Code___________________________________________________________...

Page 4: ...Chime Zones ________________________________________________________________________ 19 Selecting Chime Zones _____________________________________________________________ 19 Disabling the Audible Ou...

Page 5: ...keypad maintains complete control of your residence providing easy to understand information All actions performed in your security system are executed and displayed through the keypad Before using yo...

Page 6: ...The default Master Code to gain access to your system is 1234 For security reasons this code must be changed Refer to Programming User Codes for details on changing codes Certain features and options...

Page 7: ...and has entered the entry delay state You must enter your user code to disarm Flashing regularly The system is in exit delay You have a limited time to leave the area before it is armed Flashing 3 tim...

Page 8: ...sent Message Indicator State Description Off You have no pending messages Flashing The building manager or concierge is requesting your attention Zone Display The EliteSuite keypad features an easy to...

Page 9: ...s successfully entered on the keypad or when the system switches to a new status mode the keypad generates a series of four audible tones Entry Request Tone When navigating the menu structure a series...

Page 10: ...Operation Key Function ARM When regular arming is enabled the arm key is used to arm the system FNC The second function key enables the second function of four of the number keys Refer to the followin...

Page 11: ...t up 2 Press the desired key to select the second function 1 STAY 2 FORCE 3 MEMORY 4 BYPASS Pressing any other key will cancel second function mode Certain actions require you to press and hold the ke...

Page 12: ...User code and change User options Other users can be given a Master code by enabling User option 2 for each new master user Take care not to disable the master option for all users as this will preven...

Page 13: ...1234 1111 or 1212 To view an existing code From the User Setup menu press MENU 5 USER NUMBER 1 If the user has a valid code it will be displayed as a sequence of four number LEDs lighting one after t...

Page 14: ...ired Once all options are correct press the ENTER key to confirm the selection At any stage press the MENU key to abort the operation without saving any changes The available options are Option 1 Arm...

Page 15: ...ed item in the TROUBLE LIST 3 To choose another menu option press the MENU key or to exit press the CLEAR key Trouble List Troubles Description Trouble 4 Fire Loop The fire detection wiring or a fire...

Page 16: ...The tone will increase in frequency to indicate that only ten seconds remains Disarming To disarm an armed system or an alarm enter your user code An entry point like the front door will be programme...

Page 17: ...either Fast Force Arming or Fast Regular Arming must have been enabled by your property manager or security company Instant Arming Instant Arming will arm all zones immediately ignoring any exit dela...

Page 18: ...then the BYPASS key 4 and enter your USER CODE 2 Press the FNC key then press and hold the BYPASS key 4 for two seconds The previously assigned settings will be loaded You may then change these settin...

Page 19: ...2 If there was memory the device will emit a confirmation tone four quick beeps to indicate that it is now cleared If there was no memory then the device will emit a rejection tone Chime Zones A chime...

Page 20: ...station or property manager Press and hold keys 1 and 3 for the panic alarm Press and hold keys 4 and 6 for a medical alarm Press and hold keys 7 and 9 for a fire alarm i All Panic Alarm activations m...

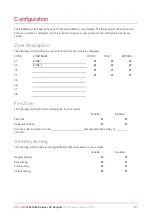
Page 21: ...ing lists the zones in your system and how each zone is configured ZONE ZONE NAME FORCE STAY BYPASS 01 ZONE 1 02 ZONE 2 03 04 05 06 07 08 Fire Zone The following lists the fire zone configuration for...

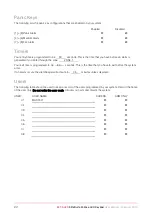
Page 22: ...efore an alarm is generated if you enter through the zone ZONE 1 Your exit time is programmed to be 30 seconds This is the time that you have to exit before the system arms If an alarm occurs the sire...

Page 23: ...roducts and because the products may be used in conjunction with products not manufactured by ICT ICT cannot guarantee the performance of the security system ICT s obligation and liability under this...

Page 24: ...ation below Integrated Control Technology P O Box 302 340 North Harbour Post Centre Auckland New Zealand 11 Canaveral Drive Albany North Shore City 0632 Auckland New Zealand Phone 64 9 476 7124 Toll F...

Page 25: ......

Page 26: ......

Page 27: ......

Page 28: ...echnology Ltd nor its employees shall be liable under any circumstances to any party in respect of decisions or actions they may make as a result of using this information In accordance with the Integ...

Reviews: