TITAN ELITE WALL MOUNT INsTALLATION
TITAN ELITE EASY-TO-WIRE WALL MOUNT INSTALLATION - 09/01/16 pjm
Page 2 of 4
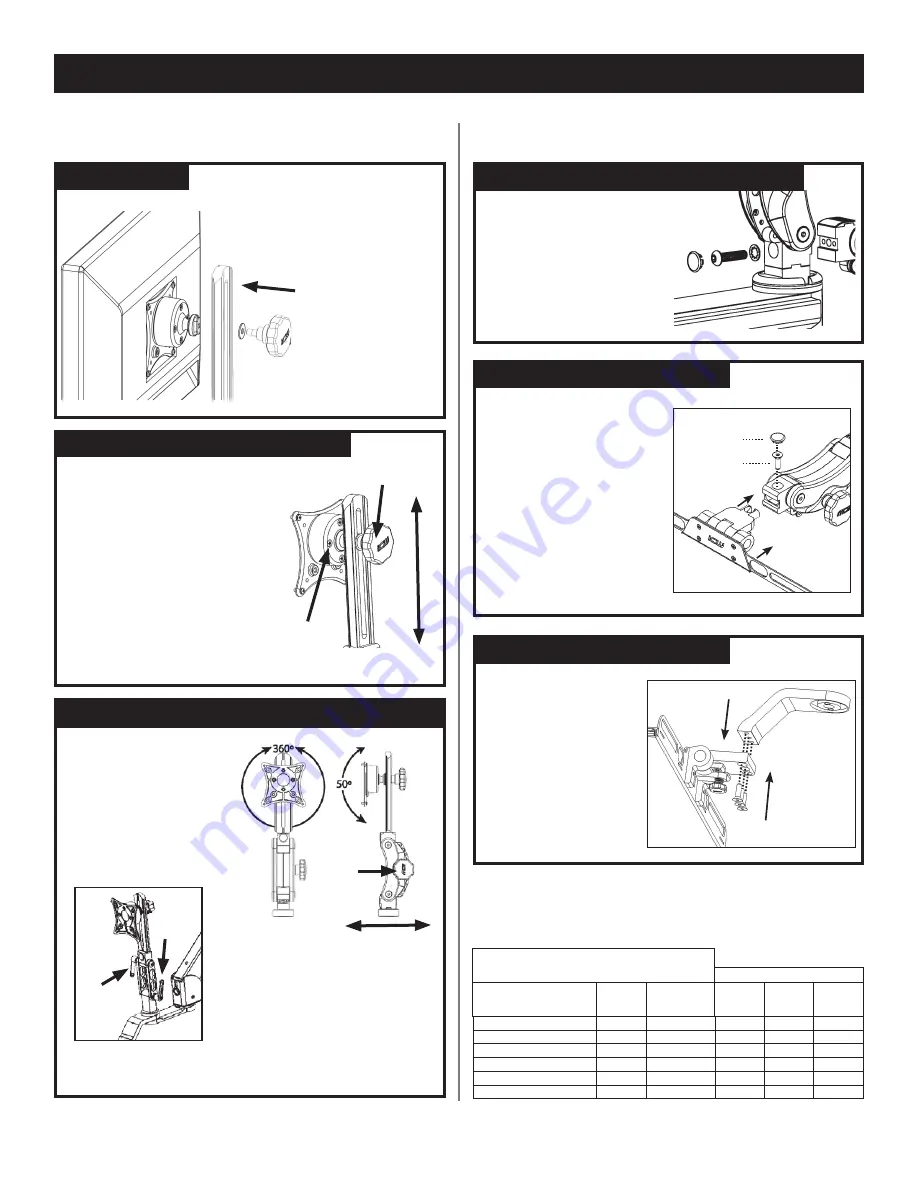
ATTACH VEsA
Attach VESA to
monitor using four
4mm screws in the
hardware bag.
Mount the VESA
assembly by
screwing the knob
through the rail
into the VESA.
Attach & Adjust Monitor
Attach Keyboard Tray
Attach the Paralink
Keyboard Mount to the
Monitor Mount by using
the 3/8-16 screw and
lock washer provided.
ATTACH PARALINK KEYBOARD TO MONITOR
•
Remove screws from
drop extension using
5/32” hex key.
•
Align holes in keyboard
tray with screw holes in
drop extension.
•
Attach keyboard tray
using the provided
screws.
ATTACH FLIP UP KEYBOARD
•
Remove beauty cap on
Paralink.
•
Remove screw using 3/16”
hex key.
•
Slide keyboard tray into
Paralink.
•
Replace screw and tighten.
•
Replace beauty cap.
Beauty cap
Screw
ATTACH KEYBOARD TO PARALINK
ADJUsT BALL VEsA TENsION & HEIGHT
Use the slider knob to
loosen the slider to adjust
the height of the monitor on
the Paralink.
Adjust the pivot tension of
the ball by gently and evenly
tightening or loosening the
four screws on the back of
the ball VESA.
Pivot tension
adjustment
screws
Slider knob
MONITOR TILT, ROTATION & ADJUsT MONITOR DEPTH
MONITOR TILT
& ROTATE
Gently hold sides of
monitor. Tilt and rotate
to desired position
with ball VESA.
ADjUsT MONITOR DEPTh
FOR
PARALINK:
Loosen adjustment
knob, move Paralink forward or
back, then re-tighten the knob.
FOR 110 MONITOR MOUNT:
Loosen
adjustment handles, move to
desired position and retighten
handles.
Adjustment
knob
Adjustment
handles
Torque Chart- In/lbs
2/23/2016
Minimum torque values
Monitor Mount
Arm
Base
Mount Arm Joint Paralink EV710
Ultra
0
2
1
-
0
2
1
-
0
2
1
e
ti
l
E
0
2
1
-
0
2
1
0
2
1
0
2
1
e
ti
l
E
2
T
Titan (T2)
120
120
120
-
120
0
2
1
5
8
0
2
1
0
2
1
0
2
1
a
rt
l
U
UL180 / UL182
120
120
-
85
-
MD Arm
140
-
120
-
120


