ULTRA 180 & 182 ARM INSTALLATION - 6/29/20
Page 2 of 4
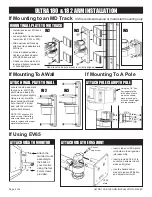
If Mounting To A Wall
If Mounting to an MD Track
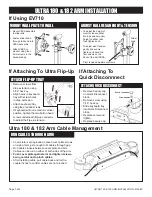
If Using EV65
Attach the
monitor mount
assembly to
the back of
your monitor,
using the
4mm screws
provided.
ATTACH VESA TO MONITOR
ULTRA 180 & 182 ARM INSTALLATION
If Mounting To A Pole
ICW recommends wood or metal stud mounting only.
W2
W3
W5
Use a level to be sure mount is correctly aligned.
• Install track as per MD track
installation.
• Loosely attach track adapters
to wall ear (W2, W3 or W5).
• Slide wall ear with loosely
attached track adapters into
MD track.
• Once in desired position,
tighten one track adapter
with 5/32 Allen wrench.
• Check to ensure wall ear is
level and tighten remainder
or track adapters.
MOUNT WALL PLATE TO MD TRACK
Attach the
monitor mount
assembly to
the back of
your monitor,
using the four
4mm screws
provided.
• Insert stubs on VESA plate
into holes in the Ergovision
joint assembly.
• Insert provided 5/16 x 3/4
socket cap screws in both
sides and tighten.
• Use the handle under
mount to loosen tilt friction
and adjust monitor tilt.
ATTACH VESA TO EV65 JOINT
Socket
cap screw
VESA
plate
ATTACH POLE CLAMP TO POLE
Using the 1/4″ hex
key, separate the
two halves of pole
mount as shown,
place around pole
at the desired height
and reassemble.
W2
Locate the stud and mark
the top hole, drill 11/64
pilot hole and insert #14
screw and tighten slightly.
Using a level, mark the
lower hold and drill pilot
hole, insert #14 screw
and, with the unit level,
tighten both screws.
NOTE: ICW supplies #14
wood screws. If installing
onto metal studs, you will
need to replace with proper
metal stud fasteners.
W3
ATTACH WALL PLATE TO WALL


