Page 1
ULTRA 180 & 182 ARM INSTALLATION - rev 11/22/17
Page 1 of 4
•
Remove small socket head cap screw in top
center of the Wall Track. Remove plastic cover.
•
Locate the wall stud and mark the top hole
of the Wall Track.
•
Drill 11/64 pilot hole, insert #14 screw and
tighten slightly. Use a level, mark the lower
holes, drill pilot holes and then insert the
#14 screws.
NOTE: #14 Wood screws are supplied with unit. If installing into metal studs, you will need to
replace these with proper metal stud fasteners
MOUNT ULTRA TRACK TO WALL
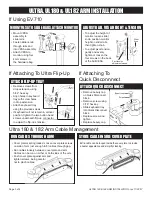
If Mounting to Ultra Wall Track
If Mounting to a Desk
•
Drill a 3/8” hole through the horizontal
mounting surface.
•
Screw stud into base of desk mount.
•
Push the stud on the desk mount
through the hole.
•
Slide the large mounting washer over
the stud from underneath.
•
Add the 3/8 split-washer.
•
Secure in place with the 3/8 nylock.
Screw stud into
desk mount
Desk
Desk
Washer
Nylock
ATTACH ULTRA DESK MOUNT
ATTACH SLIDER TO ULTRA TRACK
•
Insert slider into
wall track.
•
Replace the
small socket
head cap
screw and
plastic cover.
Adjust slider to desired height. Tighten slider using adjustment knob.
ADJUST SLIDER POSITION
STANDARD
INVERTED
ICW recommends wood or
metal stud mounting only.
MAXUMUM LOAD CAPACITY: 32 LBS. (14.5 KG)
ULTRA, UL180 & UL182 ARM INSTALLATION
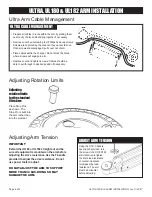
•
Drill a 3/8" hole thorugh the
horizontal mounting surface.
•
Screw stud into base of desk mount.
•
Push the stud on the desk mount
through the hole.
•
Slide the large mounting washer
over the stud from underneath.
•
Secure in place with 3/8” nylock nut.
•
Insert slider
into wall track.
•
Replace the
plastic cover
and small
socket head
cap screw.
Desk Mount
Part Number
Stud
Length
Maximum
Desk Thickness
D0
3.50”
2.47”
D1
3.50”
1.87”
D3
5.50”
1.87”
D5
7.50”
1.87”
D7
10.50”
2.38”


