ULTRA ARM INSTALLATION - 5/21/20
Page 2 of 4
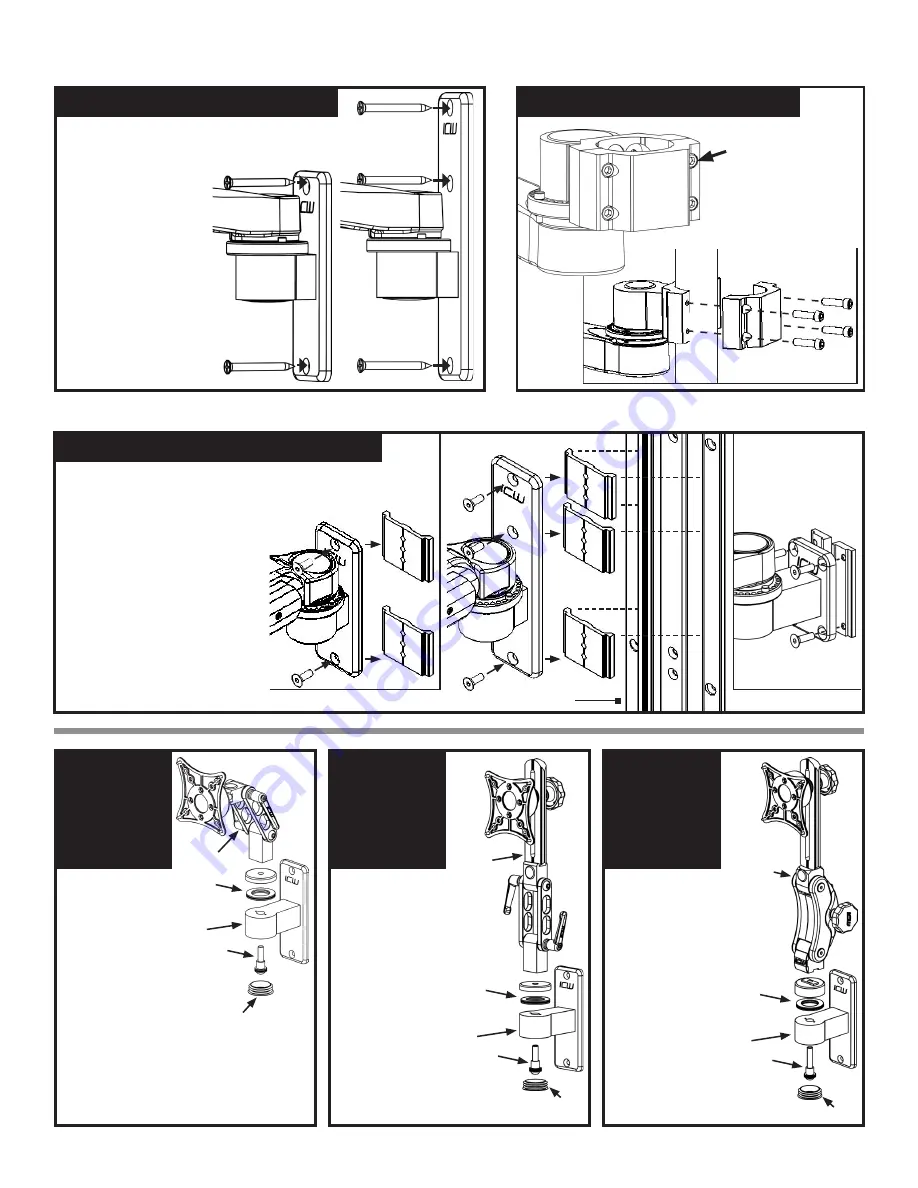
IF MOUNTING TO A POLE
IF MOUNTING TO A WALL
IF MOUNTING TO AN MD TRACK
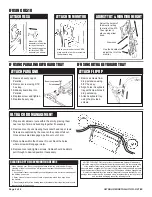
ATTACH
UL510
TO W2,
W3 OR W5
ATTACH
PARALINK
TO W2,
W3 OR W5
Attach to UL510 to
W2 wall mount using
3/8 bolt assembly
and 1.25” bearing
assembly provided.
Insert bolt assembly
up through wall ear.
Place 1.25” bearing
assembly over bolt
on the other side
of wall ear. Place
UL510 over bolt and
bearing and turn bolt
until UL510 is secure
and smoothly turns
against the bearing.
Attach to Paralink to
W2 wall mount using
3/8 bolt assembly
and 1.25” bearing
assembly provided.
Insert bolt assembly
up through wall ear.
Place 1.25” bearing
assembly over bolt
on the other side
of wall ear. Place
Paralink over bolt
and bearing and turn
bolt until Paralink is
secure and smoothly
turns against the
bearing.
ATTACH WALL PLATE TO WALL
ATTACH WALL PLATE TO WALL
MOUNT WALL PLATE TO MD TRACK
W2
Locate the stud and
mark the top hole, drill
11/64 pilot hole and
insert #14 screw and
tighten slightly. Using
a level, mark the lower
hold and drill pilot hole,
insert #14 screw and,
with the unit level,
tighten both screws.
NOTE: ICW supplies
#14 wood screws. If
installing onto metal
studs, you will need
to replace with proper
metal stud fasteners.
W3
UL510
Paralink
Beauty cap
Beauty cap
1.25”
ID bearing
assembly
1.25”
ID bearing
assembly
3/8 bolt
assembly
with 3/8
ID bearing
3/8 bolt
assembly
with 3/8
ID bearing
W2
W2
ATTACH
UL500
TO W2,
W3 OR W5
Attach to UL500 to
W2 wall mount using
3/8 bolt assembly
and 1.25” bearing
assembly provided.
Insert bolt assembly
up through wall ear.
Place 1.25” bearing
assembly over bolt
on the other side
of wall ear. Place
UL500 over bolt and
bearing and turn bolt
until UL500 is secure
and smoothly turns
against the bearing.
UL500
Beauty cap
1.25”
ID bearing
assembly
3/8 bolt
assembly
with 3/8
ID bearing
W2
Using the 1/4″ hex
key, separate the
two halves of pole
mount as shown,
place around pole
at the desired height
and reassemble.
ICW recommends wood or metal stud mounting only.
W2
W3
W5
Use a level to be sure mount is correctly aligned.
• Install track as per MD track
installation.
• Loosely attach track adapters
to wall ear (W2, W3 or W5).
• Slide wall ear with loosely
attach track adapters into MD
track.
• Once in desired position,
tighten one track adapter with
5/32 Allen wrench.
• Check to ensure wall ear is
level and tighten remainder or
track adapters.


