background image

Manual IB-1916M-C32

Manual IB-1916M-C32

Prepare (remove the paper foil) and install the delivered acrylic cover as 
follows. 
Pay attention to the correct alignment of the LED window!

Bereiten Sie die mitgelieferte Acrylabdeckung vor (Papierfolie abziehen) 
und bringen sie wie folgt an. Achten Sie auf die korrekte Ausrichtung des LED 
Ausschnitts!

Fasten two screws as follows.   

Setzen Sie zwei Schrauben wie folgt ein.

Summary of Contents for IB-1916M-C32

Page 1: ...Manual IB 1916M C32 External Type C enclosure for M 2 NVMe SSD Handbuch IB 1916M C32 Externes USB Type C Gehäuse für M 2 NVMe SSD ...

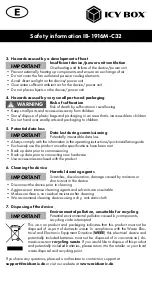
Page 2: ...rical shock Read the operating instructions prior to use Make sure the device has been de energised prior to working on it Do not remove contact protection panels Avoid contact with conducting parts Do not bring plug contacts in contact with pointed and metal objects Use in intended environments only Operate the device using a power unit meeting the specifications of the type plate only Keep the d...

Page 3: ...e accessories enclosed with the product 6 Cleaning the device Harmful cleaning agents Scratches discolouration damage caused by moisture or short circuit in the device Disconnect the device prior to cleaning Aggressive or intense cleaning agents and solvents are unsuitable Make sure there is no residual moisture after cleaning We recommend cleaning devices using a dry anti static cloth 7 Disposing...

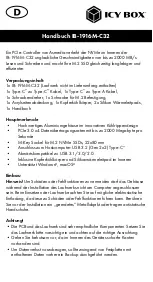
Page 4: ...h leitenden Teilen Lebensgefahr durch Stromschlag vor Benutzung Betriebsanleitung lesen vor Arbeiten am Gerät Spannungsfreiheit sicherstellen Kontaktschutzblenden nicht entfernen Kontakt mit Spannungsführenden Komponenten vermeiden Steckkontakte nicht mit spitzen und metallischen Gegenständen berühren Verwendung nur in dafür vorgesehenen Umgebungen Gerät ausschließlich mit Typenschildkonformen Net...

Page 5: ...ren dem Produkt beiliegendes Zubehör verwenden 6 Reinigung des Gerätes Schädigende Reinigungsmittel Kratzer Farbveränderungen Feuchteschäden oder Kurzschluss am Gerät vor Reinigung das Gerät außer Betrieb nehmen aggressive bzw scharfe Reinigungs und Lösungsmittel sind ungeeignet nach der Reinigung sicherstellen dass keine Restfeuchtigkeit vorhanden ist Reinigung der Geräte am besten mit trockenem ...

Page 6: ... Type C to type A cable The enclosure also works on devices with a Thunderbolt 3 Type C interface only with the transfer rate of up to 10 Gbit s specified by USB 3 1 Gen 2 The following operating systems are supported Windows macOS External USB Type C Enclosure for M 2 NVMe SSD With the help of the external USB 3 2 Type C enclosure IB 1916M C32 you can take one NVMe SSD with you quickly and easily...

Page 7: ...l copper heatsink and silicone thermal pad inside Supports Windows macOS Installation Important During the drive assembly all cabling has to be disconnected from the computer It may cause electric shock accident or malfunction When connecting the hard drive please note the electrostatic Body s static electricity may cause malfunction of the device Please touch a metal object to discharge or wear a...

Page 8: ...nigen Notebooks und PCs mit USB 3 1 3 0 oder 2 0 angebunden sein und ebenfalls Verwendung finden indem Sie das beiliegende USB Type C zu Type A Kabel verwenden Das Gehäuse arbeitet auch an Geräten mit der Thunderbolt 3 Schnittstelle mit der von USB 3 1 Gen 2 angegebenen Transferrate von bis zu 10 Gbit s Folgende Betriebssysteme werden grundsätzlich unterstützt Windows macOS Externes USB Type C Geh...

Page 9: ...m Hostcomputer USB 3 2 Gen 2x2 Type C Abwärtskompatibel zu USB 3 1 3 0 2 0 Inklusive Kupferkühlkörper und Silikonwärmeleitpad im Inneren Unterstützt Windows macOS Einbau Hinweis Um Schäden oder Fehlfunktionen zu vermeiden darf das Gehäuse während der Installation des Laufwerks nicht am Computer angeschlossen sein Beim Einsetzen der Laufwerke achten Sie auf mögliche elektrostatische Entladung da di...

Page 10: ...Manual IB 1916M C32 M 2 NVMe SSD installation Take out the SSD tray Entnehmen Sie den SSD Träger ...

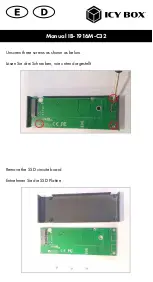
Page 11: ...Manual IB 1916M C32 Remove the SSD circuite board Entnehmen Sie die SSD Platine Unscrew three screws as shown as below Lösen Sie drei Schrauben wie unten dargestellt ...

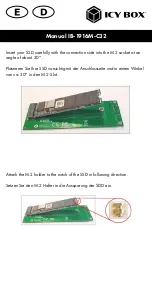
Page 12: ...llowing direction Setzen Sie den M 2 Halter in die Aussparung der SDD ein Insert your SSD carefully with the connection side into the M 2 socket at an angle of about 30 Platzieren Sie Ihre SSD vorsichtig mit der Anschlussseite und in einem Winkel von ca 30 in den M 2 Slot ...

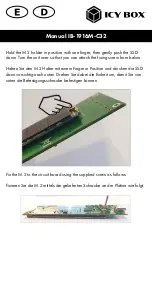
Page 13: ...ne wie folgt Hold the M 2 holder in position with one finger then gently push the SSD down Turn the unit over so that you can attach the fixing screw from below Halten Sie den M 2 Halter mit einem Finger in Position und drücken die SSD dann vorsichtig nach unten Drehen Sie dabei die Einheit um damit Sie von unten die Befestigungsschraube befestigen können ...

Page 14: ...ed thermal pads and remove the foil at one side Bereiten Sie eins der mitgelieferten Wärmeleitpads vor und entfernen Sie die Folie auf einer Seite Turn the unit back over for the next steps Drehen Sie die Einheit für die nächsten Schritte wieder um ...

Page 15: ...egen anschließend den mitgelieferten Kühlkörper auf das Wärmeleitpad wie folgt auf Place the delivered thermal pad directly to the SSD and remove the second foil as follows Legen Sie das mitgelieferte Wärmeleitpad direkt auf das SSD und entfernen Sie die zweite Folie wie folgt ...

Page 16: ...orrect alignment of the LED window Schieben Sie die Platine mitsamt der SSD vorsichtig bis zum Anschlag in die Führungsschiene des Gehäuses Achten Sie auf die korrekte Ausrichtung des LED Ausschnitts Reattach the three screws previously removed Befestigen die drei zuvor entnommenen Schrauben wieder ...

Page 17: ... follows Pay attention to the correct alignment of the LED window Bereiten Sie die mitgelieferte Acrylabdeckung vor Papierfolie abziehen und bringen sie wie folgt an Achten Sie auf die korrekte Ausrichtung des LED Ausschnitts Fasten two screws as follows Setzen Sie zwei Schrauben wie folgt ein ...

Page 18: ...6M C32 Ready to use Zur Verwendung bereit Remove the protection foil and add the delivered serial number if you like Entfernen Sie die Schutzfolie und fügen Sie wenn Sie möchten die mitgelie ferte Seriennummer hinzu ...

Page 19: ...ves in the volume management of your operating system The full USB 3 2 Gen 2x2 transfer rate can only be achieved with a compatible USB 3 2 Gen 2x2 host computer Furthermore the USB 3 2 drivers must be installed by the operating system If this is not the case install the appropriate drivers for your operating system Windows Verwendung Verbinden Sie die IB 1916M C32 mittels des beiliegenden Kabels ...

Page 20: ...without prior notice The diagrams contained in this manual may also not fully represent the product that you are using and are there for illustration purposes only RaidSonic Technology GmbH assumes no responsibility for any differences between the product mentioned in this manual and the product you may have Apple and macOS are registered trademarks of Apple Computer Inc Microsoft Windows and the ...

Reviews: