Initialization
Quick Installation Guide
1.
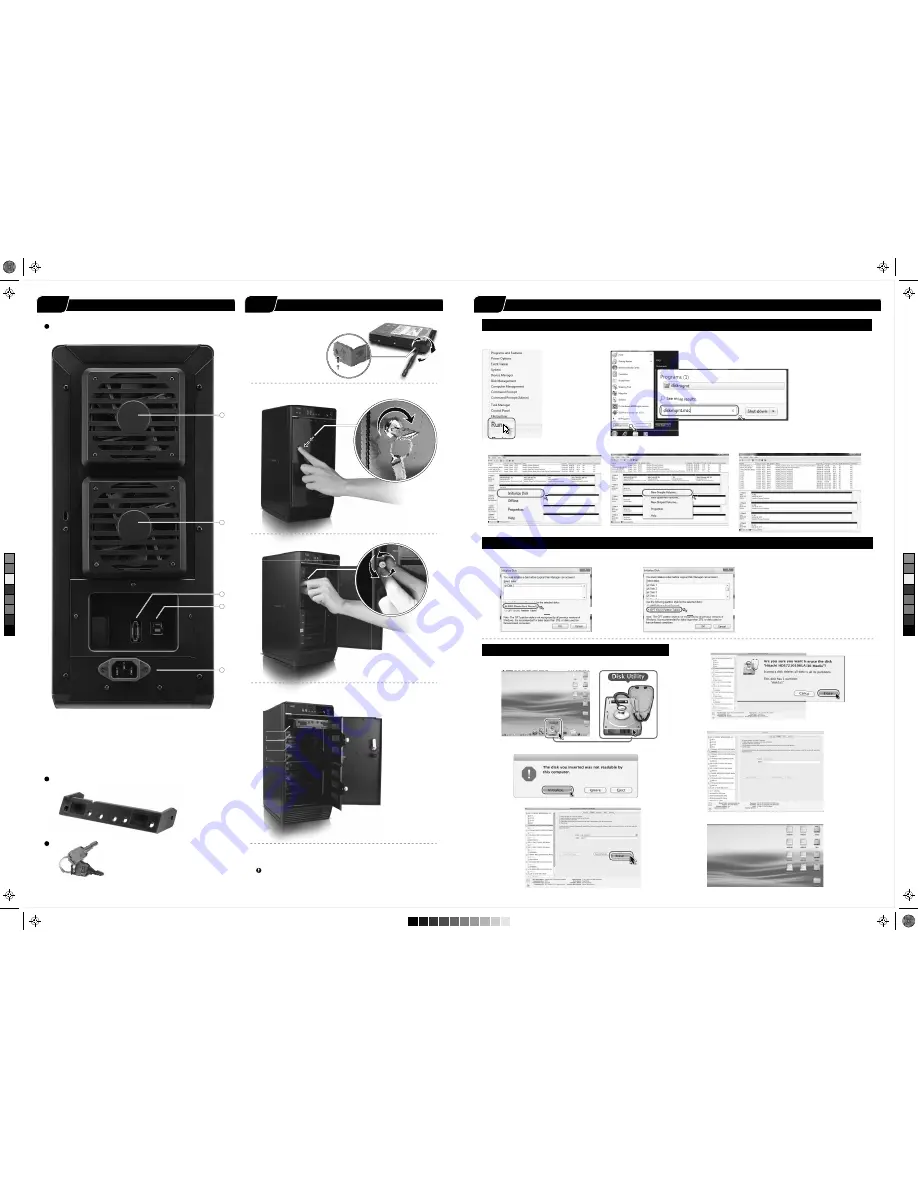
Please use the provided screws to secure
the handles to the HDDs.
2. Unlock the cover with the key supplied and press the curricular
depression to open the cover.
3. Release the inner covers anti-clockwise.
1
1
4
3
2
Descriptions
Fan
eSATA port
USB 3.0 port
220 V AC Input port
1.
2.
1.
3.
4.
Rear Panel Overview
Rear Panel
HDD Handle
Keys
4. Install the HDDs from up to down.
HDD 1
HDD
2
HDD 3
HDD
HDD
DD
DD
DD
D
D
4
5. Close and secure the covers.
6. Plug in USB or eSATA cable
USB interface is the default setting and if users wish to change to
eSATA, press and hold
hold "Interface" for 3 seconds.
1. Start disk initialization.
3. HDD format completed
2. Create new partition and format disk.
If the HDD is uninitialized, you may have to initialize it by doing steps as followed
:
At first click “Start”
“Execute” at your PC and key in “diskmgmt. msc”. After that please press “OK” key.
Note: Please enable GPT if the total capacity is more than 2TB and enable MBR if the total capacity is less than 2TB.
Start disk initialization.
Activate MBR if total volume is less than 2TB
MBR (Master Boot Record)
Activate GPT if total volume is more than 2TB
GPT (GUID Partition Table)
2. HDD initialize...
1. Click Disk Utility icon.
Macintosh O.S. 10.8 or later
3. Click Erase
4. Click Erase
5. HDD format in process
6. Format completed
STEP
4
4
STEP
5
5
STEP
6
6
Windows Vista (32bit/64bit) / Windows 7 (32bit/64bit) / Windows 8 (for PC version only)
Move the cursor of your mouse to the bottom
left corner and right click “Run”.
C
M
Y
CM
MY
CY
CMY
K


