background image

Manual IB-RD3802-C31

Start up

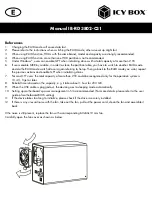
•  First connect the power supply, then connect the USB Type-C

 cable between IB-RD3802-C31 

and your computer and power on the device at the back side. Make sure that the computer is 
powered on as well.

Now you can set the preferred RAID settings as follows:
•  When using RAID function, drives with the same brand, model and capacity is strongly recom-

mended.

•  Setting or changing the RAID mode requires you to re-format the drives. This will erase all data 

on the hard drives that are being formatted. 

Make sure to backup all existing data first!

•  Be careful!

 When using the confirmation button in any RAID mode, 

all data will be erased.


Never use the confirmation button when all settings have been completed and the drives cont-
ains your data!!!

RAID Mode Description

SINGLE 

Like LARGE it is not really a RAID mode. This means that both drives are integrated as separate 
drives with its own content, independent from each other.

LARGE 

Concatenates multiple hard drives as a single large volume; resulting in a seamless expansion of 
virtual volumes beyond the physical limitations of separately connected hard drives. The data are 
written from HDD1 to HDD2.

RAID 0 

This is a method of concatenating multiple hard drives into one logical storage unit. It is the auto-
mated process of writing data across multiple drives simultaneously. Striping is used to increase the 
performance of disk reads. The multiple hard drives will write data in “column” effect. If one drive in 
a striped set fails, all of the data in the stripe set are lost.

RAID 1 

This is the automated process of writing data to multiple drives simultaneously. RAID 1 is used to pro-
vide redundancy. If one drive fails, the redundant drive(s) will continue to store the data and provide 
access to it. The failed drive can then be replaced and the drive set can be rebuilt.

Summary of Contents for IB-RD3802-C31

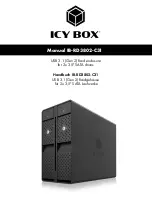
Page 1: ...Manual IB RD3802 C31 USB 3 1 Gen 2 Raid enclosure for 2x 3 5 SATA drives Handbuch IB RD3802 C31 USB 3 1 Gen 2 Raidgeh use f r 2x 3 5 SATA Laufwerke...

Page 2: ...e type plate only Keep the device power unit away from humidity liquid vapour and dust Do not modify the device Do not connect the device during thunderstorms Approach specialist retailers if you requ...

Page 3: ...tion caused by components recycling circle interrupted This icon on product and packaging indicates that this product must not be disposed of as part of domestic waste In compliance with the Waste Ele...

Page 4: ...sf hrenden Komponenten vermeiden Steckkontakte nicht mit spitzen und metallischen Gegenst nden ber hren Verwendung nur in daf r vorgesehenen Umgebungen Ger t ausschlie lich mit Typenschildkonformen Ne...

Page 5: ...einigung der Ger te am besten mit trockenem Antistatiktuch durchf hren 7 Entsorgung des Ger tes Umweltverschmutzung Wiederverwertung nicht m glich M gliche Umweltbelastung durch Bestandteile Recycling...

Page 6: ...IB RD3802 C31 1x wall power supply 1x USB Type C to Type C cable 2x keys 4x rubber feet sticker 1x manual Rubber feet attachment optional In addition you have the option of attaching the enclosed rubb...

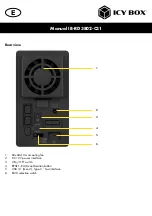
Page 7: ...r view Manual IB RD3802 C31 1 2 3 5 4 1 60x60x10 mm cooling fan 2 DC 12 V power interface 3 ON OFF switch 4 RESET RAID confirmation button 5 USB 3 1 Gen 2 Type C host interface 6 RAID selection switch...

Page 8: ...d Thunderbolt 3 interfaces The full transfer rate up to 10 Gbit s can only be reached if the USB 3 1 Gen 2 protocol is supported macOS and Windows 10 Drive installation Note When connecting the hard d...

Page 9: ...a RAID mode This means that both drives are integrated as separate drives with its own content independent from each other LARGE Concatenates multiple hard drives as a single large volume resulting in...

Page 10: ...lt in data loss you can t press the button directly with your finger During setting the RAID mode use e g a ball pen to press the RAID confirmation button on the back of the unit Be careful When using...

Page 11: ...the drive capacity When the data have been restored the HDD LEDs will turn a steady blue Attention please don t push the RAID RESET switch otherwise all data will go lost Note We recommend not turning...

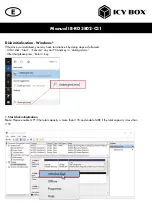
Page 12: ...doing steps as followed At first click Start Execute on your PC and key in diskmgmt msc After that please press Return key 1 Start disk initialization Note Please enable GPT if the total capacity is...

Page 13: ...2 Create new partition and format disk Manual IB RD3802 C31...

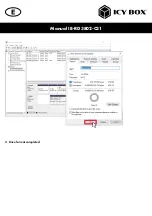
Page 14: ...3 Drive format completed Manual IB RD3802 C31...

Page 15: ...unformatted drives are used they may first have to be initialized For initialisation do the following steps 1 Click Disk Utility icon 2 Drive initialisation 3 Choose the appropriated drive and click E...

Page 16: ...4 Drive format in process 5 Format completed Manual IB RD3802 C31...

Page 17: ...s actions and enable GPT when initializing drives 7 For macOS users the total capacity of more than 2 TB could be recognized only for the operation system is 10 4 1 1 Tiger or later 8 Rebuild time is...

Page 18: ...he two pins during disconnection Remove the fan from the fan cover Replace with an equal fan Reconnect the 2pin connector Attention Pay attention to the correct alignment of the two pins during reconn...

Page 19: ...page www raidsonic de bereitgestellt wird Verpackungsinhalt 1x IB RD3802 C31 1x Steckernetzteil 1x USB Type C zu Type C Kabel 2x Schl ssel 4x Gummifu aufkleber 1x Handbuch Anbringung von Gummif en opt...

Page 20: ...ckansicht Handbuch IB RD3802 C31 1 2 3 4 5 1 60x60x10 mm L fter 2 Stromanschluss 3 AN AUS Schalter 4 RESET RAID Best tigungstaste 5 USB 3 1 Gen 2 Type C Hostschnittstelle 6 RAID Levelauswahlschalter...

Page 21: ...kann aber nur erreicht werden wenn das USB 3 1 Gen 2 Protokoll unterst tzt wird macOS und Windows 10 Festplatteneinbau Hinweis Beim Einsetzen der Laufwerke achten Sie auf m gliche elektrostatische En...

Page 22: ...chlossen sind und die Laufwerke Ihre Daten enthalten Beschreibung der verschiedenen RAID Modi SINGLE Konfiguration eines RAID Controllers mit mehreren Laufwerken die keinen Verbund bilden Damit werden...

Page 23: ...Taste nicht direkt mit dem Finger dr cken Verwenden Sie w hrend der Einstellung des RAID Mo dus z B einen Kugelschreiber um die RAID Best tigungstaste auf der R ckseite des Ger ts gedr ckt zu halten S...

Page 24: ...LED s und beide HDD LED s leuchten anschlie end durchgehend blau Hinweis Stellen Sie sicher dass die Stromversorgung w hrend des Wiederherstellungsprozesses nicht unterbrochen wird Sollte dies trotzd...

Page 25: ...abei bitte wie folgt vor F hren Sie Start und Ausf hren an Ihrem Windows Rechner aus und tippen Sie discmg mt mcs ein Dr cken Sie die Entertaste 1 Laufwerksinitialisierung starten Hinweis Aktivieren S...

Page 26: ...2 Neue Partition erstellen und formatieren Handbuch IB RD3802 C31...

Page 27: ...3 Laufwerksformatierung abgeschlossen Handbuch IB RD3802 C31...

Page 28: ...se unter Umst nden zun chst initialisiert werden Gehen Sie dabei bitte wie folgt vor 1 ffnen Sie das Festplattendienstprogramm 2 Initialisieren Sie das Laufwerk mithilfe des Dienstprogrammes 3 W hlen...

Page 29: ...4 Formatierung wird durchgef hrt 5 Nach Abschluss der Formatierung Handbuch IB RD3802 C31...

Page 30: ...Benutzer k nnen erst ab dem Betriebssystem Tiger 10 4 1 1 oder h her auf Laufwerke gr er 2 TB zugreifen 8 Die Rebuilddauer Wiederherstellung ist abh ngig von der Kapazit t der verwendeten Laufwerke Al...

Page 31: ...ie den L fter aus der L fterabdeckung Ersetzen Sie den L fter durch einen baugleichen L fter Stecken Sie den 2 Pin Stecker wieder auf ACHTUNG Achten Sie auf die richtige Ausrichtung des 2 Pin Steckers...

Page 32: ...al may also not fully represent the product that you are using and are there for illustration purposes only RaidSonic Technology GmbH assumes no responsibility for any differences between the product...

Reviews: