background image


78

8.  

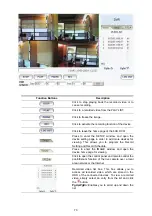
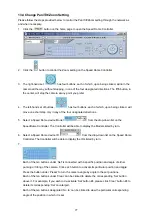
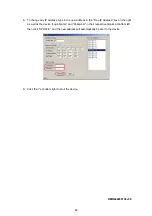
The ‘AutoPan’ section 

  has three buttons. The ‘Start’ and ‘End’ buttons fix the two 

points of any panning movement you select. The third or bottom button sets the chosen 

movement in the play mode. 


Summary of Contents for IV-400CD-SN

Page 1: ...to connect or operate this product please read this manual completely http www idview com A rec T rec DISK Power Display Search Play Stop Rec Pause Enter Setup Seq Save ZOOM TIME LAPSE DIGITAL VIDEO...

Page 2: ...hazard CAUTION Danger of explosion if the Lithium battery RTC Battery is incorrectly replaced Danger of explosion if battery is incorrectly replaced Replace only with the same or equivalent type recom...

Page 3: ...Information and channel selection 12 3 4 Updating System Software 14 4 BASIC OPERATIONS 15 4 1 Configuring Recording Settings 15 4 2 Recording Operations 17 4 3 Playback Operations 22 4 4 Search Opera...

Page 4: ...K CONFIGURATION 64 12 1 Cable Connections 64 12 2 Configure Your DVR Network Settings 65 12 3 TCP IP Communication Software 67 12 4 TCP IP installation 69 12 5 TCP IP Configuration setting 69 12 6 Tes...

Page 5: ...s video in hard disk drives instead of VCR tapes Maximum 2 hard disk drive capability one removable Hard disk drive hot swapping capability Pre alarm image recording Time lapse and real time recording...

Page 6: ...you remove the hard disk from the slot without turning off the device PAUSE button In a playback display press this to freeze the display During the freeze press to display one frame of a picture at a...

Page 7: ...according to the sequencer setting in the setup menu In the SD card backup mode press to save the desired still image to an SD card T rec Indicator This indicator of the timer recording mode lights u...

Page 8: ...icates the power status of the Mobile Rack The green light indicates the Mobile Rack is activating Mobile Rack HDD LED Indicates the HDD status of the Mobile Rack The orange light indicates the HDD is...

Page 9: ...ctor is used to link the device s audio input AUDIO IN Connector This connector is used to connect the audio output from a camera or other devices to the DVR ETHERNET 10 100 Connector This is one stan...

Page 10: ...ger Connect this to external devices such as buzzers or lights 5V 0V Active 4 ALARM RESET INPUT This pin connects to an alarm clear device for clearing an alarm 5V 0V Active 5 RECORD IN INPUT This pin...

Page 11: ...UT MONITOR ETHERNET I O ATTACHING AN EXTERNAL DEVICE TO A DVR Connect an alarm out alarm input and a peripheral device as shown in the diagram below Alarm In Alarm1 In Alarm2 In Alarm3 In Alarm4 In SD...

Page 12: ...sk drives Manufacturer Model Capacity Rotation WD800AB 80GB 5400 RPM WD1200AB 120GB 5400 RPM WD800BB 80GB 7200 RPM WD1200BB 120GB 7200 RPM WD1800BB 180GB 7200 RPM WD2000BB 200GB 7200 RPM Western Digit...

Page 13: ...isplays a different message detailed in the following example By default the unit displays titles time and date on a monitor as shown next Default display CH1 CH2 CH3 CH4 are titles for the correspond...

Page 14: ...pacity of the installed hard disk POS Percentage of system R Recording P Playback IP 192 168 1 90 Setting of the Ethernet communication 192 168 1 90 External signal x Cannot operate at now 3 3 2 Chann...

Page 15: ...SN is updating the system software which will take approximately 90 seconds to process 5 Restart the unit by turning the POWER button off upon which the device sounds a tone twice and displays the me...

Page 16: ...ive will be filled in 3 7 hours see the gray area in the table If the total capacity of 80GB hard disk drives is in use under the same refresh rate and picture quality it will be filled in 14 8 hours...

Page 17: ...8 6 HIGH 4 5 7 2 10 8 18 32 5 61 4 119 3 206 1 726 9 1088 6 1450 3 STANDARD 5 7 9 13 5 22 6 40 6 76 8 149 1 257 7 908 7 1360 8 1812 9 Image Quality BASIC 7 7 11 4 17 1 28 5 51 3 97 188 4 325 5 1147 8...

Page 18: ...take the following steps to program the scheduled recording 1 Press the Setup button to enter the MAIN MENU 2 Select the TIMER SEQ TITLE and press the Enter button to enter the TIMER SEQ TITLE page 3...

Page 19: ...rom the menu to start recording NOTE If you activate the recording function before the scheduled recording the unit will operate recording as shown in the diagram below and keep those Images in differ...

Page 20: ...END START END S 00 00 00 00 00 00 00 00 M 00 00 00 00 00 00 00 00 T 00 00 00 00 00 00 00 00 W 00 00 00 00 00 00 00 00 T 00 00 00 00 00 00 00 00 F 00 00 00 00 00 00 00 00 S 00 00 00 00 00 00 00 00 OK C...

Page 21: ...set ALM OPERATION to ON To deactivate it set ALM OPERATION to OFF 5 To active the motion alarm recording Select MOTION SETTING and press the Enter button to enter the MOTION SETTING PAGE set CH1 CH2 C...

Page 22: ...2 3 for more details NOTE The status of recording operations when an alarm takes place is shown in the diagrams below 1 2 3 4 Manual or Externally Triggered Recording Alarm Takes Place Actual Recordin...

Page 23: ...uired STOP PLAY Play the file from the stop position B Search to play back a particular recorded video Search PLAY Play a selected file Play to the end of the file Show the ending message search again...

Page 24: ...button for the picture by picture mode 2 There are two ways available by PAUSE button or by JOG to play in the picture by picture mode but the PAUSE button can only function in a forward direction the...

Page 25: ...g 2 The maximum number of lists for a particular HDD is 3000 4 4 2 Alarm list Search Take the following steps to proceed with the alarm list search function 1 Press the Search button to enter the sear...

Page 26: ...Search button to enter the search mode 2 Select the THUMBNAIL and press the Enter button to access the thumbnail page 3 Set the date you wish to search for the recorded video 4 Press the Enter button...

Page 27: ...er the search mode 3 Select the SD CARD and press the Enter button to access the complete list of JPG files 4 Highlight the specific JPG file you require and press the Enter button to display the imag...

Page 28: ...1 to HD2 Stay on the DISK SETTING page Use the and v buttons and to highlight BACKUP select FULL then press the Enter button to proceed ALARM Duplicate all the alarm event recorded video from HD 1 to...

Page 29: ...deo a warning message HD2 SPACE NOT ENOUGH will be displayed on the screen Please insert a larger capacity of hard disk drive and start the process all over again MAIN MENU RECORD ALARM MOTION TIMER S...

Page 30: ...of AVI Clips into SD Card Please take the following steps to archive a critical video in an SD card 1 Insert an SD Card into the SD card slot of the rear unit 2 Start playing back the recorded video 3...

Page 31: ...select the SYSTEM Highlight SYSTEM and press the Enter button to enter the SYSTEM SETTING page Then set SD SETUP to LOAD 4 Updating System Software please refer to section 3 4 for more details 4 6 Ke...

Page 32: ...ons within the menu setup mode are described in the paragraphs below KEY FUNCTIONS Setup button Press to enter the setup menu Press again to exit the setup mode and v buttons Press to select the desir...

Page 33: ...determines the image quality to be recorded The DVR stores images in the compressed format and allows the image quality to be altered by the image size There are 4 levels of image quality you can sele...

Page 34: ...S 8 3F S 5F S and REMAIN If you select REMAIN for use the device will record images at the same speed as set on the REC page REC QUALITY This option determines the image quality to be recorded when a...

Page 35: ...ing Duration NOTE Recording may be interrupted at the time of Alarm in or Alarm out LIVE images may be interrupted at the time of Alarm out PRE ALARM This option determines that images prior to an ala...

Page 36: ...the motion detection OFF Disables the motion detection SENSITIVITY This option allow users to set the motion sensitivity 1 is the most sensitive setting 5 is the least sensitive setting MOTION SETTIN...

Page 37: ...d scheduled recording ON Enables the scheduled recording OFF Disables the scheduled recording TIMER This entry allows users to program the time each day that the DVR will start and stop recording Ther...

Page 38: ...g In the live mode press the Seq Save button to switch the screen to the sequential jumping mode TITLE This entry allows users to set the titles for each video source or camera in a live or recording...

Page 39: ...ON Enables the RS 232 communication port When you wish the unit to be controlled by an external device please select this entry for use OFF Disables the RS 232 communication port RS 485 The RS 485 co...

Page 40: ...RT allows users to set the HTTP port number of 80 1080 and 2080 FTP SETTING This entry allows users to set the FTP File Transfer Protocol ENABLE This option is to select enable or disable for the FTP...

Page 41: ...This is required for the purpose of making an FTP connection Please consult with a qualified MIS professional to configure it FTP IP Every FTP server has to own an IP address to be identified on the...

Page 42: ...s option must be set to REC For more details please refer to section 4 3 4 BACKUP This function allows you to duplicate data from HD 1 to HD 2 Please set HD 2 as BACKUP first For operation details ple...

Page 43: ...LOCK Disables the entire front panel controls UNLOCK Releases the key lock UPDATE Updates system software Note The log keeps an operation history on a revolving basis because of a limit of 2000 recor...

Page 44: ...eration complete Timer activate deactivate Recording switching between HDDs PASSWORD This option allows you to set a password to prevent any unauthorized re formatting of the hard disk drives or use b...

Page 45: ...ings he can save the whole settings to an SD card then transfer them to another DVR SAVE Saves the whole setting to the SD card LOAD Loads the whole setting to the SD card VERSION This item is in the...

Page 46: ...6 2 Communication Protocol 6 2 0 General Command Format Lead Code 0x41 Dest ID Src ID Main category Second category Number of parameters Parameter 1 Parameter 2 End Code 0x4f Lead Code 0x41 Dest ID 0x...

Page 47: ...43 8F 30x 1 8x KEY_SHUTTLE_R6 144 90 100x 1 8x KEY_SHUTTLE_R7 145 91 100x 1 16x SIGNAL_REC_IN 163 A3 SIGNAL_ALARM_RESET 165 A5 SIGNAL_REC_OUT 169 A9 SIGNAL_ALARM_IN 189 BD SIGNAL_ALARM_OUT 209 D1 6 2...

Page 48: ...0x4f 48 Bytes Data 4 HDDs Status Primary Master Slave Secondary Master Slave Every HDD use 12 Bytes 0 HDD Exists if 1 1 Active HDD if 1 2 Current HDD for REC if 1 3 Current HDD for PLAY if 1 4 7 Capac...

Page 49: ...lowing steps The jumper settings of hard disk drives for the system Location Jumper IDE 1 Compartment HD 1 Master IDE 2 Compartment HD 2 Master 7 1 Built in hard disk 1 1 Unscrew all the mounting scre...

Page 50: ...of the IDE cable and the red wire of power cable must line up side by side 10 Place the mobile rack back onto the device and screw it in 7 2 Mobile Rack 1 2 1 Make sure that the key is unlocked 2 Pul...

Page 51: ...ust line up side by side 6 Place the HDD inside the mobile rack Use four of the provided screws 7 8 7 Place the top cover back on the carrier body by sliding it forward 8 Slide the carrier body back i...

Page 52: ...ON TIMER SEQ TITLE COMMUNICATION DISK SYSTEM GO TO TIMER SEC TITLE PAGE TIMER SEQ TITLE CLOCK SET REC ENABLE OFF TIMER SET SEQUENCER SET TITLE SET MAIN PAGE TIMER REC ENABLE MAIN MENU RECORD ALARM MOT...

Page 53: ...U RECORD ALARM MOTION TIMER SEQ TITLE COMMUNICATION DISK SYSTEM GO TO SYSTEM SETTING SYSTEM OPERATION LOG ENTER MENU BACKGND 2 BUZZER ON PASSWORD SET SETUP PWD OFF DEFAULT LOAD SD SETUP SAVE VERSION E...

Page 54: ...7 SET TO NTSC PLS RESTART System has to be set to NTSC please reboot PAL is similar 18 SOFTWARE UPDATE Software update 19 PLEASE RESTART The system should be rebooted after the software has been updat...

Page 55: ...N operation 10 1 The Network Viewer 10 1 1 Introduction to Network Viewer The Network Viewer allows you to potentially access an unit of the IV 400CD SN from a remote desktop or a laptop in a TCP IP n...

Page 56: ...fter the installation is complete pop up the START menu from your computer and point to Programs IDVIEW 4CH DVR Network Viewer to open up the program selection page as shown below Click the IDVIEW 4CH...

Page 57: ...es in the LAN 2 Choose a channel number from the Channel drop down list 3 Type in the user name for the chosen 4CH DVR 4 Type in the password of the device and click the Modify tag to add the device t...

Page 58: ...n a name to the chosen device Password Type in the preset password for making a connection Add Click to add the settings of a chosen device Modify Click to change the settings of a chosen device Delet...

Page 59: ...e in the multi format screens of 1 and 2x2 Press to enter the PC SYSTEM SETUP window which allows you to program the System Setup Record Setup and Alarm Setup Press to enter the DEVICE SETUP window to...

Page 60: ...ideo kept in the HDD of the device Enter the MONTH DAY YEAR HOUR MINUTE you wish to search and click GO to proceed Every 4CH DVR has to own an IP address and a title to be identified on the network Th...

Page 61: ...TUP page see the sample screen as in A above 2 Set the ALRM SETTING to ON to enable the drop down list in the ALARM SETTING area 3 Select a desired recording rate and Quality from the corresponding dr...

Page 62: ...SAVINGS box you wish to save in 4 Click the SAVE tag the program will automatically copy the displayed images into the designated folder The images are saved under the DVRxxx jpg file names which are...

Page 63: ...r tag to start the Image View program See a sample screen below This is image integrity protection software It not only allows you to view an archived image from the SD card or HDD of a computer but a...

Page 64: ...dest data will be kept in the index of the previous oldest data For any newly recorded data this approach will be applied until the disk becomes full HD1 HD1 1 12 02 02 12 20 55 1 12 02 02 12 20 55 2...

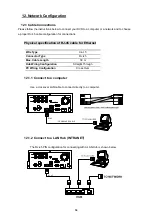
Page 65: ...x Cable Length 30 m Hub Wiring Configuration Straight Through PC Wiring Configuration Cross Over 12 1 1 Connect to a computer Use a crossover LAN cable to connect directly to a computer RJ 45 CROSSOVE...

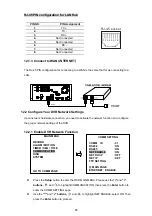
Page 66: ...on network hardware connection you need to activate the network function and configure the proper network settings of the DVR 12 2 1 Enable DVR Network Function Press the Setup button to enter the OSD...

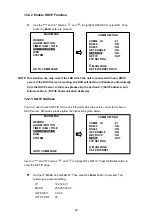
Page 67: ...a DHCP server Otherwise please follow the instructions given below Use the and v buttons and to highlight the NET IP Press the Enter button to enter the NET IP page Set the IP MASK and GATEWAY Then p...

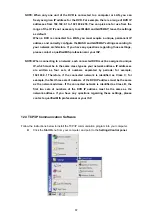
Page 68: ...etwork each connected DVR must be assigned a unique IP which must be in the same class type as your network address IP addresses are written as four sets of numbers separated by periods for example 19...

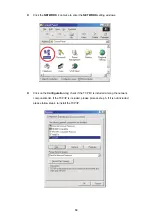
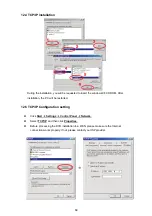
Page 69: ...r the NETWORK setting windows Click on the Configuration tag check if the TCP IC is included among the network components list If the TCP IP is included please process step 5 If it is not included ple...

Page 70: ...After installation the PC will be restarted 12 5 TCP IP Configuration setting Click Start Settings Control Panel Network Select TCP IP and then click Properties Before processing the DVR installation...

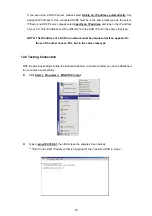
Page 71: ...t from the DVR IP but in the same class type NOTE The IP address of a DVR in a network must be unique to itself as opposed to those of the other chosen PCs but in the same class type 12 6 Testing Conn...

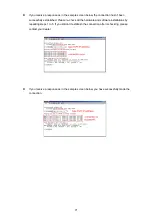
Page 72: ...ssfully established Please re check all the hardware and software installations by repeating steps 1 to 5 If you still can t establish the connection after rechecking please contact your dealer If you...

Page 73: ...ault User Name and password is admin and 9999 respectively 3 Enter the user name Login Name 4 Fill in the password Password 5 Click the Login button and enter the home page of the 4CH DVR both the use...

Page 74: ...vices for viewing This allows you to program the Record Setting and Record Schedule Press to enter the IMAGE window and open the device home page for viewing Click to open the control panel and remote...

Page 75: ...s in the playback mode LIVE The device enters the live display mode This allows you to search a recorded video stored in the HDD of the device Enter the YEAR MONTH DAY HOUR MINUTE you wish to search a...

Page 76: ...m setting including REC rate REC quality ALARM REC enable ALARM REC rate and ALARM REC quality as and when necessary 3 Click the button to submit the new Record Alarm setting 4 Click the button to ret...

Page 77: ...ting page allows users to program the time each day that the 4CH DVR will start and stop recording The time is displayed in a 24 hour clock format If there is a time overlap showing between two contin...

Page 78: ...e device Model from the drop down list on the SpeedDome Controller The Controller will be able to display the Models listed by turn 6 Select a Speed Dome device ID from the drop down list on the Speed...

Page 79: ...78 8 The AutoPan section has three buttons The Start and End buttons fix the two points of any panning movement you select The third or bottom button sets the chosen movement in the play mode...

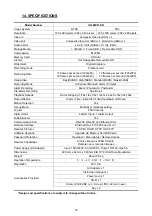
Page 80: ...ing 1 16x 1 8x 1 4x 1 2x 1x 2x 4x 8x 16x 30x 100x Record Search Alarm Time Event list Filter thumbnail SD card Motion Detection Yes Set up Menu Multi layer Network setting Log list 2000 records Alarm...

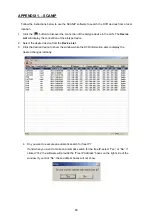
Page 81: ...e device 2 Select the desired device from the Device List 3 Click the desired device to show the window while the DVR information acts to display the desired changes instantly 4 Do you want to execute...

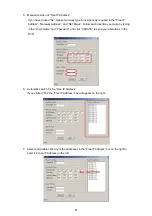
Page 82: ...ollow each insertion you make by typing in the Login Name and Password and click UPDATE to send your alterations to the DVR 6 Automatic search for the Free IP Address If you clicked Yes the Free IP Ad...

Page 83: ...ee IP Address box on the right as well as the device Login Name and Password in their respective blanks at bottom left then click UPDATE and the new address will automatically be sent to the device 9...

Reviews: