23
3.2 Recording Operations
This section details the way to record video
into hard-disk drive. Before commencing with
the recording function, please configure the
recording setting properly according to your
needs.
3.2.1 Manual Recording
Take the following steps to start and stop
recording:
(1) Press the
REC
button to record video into a
hard disk drive with the corresponding
programmed recording settings. The
REC
button will light up indicating the DVR is in the
recording status.
(2) Press the
STOP
button to stop recording any
time.
(3) To access just recorded video, please refer to
section 3.4 for more details.
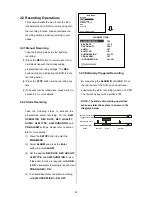
3.2.2 Alarm Recording
Take the following steps to activate the
programmed alarm recording. For the
ALM
OPERATION
,
REC RATE
,
REC QUALITY
,
AUDIO
,
ALM TYPE
,
ALM DURATION
, and
PRE-ALARM
settings, please refer to section
4.2
for more details.
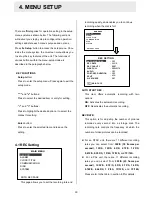
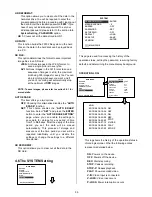
(1) Press the
SETUP
button to enter the
MAIN MENU
.
(2) Select
ALARM
and press the
Enter
button to enter
ALARM
.
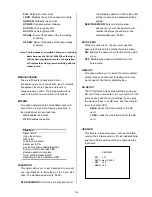
(3) Set the desired
REC RATE, REC QUALITY,
ALM TYPE,
and
ALM DURATION
for use.
If the audio function is required, set
AUDIO
to
ON
. If pre-alarm recording is required, set
PRE-ALARM
to
ON
.
(4) To activate/deactivate the alarm recording,
set
ALM OPERATION
to
ON/ OFF
.
3.2.3 Externally Triggered Recording
By connecting the
ALARM IN
of ALARM I/O on
the rear panel of the DVR, you can activate /
deactivate the alarm recording function of a DVR.
The file will be kept with a prefixed
“A”
.
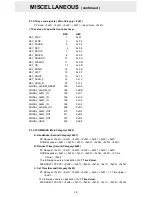
NOTE: The status of recording operations
when an alarm takes place is shown in the
diagrams below
.
Manual or Externally
Triggered Recording
Alarm Takes Place
Actual Recording
Speed
Normal
Alarm
Normal
RECORD
ALARM
CLOCK/ TITLE
COMMUNICATION
DISK
SYSTEM
MAIN MENU
GOTO ALARM PAGE
ALM OPERATION
REC RATE
REC QUALITY
AUDIO
ALM TYPE
ALM DURATION
PRE-ALARM
IO CONNECTION
ALARM SETTING
MAIN PAGE
: OFF
: 15 F/S
: BEST
: OFF
: NO
: 30 SEC
: OFF
: ALARM

