background image

• 

Bluetooth 2.1 A2DP-Verbindung mit allen mobilen Geräten

• 

Eingebauter wiederaufladbarer Akku für bis zu 5-8 Stunden Betriebsdauer

• 

Leistungsfähiger, diskret aufgebauter Verstärker mit 100 Watt (Max.) Spitzenleistung

• 

Hochwertiges Breitbandlautsprechersystem mit 2x 10” Tieftöner und 1” Hochtöner

• 

USB-Eingang für MP3-Wiedergabe

• 

2 kabellose Mikrofone im Lieferumfang enthalten

• 

Talk-Over-Modus, Equalizer, Lautstärkeregelung

• 

AUX Line-Eingang, Line-Ausgang, 2x kabelgebundener Mikrofoneingang mit ¼”-Anschluss

• 

Integrierter Griff für leichten Transport

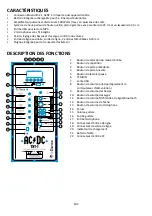
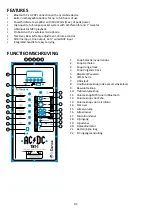
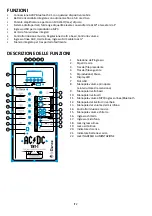
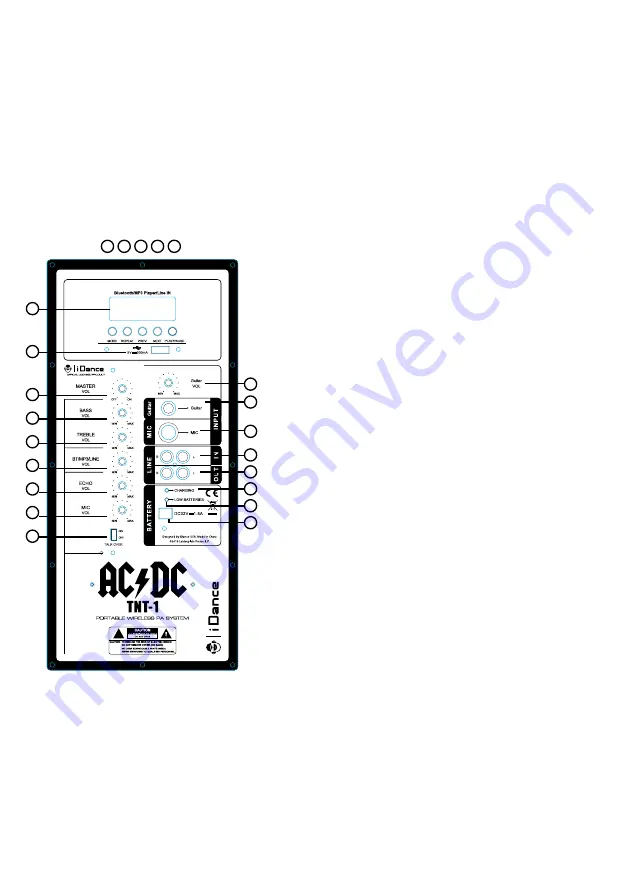
1.  EingangsauswahI

2.  Titel wiederholen

3.  Voriger Titel

4.  Nächster Titel

5.  Wiedergabe/Pause

6.  LED-Display

7.  USB-Schnittstelle

8.  Gesamtlautstärkeregler (auch Ein-/Ausschalter)

9.  Basslautstärkeregler

10.  Höhenlautstärkeregler

11.  MP3/Line in/Bluetooth-Lautstärkeregler

12.  Echoregler

13.  Mikrofonlautstärkeregler

14.  Talk-Over

15.  Lautstärkeregler für den Gitarreneingang

16.  Gitarreneingang

17.  Mikrofoneingang

18.  Line In-Buchse

19.  Line Out-Buchse

20.  Ladeanzeige

21.  Akkustand niedrig

22.  Stromversorgungsbuchse (Gleichstrom)

FUNKTIONEN UND MERKMALE

FUNKTIONSBESCHREIBUNG

DE2

1

6

7

8

9

10

15

12

17

11

16

13

18

20

14

19

21
22

3

2

4 5

Summary of Contents for AC DC TNT 1

Page 1: ...1 IT4 This product meets the essential requirements of Directive 1999 5 EC http www idanceaudio com documentation declarationofconformity WORLD HEADQUARTERS iDance H K Unit i 6 F MG Tower 133 Hoi Bun...

Page 2: ...eed all warnings 3 Follow all instructions 4 Do not use this apparatus near water 5 Clean only with dry cloth 6 Do not block any ventilation openings 7 Install in accordance with the manufacturer s in...

Page 3: ...IC input Integrated handle for easy carrying 1 Input mode selection button 2 Repeat button 3 Previous track button 4 Next track button 5 Play Pause button 6 LED Display 7 USB slot 8 Master volume kno...

Page 4: ...f connection is successful the dot will twinkle slowly twinkle about once in 2 seconds 5 WIRED MIC IN 1 4 Jack input Connect your microphone or musical instruments with a 6 35mm cable 6 Wireless MIC I...

Page 5: ...ead it shall be handed over to the applicable collection point for the recycling of electrical and electronic equipment By ensuring this product is disposed of correctly you will help prevent potentia...

Page 6: ...3 Tenir compte des avertissements 4 Suivre toutes les instructions 5 Ne pas utiliser l appareil pr s de l eau 6 Nettoyer uniquement avec un chiffon sec 7 Ne pas bloquer les ouvertures de ventilation I...

Page 7: ...acilement 1 Bouton de s lection du mode d entr e 2 Bouton de r p tition 3 Bouton de piste pr c dente 4 Bouton de piste suivante 5 Bouton de lecture pause 6 T MOIN 7 Fente USB 8 Bouton de volume princi...

Page 8: ...ment environ une fois toutes les 2 secondes 5 ENTR E DE MIC C BL E Connecteur d entr e 6 35 mm Connectez votre microphone ou instrument musical l aide d un c ble de 6 35 mm 6 Entr e MIC sans fil i All...

Page 9: ...es Il devra au contraire tre remis au point de collecte concern pour le recyclage de l quipement lectrique et lectronique En s assurant de la mise au rebut ad quate de ce produit vous aidera viter des...

Page 10: ...OR SHOCK DO NOT REMOVE COVER OR BACK NO USER SERVICEABLE PARTS INSIDE REFER SERVICING TO QUALIFIED PERSONNEL Class II equipment symbol This symbol indicates that the unit has a double system Belangrij...

Page 11: ...IC input Integrated handle for easy carrying 1 Knop Selectie invoermodus 2 Knop Herhalen 3 Knop Vorige track 4 Knop Volgende track 5 Afspelen Pauzeren 6 LED Scherm 7 USB sleuf 8 Hoofdvolumeknop ook aa...

Page 12: ...tand wordt gebracht En als de connectie tot strand is gebracht zal de stip langzaam knipperen elke 2 seconde 5 BEKABELDE MIC IN 1 4 invoer Verbind uw microfoon met een muziekinstrument via een kabel v...

Page 13: ...ingeleverd worden bij een plaatselijk inzamelpunt voor het recyclen van elektrische en elektronische apparaten in overeenstemming met de landelijke wetgeving Door dit product correct te verwijderen he...

Page 14: ...sers 5 Putzen Sie es nur mit Trockene Stoffe 6 Blockieren Sie keine Ventilations ffnungen 7 Bauen Sie das Ger t bereinstimmend mit den Aufbauanleitungen 8 Bauen Sie es nicht in der n he W rmquellen wi...

Page 15: ...ng mit Anschluss Integrierter Griff f r leichten Transport 1 EingangsauswahI 2 Titel wiederholen 3 Voriger Titel 4 N chster Titel 5 Wiedergabe Pause 6 LED Display 7 USB Schnittstelle 8 Gesamtlautst rk...

Page 16: ...4 Eingangsbuchse Verbinden Sie Ihr Mikrofon oder Musikinstrumente ber ein Kabel mit einem 6 35 mm Klinkenstecker 6 Kabellose Mikrofone i Schalten Sie das Ger t mit dem Gesamtlautst rkeregler ein Posit...

Page 17: ...dem Hausm ll zugef hrt werden darf Stattdessen bringen Sie es bitte zur n chsten zust ndigen Sammelstelle f r Recycling von elektrischen und elektronischen Ger ten Indem Sie sicherstellen dass dieses...

Page 18: ...iones 2 Guarde estas instrucciones Lea todas las precauciones 3 Siga todas las instrucciones 4 No use este aparato cerca del agua 5 Solo lo limpie con toallas secas 6 No bloquee ninguna apertura de ve...

Page 19: ...facilitar el transporte 1 Bot n de selecci n del modo de entrada 2 Bot n Repetici n 3 Bot n Pista anterior 4 Bot n Pista siguiente 5 Bot n Reproducir Pausar 6 Pantalla LED 7 Puerto USB 8 Control maes...

Page 20: ...DE MICR FONO POR CABLE conector de 1 4 Conecte su micr fono o instrumento musical con un cable de clavija de 6 35 mm 6 Entrada de micr fono inal mbrico i Encienda el aparato colocando el interruptor...

Page 21: ...asura dom stica En su lugar debe ser entregado en el punto de recogida de equipos el ctricos y electr nicos de aplicaci n para su reciclaje Asegurando que este producto se elimina correctamente ayudar...

Page 22: ...il presente apparecchio in prossimit di acqua 5 Servirsi solo di panni asciutti per la pulizia 6 Non ostruire le aperture di ventilazione 7 Installare in base alle istruzioni del produttore 8 Non inst...

Page 23: ...acilmente 1 Selezione dell ingresso 2 Ripeti traccia 3 Traccia file precedente 4 Traccia file seguente 5 Riproduzione Pausa 6 Display LED 7 Slot USB 8 Manopola volume principale e interruttore di acce...

Page 24: ...ger lentamente circa una volta ogni 2 secondi 5 INGRESSO MICROFONO CABLATO jack 1 4 Collegare il microfono o gli strumenti musicali con un cavo da 6 35 mm 6 Ingresso MICROFONO wireless i Accendere l i...

Page 25: ...eve essere portato al punto di raccolta pertinente per il riciclo delle apparecchiature elettriche ed elettroniche Assicurandosi che questo prodotto sia smaltito correttamente si eviteranno potenziali...

Reviews: