background image

EN3

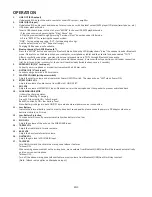
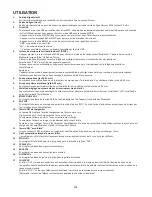
OPERATION

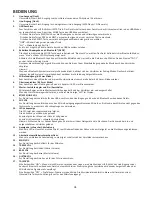
1. 

LINE OUT (RCA output) 

Unbalanced RCA output the audio source for others PA system / amplifier.

2. 

LINE IN (RCA input) 

Unbalanced RCA audio input audio source for music sources with line level output (MP3 player/CD player/smartphone…etc.)

3. 

USB driver playback mode 

Insert a USB thumb driver to the slot, press “MODE” to choose USB MP3 playback mode. 

 i. Play or pause music by pressing the “Play / Pause” key. 

 ii. Play the previous/next song by pressing “Pervious / Next” key when under USB mode. 

 iii. Press “REPEAT” for selecting the repeat modes:  

“ONE” --for repeating one song, “ALL” –for repeating all songs.  

And the default mode is “ALL” (repeat all songs) 

Charging USB devices is not available.

4. 

Bluetooth mode (for A2DP Bluetooth®) 

Press the “MODE” button and switch to Bluetooth mode, When the LED display shows “blue”, the speaker is under Bluetooth 

mode. Please turn on the Bluetooth on your computer, smartphone or tablet and then search for device named “TNT-1”  

After successfully connection, you may stream your playback music to TNT-1 through Bluetooth connection. 

Remarks: When the dot under Bluetooth icon twinkle twice a second, it means without connection or still under connection 

trial. And if connection is successful, the dot will twinkle slowly (twinkle about once in 2 seconds)

5. 

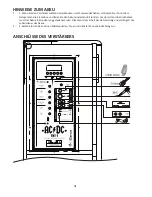
WIRED MIC IN (1/4” Jack input) 

Connect your microphone or musical instruments with a 6.35mm cable.

6. 

GUITAR IN (1/4” Jack input) 

Connect your guitar with a 6.35mm cable.

7. 

MASTER VOLUME (with power switch) 

Adjust the master volume and also works as Power ON/OFF switch. The screen shows “HIFI” when Power ON.

8. 

BT/MP3/LINE VOL 

Adjust the volume of audio source from USB slot / LINE IN/ BT.

9. 

MIC VOL 

Adjust the volume of WIRED MIC input. Please do not aim the microphone at the speaker to prevent audio feedback.

10.  CHARGING INDICATOR 

It shows the charging status:  

Green LED Flashing = Charging 

Green LED constantly ON = fully charged 

Red LED constantly ON = low battery level 

Note: Battery is charged in both ON/OFF state when external power source is connected.

11.  Low Battery 

Indicate the internal battery level. In order to keep best sound quality, please connect power via DC adaptor when Low 

batteries indicator is lit in red.

12.  Low-Battery Protection 

The speaker will turn off power automatically when battery is too low.

13.  ECHO VOL 

Adjust the volume of the echo on the WIRED MIC input.

14.  TREBLE VOL 

Adjust the treble level of master volume.

15.  BASS VOL 

Adjust the bass level of master volume.

16.  GUITAR VOL 

Adjust the gain level of GUITAR IN input.’

17. TALKOVER 

Turn ON this switch to activate the microphone talkover features: 

Talkover ON: 

When making announcement on the microphone, music volume from Bluetooth/USB/Line-IN will be lowered automatically 

until no voice on microphone. 

Talkover OFF: 

Turn off the above microphone talk over feature, music volume from Bluetooth/USB/Line-IN will stay constant. 

(Note: Talkover only applies on Microphone input)

Summary of Contents for AC DC TNT-1

Page 1: ...1999 5 EC http www idanceaudio com documentation declarationofconformity WORLD HEADQUARTERS iDance H K Unit i 6 F MG Tower 133 Hoi Bun Road Kwun Tong Kowloon Hong Kong UK OFFICE iDance Audio U K Graha...

Page 2: ...for your safety If the provided plug does not fit into your outlet consult an electrician for replacement of the obsolete outlet 10 Protect the power cord from being walked on or pinched particularly...

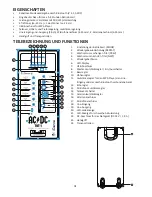
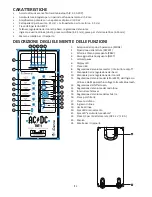
Page 3: ...asy carrying 1 Input mode selection button 2 Repeat button 3 Previous track button 4 Next track button 5 Play Pause button 6 LED Display 7 USB slot 8 Master volume knob also as power switch 9 Bass vol...

Page 4: ...35mm cable 6 GUITAR IN 1 4 Jack input Connect your guitar with a 6 35mm cable 7 MASTER VOLUME with power switch Adjust the master volume and also works as Power ON OFF switch The screen shows HIFI wh...

Page 5: ...t to AC main power and charge for minimum 8 hours and charge for 48 hours at the first time using This protects the battery capability and extends the lifetime 2 Please don t expose the battery to any...

Page 6: ...STEMS This symbol on the product or on its packaging indicates that this product shall not be treated as household waste Instead it shall be handed over to the applicable collection point for the recy...

Page 7: ...r des objets tranchants Evitez toute tension l endroit o le c ble sort de l appareil 11 Utilisez seulement les accessoires fournis ou recommand s par le fabricant 12 Placez et transportez l appareil s...

Page 8: ...ant NEXT 5 Lecture pause 6 Afficheur DEL 7 Prise USB 8 R glage du volume master interrupteur marche arr t 9 Molette de r glage des basses 10 Molette de r glage des aigus 11 Molette de r glage du volum...

Page 9: ...c ble avec fiche jack de 6 35 mm 7 Molette de r glage du volume master et interrupteur marche arr t Avec cette molette vous pouvez r gler le volume master et allumer et teindre l amplificateur L indic...

Page 10: ...nt 8 heures au minimum Il faut charger l accu pendant 48 heures avant d utiliser l amplificateur pour la premi re fois Ceci permet de maintenir le rendement de l accu et prolonge sa dur e de vie 2 N e...

Page 11: ...ans les pays de l Union Europ enne et aux autres pays europ ens disposant de syst mes de collecte s lective Ce symbole appos sur le produit ou sur son emballage indique que ce produit ne doit pas tre...

Page 12: ...ht durch scharfe Gegenst nde besch digt wird Achten Sie darauf dass das Kabel nicht dort wo es aus dem Ger t austritt unter Zugspannung steht 11 Verwenden Sie nur das mitgelieferte oder vom Hersteller...

Page 13: ...rigen Titel PREV 4 Wechsel zum n chsten Titel NEXT 5 Wiedergabe Pause 6 LED Display 7 USB Anschluss 8 Master Lautst rkeregler Ein Ausschalter 9 Bassregler 10 H henregler 11 Lautst rkeregler f r den MP...

Page 14: ...durch ein Kabel mit 6 35 mm Klinkenstecker 7 Master Lautst rkeregler und Ein Ausschalter Mit diesem Regler wird die Master Lautst rke eingestellt und der Verst rker ein und ausgeschaltet Wenn der Vers...

Page 15: ...n Sie den Akku mindestens 8 Stunden Vor der ersten Inbetriebnahme muss der Akku 48 Stunden lang geladen werden Dies dient dem Erhalt der Akkuleistung und verl ngert die Lebensdauer des Akkus 2 2 Setze...

Page 16: ...en Umwelt und Gesundheit werden durch falsches Entsorgen gef hrdet Materialrecycling hilft den Verbrauch von Rohstoffen zu verringern Weitere Informationen ber das Recycling dieses Produkts erhalten S...

Page 17: ...a del cavo d alimentazione non entra nella presa a muro domandate consiglio ad un tecnico qualificato 10 Disponete il cavo d alimentazione in modo che non venga schiacciato incastrato o danneggiato da...

Page 18: ...ano seguente NEXT 5 Lettura pausa 6 Display LED 7 Presa USB 8 Regolazione del volume master interruttore on off 9 Manopola per la regolazione dei bassi 10 Manopola per la regolazione dei toni alti 11...

Page 19: ...i accensione spegnimento Questa manopola regola il volume master e permette di accendere e spegnere l amplificatore La scritta HiFi visualizzata al momento di accendere l amplificatore 8 BT MP3 LINE V...

Page 20: ...re al minimo Prima di usare l amplificatore per la prima volta dovete caricare l accumulatore per 48 ore Ci mantiene il rendimento dell accumulatore e aumenta la sua durata di vita 2 Non esponete l ac...

Page 21: ...nto inadeguato Il riciclaggio dei materiali aiuta a conservare le risorse naturali Per informazioni pi dettagliate circa il riciclaggio di questo prodotto potete contattare l ufficio comunale il servi...

Reviews: