1.
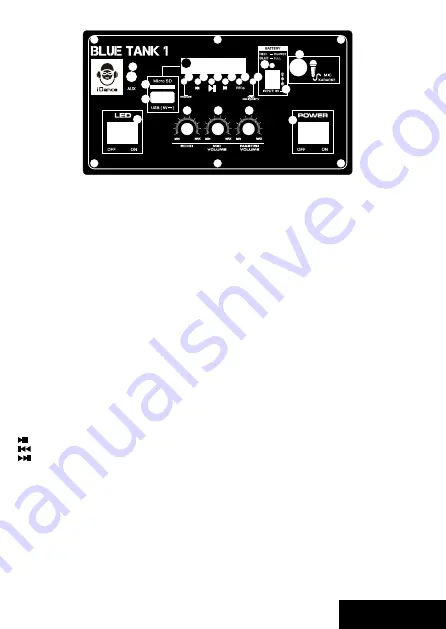
LED Display: This display shows the status in different modes
2.
Modes: Press this button to switch between different modes (USB / AUX / BT / FM)
3.
Prev: press to select previous track in USB/BT mode (or previous channel in Radio)
4.
Play/Pause: press to play / pause the music playback in USB/BT mode
5.
Next: press to select next track in USB/BT mode (or next channel in Radio)
6.
Record: press this to enter recording mode In recording mode, press to record and press again to stop.
7.
Mic Priority: press this to enable microphone talk over feature, music volume will be lowered automatically when
voice is presented on mic
8.
Charging indicator: Red: Charging, Blue: Full
9.
DC input: Connect only with included power adaptor to re-charge
10.
1/4” Microphone input
11.
mini-jack Line-in input
12.
MicroSD slot: Insert Micro SD card with MP3 file.
13.
USB slot: Insert USB drive with MP3 file
14.
Echo: Turn this knob to adjust Echo level on Microphone
15.
Mic Vol: Turn this knob to adjust microphone volume
16.
Master Vol: Turn this knob to adjust master output volume
17.
Power ON/OFF switch
18.
LED light show ON/OFF switch
NOTE:
The internal lithium ion battery will be charged when DC input is connected.
GENERAL OPERATION: USB/Micro SD PLAYER
•
Format the USB/Micro SD drive to FAT-32 file system
•
Ensure no files type other than mp3 in the USB/Micro SD drive
•
Plug the USB/MicroSD drive into the BlueTank 1
•
MP3 file will be played automatically through BlueTank 1
•
Use the buttons in the back panel to navigate the music in USB/Micro SD drive
Key: Press this button to play/pause the music
Key: Press for previous music,
Key: Press for next music,
Note: maximum USB/Micro SD capacity at 32GB
GENERAL OPERATION: USB/Micro SD VOICE RECORDER
Record
•
Insert a USB/Micro SD drive into the BlueTank 1
•
Connect your microphone to BlueTank 1 with a ¼” jack
•
Press REC button to start record
•
Press REC button to stop recording.
•
A recording file will be created in USB/Micro SD
Playback
•
Insert USB/Micro SD and the recording will be stored in the USB/Micro SD drive
Front Panel Function
Fig.1
1
2 3 4 5 6 7
8
9
10
11
12
13
14
15
16
17
18
ENGLISH


