background image

EN1

WARNING

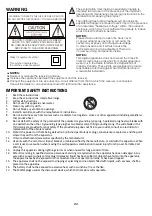
WARNING: TO REDUCE THE RISK OF FIRE OR SHOCK, 

DO NOT EXPOSE THIS PRODUCT TO RAIN OR MOISTURE 

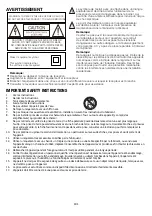
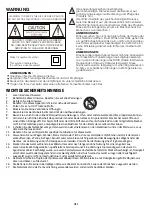
The exclamation mark inside an equilateral triangle is 

intended to alert user of the presence of the important 

operating and maintenance (servicing) instructions in the 

literature accompanying the product.
The lightning flash with arrowhead symbol inside an 

equilateral triangle is intended to alert User of the presence 

of un-insulated “hazardous voltage” within  the product’s 

enclosure, which may be of sufficient magnitude to induce 

a risk of electric shock to persons

NOTES:

Please do not attempt to open the back cover 

or power adapter as opening or removing the 

covers may expose you to dangerous voltage 

or other hazards, and it will also cause the 

restricted servicing to be disabled: There are 

no user servicing components inside.

NOTES:

This digital apparatus does not exceed the Class B 

limits for radio noise emissions from digital apparatus 

as set out in the Radio Interference Regulations of 

Industry Canada. These limits are designed to provide 

reasonable protection against harmful interference in 

a residential installation.

NOTES:

Reorient or relocate the receiving antenna.

Increase the separation between the equipment and the receiver.

Connect the equipment into an outlet on a circuit different from that to which the receiver is connected

Consult the dealer or an experienced radio/TV technician for assistance.

CAUTION: TO REDUCE THE RISK OF FIRE OR 

SHOCK, DO NOT REMOVE COVER OR BACK. 

NO USER-SERVICEABLE PARTS INSIDE. REFER 

SERVICING TO QUALIFIED PERSONNEL

Class II equipment symbol

This symbol indicates that

the unit has a double system.

IMPORTANT SAFETY INSTRUCTIONS

1. 

Read these instructions. 

2. 

Keep these instructions. Heed all warnings.

3. 

Follow all instructions.

4. 

Do not use this apparatus near water. 

5. 

Clean only with dry cloth.

6. 

Do not block any ventilation openings. 

7. 

Install in accordance with the manufacturer’s instructions.

8. 

Do not install near any heat sources such as radiators, heat registers, stoves, or other apparatus (including amplifiers) 

that produce heat. 

9. 

Do not defeat the safety of the polarized of the polarized or grounding-type plug. A polarized plug has two blades with 

one wider than the other. A grounding type plug has two blades and a third grounding prong. The wide blade or the 

third prong are provided for your safety. If the provided plug does not fit into your outlet, consult an electrician for 

replacement of the obsolete outlet.

10.  Protect the power cord from being walked on or pinched particularly at plugs, convenience receptacles, and the point 

where they exit from the apparatus.

11.  Only use attachments/accessories specified by the manufacturer.

12.  Use only with the cart, stand, tripod, bracket, or table specified by the manufacture, or sold with the apparatus. When 

a cart is used, use caution when moving the cart/apparatus combination to avoid injury from tip-over. Portable Cart 

Warning

13.  Unplug this apparatus during lightning storms or when unused for long periods of time.

14.  Refer all servicing to qualified service personnel. Servicing is required when the apparatus has been damaged in any 

way such as power-supply cord or plug is damaged, liquid has been spilled or objects have fallen into the apparatus, 

the apparatus has been exposed to rain or moisture does not operate normally, or has been dropped. 

15.  The apparatus shall not be exposed to dripping or splashing and no objects filled with liquids, such as vases, shall be 

placed on the apparatus. 

16.  The battery shall not be exposed to excessive heat such as sunshine, fire or the like. 

17.  The MAINS plugs used as the disconnect device, which shall remain readily operable.

Summary of Contents for XD25

Page 1: ...1999 5 EC http www idanceaudio com documentation declarationofconformity xd25 WORLD HEADQUARTERS iDance H K Unit i 6 F MG Tower 133 Hoi Bun Road Kwun Tong Kowloon Hong Kong UK OFFICE iDance Audio U K...

Page 2: ...eed all warnings 3 Follow all instructions 4 Do not use this apparatus near water 5 Clean only with dry cloth 6 Do not block any ventilation openings 7 Install in accordance with the manufacturer s in...

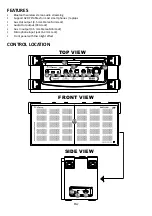
Page 3: ...nes laptops Aux Out output 3 5 mm Stereo Mini Jack Audio Out output RCA Jack Aux In output 3 5 mm Stereo Mini Jack Microphone input jack 6 3 mm Jack Front panel with Disco light effect FEATURES CONTRO...

Page 4: ...turn on o panel disco light show 9 MIC LEVEL Button Turn this knob to adjust the microphone volume sound level 10 VOICE CHANGER Switch Change your microphone voice into beast LOW or kid HIGH by selec...

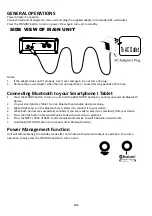
Page 5: ...both devices are successfully connected you are ready to play music wirelessly from your device 5 Press the PLAY button of external Bluetooth device to start music playback 6 Press the NEXT PREV of XD...

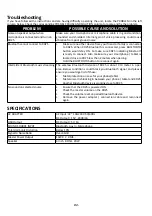
Page 6: ...e your smartphone tablet is located close to XD25 less than 2 meters when pairing Hold the BLUETOOTH button to reconnect again Intermittent Bluetooth music streaming The wireless Bluetooth distance of...

Page 7: ...3 Tenir compte des avertissements 4 Suivre toutes les instructions 5 Ne pas utiliser l appareil pr s de l eau 6 Nettoyer uniquement avec un chiffon sec 7 Ne pas bloquer les ouvertures de ventilation I...

Page 8: ...tie Auxiliaire Mini Jack st r o 3 5 mm Sortie Audio RCA Entr e Auxiliaire Mini Jack st r o 3 5 mm Entr e Microphone Jack 6 3mm Panneau avant avec effet lumi re Disco CARACTERISTIQUES LOCALISATION DES...

Page 9: ...disco 9 Bouton MIC LEVEL Tournez ce bouton pour r gler le niveau de volume du microphone 10 Interrupteur VOICE CHANGER Change la voix de votre microphone en b te LOW ou en enfant HIGH en s lectionnant...

Page 10: ...us tes pr t couter de la musique sans fil depuis votre appareil 5 Appuyez sur le bouton PLAY de l appareil externe Bluetooth pour d buter la lecture de la musique 6 Appuyez sur NEXT PREV du XD25 ou de...

Page 11: ...fiez que le XD25 indique que le Bluetooth est pr t tre connect V rifiez que votre smartphone tablette est moins de 2 m tres du XD25 lors du jumelage Maintenez le bouton BLUETOOTH pour reconnecter En B...

Page 12: ...OR SHOCK DO NOT REMOVE COVER OR BACK NO USER SERVICEABLE PARTS INSIDE REFER SERVICING TO QUALIFIED PERSONNEL Class II equipment symbol This symbol indicates that the unit has a double system Belangrij...

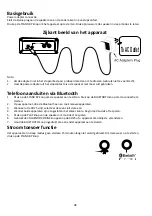
Page 13: ...CA Jack AUX Input 3 5mm Stereo Mini Jack Microfoon input 6 3mm Jack Panel met disco licht effecten USB uitgang om je smartphone op te laden Power adapter Inbegrepen voor de stroom toevoer Functies Loc...

Page 14: ...knop Gebruik deze knop om de disco lichten van het panel aan of uit te zetten 9 Microfoon volume Gebruik deze draai knop het volume van de microfoon in te stellen 10 Stem veranderingen knop Gebruik de...

Page 15: ...en sluit deze aan 4 Wanner beide apparaten zijn aangesloten met elkaar kunt u begin met muziek af te spelen 5 Druk op de PLAY knop van de speaker om muziek af te spelen 6 Gebruik de VOLGENDE VORIGE kn...

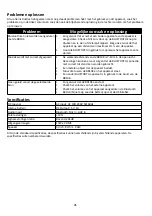
Page 16: ...van maximaal 2m is van de speaker Houd de BLUETOOTH ingedrukt om opnieuw het apparaat aan te sluiten Muziek wordt niet correct afgespeeld De werkende afstand van de BB10K is 7 10m in de open lucht Dez...

Page 17: ...sers 5 Putzen Sie es nur mit Trockene Stoffe 6 Blockieren Sie keine Ventilations ffnungen 7 Bauen Sie das Ger t bereinstimmend mit den Aufbauanleitungen 8 Bauen Sie es nicht in der n he W rmquellen wi...

Page 18: ...tzung f r die meisten Smartphones und Laptops Aux Aus Ausgang 3 5 mm Stereo Mini Jack Aux Aus Ausgang RCA Jack Aux In Ausgang 3 5 mm Mini Jack Mikrofon Eingangs Jack 6 3 mm Jack Frontplatte mit Disco...

Page 19: ...wird der Anzeiger ein flashen 8 LED Taste Dr cken Sie die Taste um die Disco Anzeige ein auszuschalten 9 MIC LEVEL Taste Dr cken Sie um die Lautst rke einzustellen 10 STIMMEN WECHSLER Schalter ndern S...

Page 20: ...reich miteinander verbunden sind k nnen Sie Musik drahtlos von Ihrem Ger t aus spielen 5 Dr cken Sie auf die PLAY Taste des Ger ts um die Musikwiedergabe zu starten 6 Dr cken Sie die NEXT PREV Tasten...

Page 21: ...25 ist etwa 7 10 Meter im offenen Gebiet m glich Die folgende Bedingungen k nnen zu der Blockierung des Bluetooth Signal f hren darum bitten wir Ihnen Diese zu beachten Metallschutz H llen f r Ihr Tel...

Page 22: ...iones 2 Guarde estas instrucciones Lea todas las precauciones 3 Siga todas las instrucciones 4 No use este aparato cerca del agua 5 Solo lo limpie con toallas secas 6 No bloquee ninguna apertura de ve...

Page 23: ...Jack RCA Input AUX Mini Jack Est reo 3 5mm Input de Micr fono Jack 6 3mm Panel frontal con efectos de luces disco Entrada USB para la carga de la bater a Adaptador de corriente Incluido para alimenta...

Page 24: ...es de discoteca del panel 9 Bot n de niveles del micr fono Use esta perilla para ajustar el volumen del micr fono 10 Interruptor de cambio de voz Ajuste su voz con este interruptor para cambiar entre...

Page 25: ...correcta est listo para reproducir m sica de manera inal mbrica desde su dispositivo 5 Pulse el bot n de PLAY del dispositivo externo Bluetooth para empezar la reproducci n 6 Pulse el bot n NEXT PREV...

Page 26: ...s que aseg rese de que XD25 est indicando que est listo para conectarse Tambi n mire si su dispositivo se encuentra a menos Mantenga pulsado el bot n de BLUETOOTH para conectar de nuevo Reproducci n d...

Page 27: ...il presente apparecchio in prossimit di acqua 5 Servirsi solo di panni asciutti per la pulizia 6 Non ostruire le aperture di ventilazione 7 Installare in base alle istruzioni del produttore 8 Non inst...

Page 28: ...o Out jack RCA Uscita Aux In jack stereo mini da 3 5 mm Jack ingresso microfono jack da 6 3 mm Pannello frontale con effetto luce Disco Porta USB per caricabatteria cellulare Alimentatore incluso per...

Page 29: ...i effetti luminosi da discoteca 9 Pulsante MIC LEVEL Ruotare questa manopola per regolare il livello audio del volume del microfono 10 Interruttore VOICE CHANGER Modificare la voce del proprio microfo...

Page 30: ...di scansione Bluetooth selezionarla per connetterla al proprio dispositivo 4 Quando i due dispositivi sono stati connessi sar possibile riprodurre musica dal proprio dispositivo in modalit wireless 5...

Page 31: ...5 indica che il Bluetooth pronto alla connessione Assicurarsi anche che lo smartphone tablet sia abbastanza vicino all unit XD25 meno di 2 metri in fase di abbinamento Tenere premuto il tasto BLUETOOT...

Reviews: