background image

8

9

8

9

INTRODUCTION

To get the best out of your new 
appliance, please read this user 
guide carefully before using it for the 

first time. We also recommend that 

you keep the instructions for future 
reference, so that you can remind 
yourself of the functions of your 
appliance.

SAFETY MEASURES
General 

•  Incorrect use of this appliance may 

cause personal injury and damage.

•  Use for its intended purpose 

only. The manufacturer is not 
responsible for any damage 
resulting from incorrect use or 
handling (see also the ‘Guarantee 
Terms’ section).

•  For domestic use only. Not for 

outdoor or commercial use.

•  For connection to 20 V, 50 Hz 

only.

•  Do not submerge in water or any 

other liquid.

•  Never spray steam towards other 

people, as it can cause serious 
burns and scalding.

•  The appliance will become very hot 

during use. Never touch the sole 
or sides when hot to avoid risk of 
burns. Touch handle or buttons 
only.

•  Always stand the appliance upright 

while hot.

•  Never leave unattended when in 

use, and keep an eye on children.

•  Do not cover.
•  Always keep at a safe distance 

from combustible objects when in 
use. 

•  Allow to cool down completely and 

empty any remaining water before 
putting it away. The appliance 
should be kept out of the reach of 
children.

•  Never leave in a place where the 

temperature might drop below 
freezing point.

•  Protect the soleplate, and NEVER 

run it over metal or similar 
surfaces, as this will damage it.

•  Do not fill water over the MAX 

marker. Do not add anything to the 
water. Ordinary tap water can be 
used.

Cord and plug

•  Do not allow the cord to hang over 

the edge of a table/counter, and 
keep it away from hot objects and 

naked flames.

•  Check regularly that neither cord 

nor plug is damaged and do not 
use if they are, or if the appliance 
has been dropped or damaged in 
any other way. 

•  If the appliance or plug is 

damaged, it must be inspected 
and if necessary, repaired by 
an authorised repair engineer, 
otherwise there is a risk of electric 
shock. Never try to repair the 
appliance yourself (see also 
Guarantee Terms).

•  Remove the plug from the socket 

after use, when cleaning, when 

filling the water reservoir, and when 

left unattended.

•  Avoid pulling the cord when 

removing the plug from the socket. 
Instead, hold the plug. 

•  Check that it is not possible to 

pull or trip over the cord or any 
extension cord.

•  The cord must not be wound 

around the appliance.

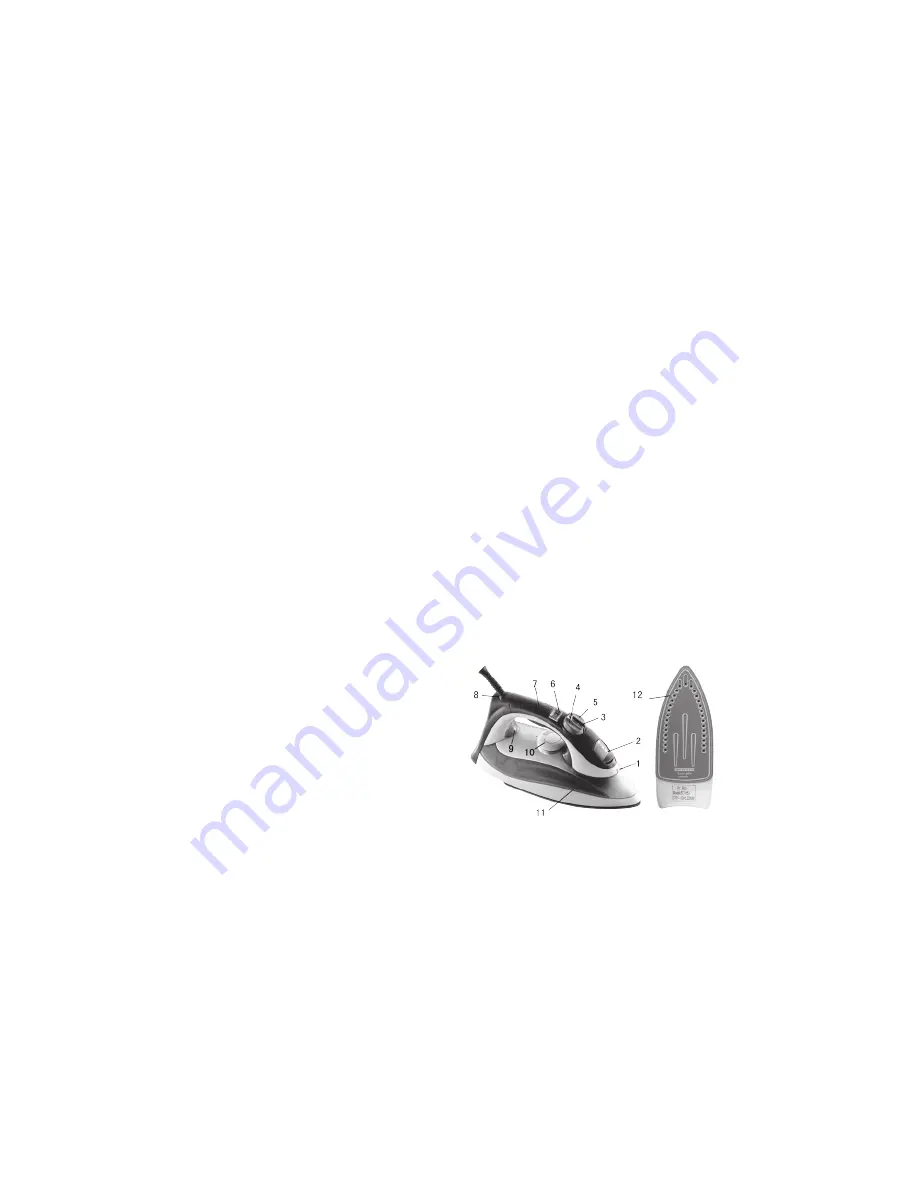
KEY TO MAIN COMPONENTS OF 
THE APPARATUS

.   Spray nozzle
2.    Water reservoir cover
.    Function selector
4.    Steam shot button
5.    Spray button
6.    Display
7.    Handle
8.    Power cable with ball joint
9.    Thermostat and indicator lamps
0.  Temperature control dial
.  MAX water level mark
2.  Soleplate

UK

Summary of Contents for 741-048

Page 1: ...1 048 DK Dampstrygejern med display 2 SE ngstrykj rn med display 6 NO Dampstrykejern med display 10 FI H yrysilitysrauta n yt ll 14 UK Steam iron with display 18 DE Dampfbugeleisen mit Display 22 www...

Page 2: ...t m ikke tild kkes Hold altid apparatet p sikker afstand fra br ndbare genstande n r det er i brug Lad apparatet k le helt af og t m det for vand inden det stilles v k Apparatet b r opbevares utilg ng...

Page 3: ...l mv 120 160 C Uld silke eller blandinger 160 205 C Bomuld eller linned Stil apparatet lodret p enden S t stikket i stikkontakten og t nd for str mmen o Den orange termostatlampe 9 t ndes og displayet...

Page 4: ...il termostaten ved at dreje termostatknappen til positionen MIN og derefter tilbage til den nskede temperatur Indikatorlampen slukkes og termostatlampen t ndes Du kan forts tte strygningen n r termost...

Page 5: ...ere det brugte udstyr til den forhandler du k bte det af p betingelse af at du k ber nyt udstyr Kontakt forhandleren distribut ren eller de kommunale myndigheder for at f yderligere oplysninger om hvo...

Page 6: ...r ckh ll f r barn L mna aldrig apparaten p en plats d r temperaturen kan sjunka under fryspunkten Skydda stryksulan och dra den ALDRIG ver metall eller liknande ytor detta skadar den Fyll inte p med...

Page 7: ...du h jer temperaturen med temperaturreglaget t nds termostatlampan Forts tt inte med strykningen f rr n lampan slocknat ngstrykning ngstrykning kan bara g ras vid h g temperatur Anv nd inte ngstrykni...

Page 8: ...svalna helt och torka av stryksulan med en fuktig trasa F rvara alltid apparaten uppr tt och l gg en trasa ver stryksulan som skydd RENG RING Allm n reng ring Apparaten f r inte s nkas ned i vatten el...

Page 9: ...r lokala myndighet f r ytterligare information om hantering av avfall som utg rs av eller inneh ller elektriska eller elektroniska delar GARANTIVILLKOR Garantin g ller inte om ovanst ende instruktione...

Page 10: ...vannet f r du setter det bort Oppbevar apparatet utilgjengelig for barn La aldri apparatet st p et sted der temperaturen kan falle under frysepunktet Beskytt s len og f r den ALDRI over metall eller l...

Page 11: ...n regulerer temperaturen p apparatet o Dersom du skrur opp temperaturen ved hjelp av temperaturvelgeren vil lampen lyse Ikke stryk f r denne sl r seg p Ampstryking Dampstryking er bare mulig ved h ye...

Page 12: ...rk s len med en fuktig klut Oppbevar alltid apparatet p h ykant og plasser en klut over s len for beskyttelse RENGJ RE APPARATET Generell rengj ring Apparatet m ikke legges i vann eller annen v ske Re...

Page 13: ...erligere informasjon om hva du skal gj re med elektrisk og elektronisk avfall GARANTIBETINGELSER Garantien gjelder ikke hvis instruksjonene over ikke f lges hvis apparatet er blitt endret hvis apparat...

Page 14: ...tyhjenn j ljell oleva vesi ennen silitysraudan poislaittamista Laite on pidett v lasten ulottumattomissa l milloinkaan j t tuotetta paikkaan jossa l mp tila voi tippua alle j tymispisteen Suojaa alus...

Page 15: ...tteen l mp tilaa o Jos lis t l mp l mp tilan s t py r k ytt m ll termostaatin valo syttyy l aloita silityst ennen kuin se sammuu H yrysilitys H yrysilitys on mahdollista vain korkeissa l mp tiloissa l...

Page 16: ...mostaatin valo sammuu Anna kuivua kokonaan ja kuivaa pohja kostealla kankaalla S ilyt aina pystyasennossa ja suojaa pohja kankaalla PUHDISTUS Peruspuhdistus l upota laitetta veteen tai muuhun nesteese...

Page 17: ...aat j lleenmyyj lt si tukkukauppiaaltasi tai paikallisilta viranomaisilta TAKUUEHDOT Takuu ei ole voimassa jos edell olevia ohjeita ei ole noudatettu laitteeseen on tehty muutoksia laitetta on k sitel...

Page 18: ...of children Never leave in a place where the temperature might drop below freezing point Protect the soleplate and NEVER run it over metal or similar surfaces as this will damage it Do not fill water...

Page 19: ...turn the temperature up using the temperature control dial the thermostat lamp will light Do not continue ironing until it goes out Steam ironing Steam ironing is only possible at high temperatures D...

Page 20: ...The appliance must not be immersed in water or any other liquid Clean appliance with the exception of the sole using a damp cloth and a little detergent if necessary Never use a scouring sponge or ab...

Page 21: ...ollowed if the appliance has been interfered with if the appliance has been mishandled subjected to rough treatment or has suffered any other form of damage if faults have arisen as a result of faults...

Page 22: ...nd zu entz ndlichen Gegenst nden Lassen Sie es v llig abk hlen und leeren Sie das verbleibende Wasser aus bevor Sie es wegstellen Das Ger t au er Reichweite von Kindern halten Lassen Sie es nie in ein...

Page 23: ...ernen Sie den Deckel f r den Wasserbeh lter 2 siehe Abbildung und f llen Sie Wasser bis zur MAX Markierung 11 ein Schlie en Sie die Abdeckung des Wassertanks Temperatur einstellen Schieben Sie den Fun...

Page 24: ...die Spr htaste 5 Das Ger t gibt ber die Spr hd se 1 einen Spr hnebel ab Trockenb geln Beim Trockenb geln wird die gleiche Methode angewandt wie beim Dampf aber der Funktionsw hlschalter muss sich in P...

Page 25: ...rforderlichenfalls ein wenig Reinigungsmittel Verwenden Sie keine Scheuerschw mme oder schleifenden Reinigungsmittel f r die Reinigung der B gelsohle Verwenden Sie einen gut ausgewrungenen Lappen und...

Page 26: ...ll erfahren m chten GARANTIEBEDINGUNGEN Diese Garantie gilt nicht falls die vorstehenden Hinweise nicht beachtet werden falls unbefugte Eingriffe am Ger t vorgenommen wurden falls das Ger t unsachgem...

Page 27: ...27 27...

Page 28: ...28 28...

Page 29: ...29 29...

Page 30: ...30 30...

Page 31: ...31 31...

Page 32: ...32...

Reviews: