background image

Congratulations with your new multi mixer.
Please read all instructions before you start
using your new kitchen appliance. We
recommend that you save this instruction
manual for future use.

IMPORTANT SAFEGUARDS:

When using electric appliances, basic safety
precautions should always be followed including
the following:
*

Read all instructions before use.

*

To protect against risk of electrical shock, do
not put cord, plugs, or the motor part into
water or other liquids.

*

Close supervision is needed when this
appliance is used by or near children.

*

Unplug from outlet when not in use, before
putting on or taking off parts, and before
cleaning.

*

Avoid contacting moving parts.

*

Do not use outdoors.

*

Do not let cord hang over edge of table or
counter.

*

Keep hands and utensils out of container
while blending, to reduce the risk of severe
injury to persons or damage to the
stickmixer. A scraper may be used, but only
when the stickmixer is not running.

*

Blades are sharp. Handle carefully.

*

The use of attachments, including canning
jars, not recommended by the manufacturer
may cause a risk of injury to persons.

This appliance is designed for short time
operation. After 1 minute continuous use, allow a
few minutes rest before next use to avoid
overheating.

If the supply cord is damaged, the manufacturer
or its service agent or a similar qualified person
must replace it, in order to avoid a hazard.
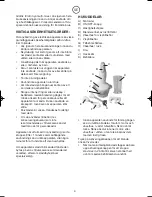
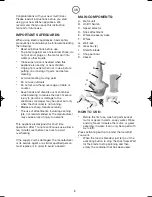
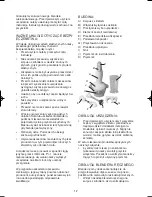
MAIN COMPONENTS:

A. Motor unit

B. On/Off 

Switch 

C. Speed selector

D. Stick attachment

E. Whisk Accessory base

F.  Whisk

G. Wall rack

H. Gear box (2)

I.

Small S-blade

J.

Chopper bowl

K. Vessel

HOW TO USE:

*

Before the first use, wash all parts except
motor or gears in warm, soapy water. Rinse
and dry. Never immerse the motor- or gears
assembly in water; it can only be wiped with
wet cloth.

Press activating button to blend the foodstuff
you want.
*

When the food is blended, just let go of the
activating button to stop the stickmixer. Wait
for the blade to stop spinning and then
empty the container that has been used.

8

A

B

C

D

E

G

I

J

K

F

H

UK

GMT-32 IM_new  11/11/03  12:18  Side 8

Summary of Contents for Agat GMT-032BD

Page 1: ...Agat Model GMT 032BD Art No 746 057 DK Multimixer 2 SE Multi blender 4 FI Tehosekoitin 6 UK Multi Mixer 8 DE Multimixer 10 PL BLENDER WIELOZADANIOWY 12 ...

Page 2: ...rantien Børn der befinder sig i nærheden af apparatet når dette er i brug bør holdes under opsyn Apparatet bør opbevares utilgængeligt for børn Hvis brug af forlængerledning er nødvendig bør man bruge en 10 ampere ledning Man skal være forsigtig med placeringen af forlængerledningen så man ikke snubler over denne Brug ikke apparatet hvis der er tydelige tegn på skader Brug kun apparatet indendørs ...

Page 3: ...ksen låget over skålen 5 Drej motor delen i gearboksen indtil at den låser 6 Tænd på motordelen og hold denne med den ene hånd mens De med den anden hånd holder på skålen 7 Efter brug fjernes motordelen fra gear boksen låget 8 Herefter fjernes gearboksen låget 9 Forsigtig fjernes kniven 10 Til sidst fjernes de behandlede fødevarer RENGØRING Rengør motordelen og gear boksen til piskeriset med en hå...

Page 4: ...när apparaten står stilla Knivbladen är vassa Handskas försiktigt med dem Om du använder tillbehör t ex konserveringsburkar som inte rekommenderas av tillverkaren kan det medföra risk för personskador Apparaten är utformad för användning i korta etapper Efter 1 minuts sammanhängande användning ska du låta apparaten vila några minuter för att undvika att den överhettas Om apparatens sladd blir skad...

Page 5: ...ven och vrid 90 för att låsa den Placera alltid hackskålen på ett halkfritt underlag 3 Placera livsmedlet i hackskålen 4 Placera växelhuset på hackskålen 5 Vrid på motorenheten på växelhuset tills den låser fast 6 Tryck på knappen för att starta hacktillsatsen Medan hackningen pågår ska du hålla motorenheten med ena handen och hålla hackskålen med den andra handen 7 Efter användning vrider du av m...

Page 6: ...säosia esim säilykepurkkeja joita valmistaja ei ole suositellut käytettäväksi sillä se saattaa aiheuttaa loukkaantumisen Laite on suunniteltu lyhytaikaiseen käyttöön Kun laitetta on käytetty yhtäjaksoisesti 1 minuutin ajan anna sen levätä muutama minuutti ennen kuin käytät sitä uudestaan Siten ehkäiset laitteen ylikuumenemisen Vaurioituneen virtajohdon saa vaihtaa vain valmistajan valtuuttaman huo...

Page 7: ...a terä teholeikkurin kulhon keskellä olevaan pidikkeeseen Teholeikkuri paina terää alaspäin ja käännä sitä 90 niin että se lukittuu Aseta teholeikkurin kulho aina liukumista estävälle alustalleen 3 Pane ruoka aineet teholeikkurin kulhoon 4 Pane vaihteisto teholeikkurin kulhon päälle 5 Kierrä moottori kiinni vaihteistoon siten että se lukittuu 6 Käytä teholeikkuria painamalla kytkintä Pidä käytön a...

Page 8: ...when the stickmixer is not running Blades are sharp Handle carefully The use of attachments including canning jars not recommended by the manufacturer may cause a risk of injury to persons This appliance is designed for short time operation After 1 minute continuous use allow a few minutes rest before next use to avoid overheating If the supply cord is damaged the manufacturer or its service agent...

Page 9: ...lade and turn 90 to lock it Always place the chopper bowl on the anti slip base 3 Place food in the chopper bowl 4 Place the gearbox on the chopper bowl 5 Turn the motor unit on the gearbox until it locks 6 Press switch to operate the chopper During processing hold the motor unit with one hand and the other hand hold the chopper bowl 7 After use turn the motor unit off the gearbox 8 Then remove th...

Page 10: ...nder die sich in der Nähe eines in Betrieb befindlichen Geräts aufhalten sind zu beaufsichtigen Das Gerät für Kinder unzugänglich aufbewahren Bei Bedarf einer Verlängerungsschnur ein 10 Ampere Kabel benutzen Vorsicht beim Verlegen Stolpergefahr Benutzen Sie das Gerät nicht wenn es deutliche Anzeichen von Beschädigung aufweist Benutzen Sie das Gerät nur in Innenräumen Das Gerät darf nicht gewerblic...

Page 11: ...etriebebox drehen 6 Motoreinheit einschalten und die Einheit mit einer Hand die Schüssel mit der anderen Hand halten 7 Nach dem Gebrauch die Motoreinheit von Getriebebox Deckel abnehmen 8 Getriebebox Deckel abnehmen 9 Messer vorsichtig herausnehmen 10 Die behandelten Lebensmittel zuletzt herausnehmen REINIGUNG Die Motoreinheit und die Getriebebox für den Quirl mit einem hart ausgewrungenen Tuch re...

Page 12: ...ducenta w tym pojemników roboczych stwarza ryzyko obra eƒ cia a Urzàdzenie mo e pracowaç w sposób ciàg y jedynie przez krótki czas Po 1 minucie nieprzerwanego u ywania nale y wy àczyç urzàdzenie na kilka minut aby uniknàç przegrzania W przypadku uszkodzenia przewodu sieciowego jego wymiany powinien dokonaç producent autoryzowany punkt serwisowy lub inna osoba posiadajàca odpowiednie kwalifikacje B...

Page 13: ...iowe do pojemnika rozdrabniacza 4 Za ó przek adni na pojemnik rozdrabniacza 5 Przykr ç korpus z silnikiem na przek adni a do zatrzaÊni cia 6 NaciÊnij przycisk aby uruchomiç rozdrabniacz W tym czasie jednà r ka trzymaj korpus z silnikiem a drugà pojemnik rozdrabniacza 7 Po u yciu odkr ç korpus z silnikiem od przek adni 8 Nast pnie zdejmij przek adni 9 Ostro nie wyjmij ostrze 10 Wyjmij produkty ywno...

Page 14: ...14 ...

Reviews: