background image

USE THE HAND BLENDER

The Hand blender is perfectly suited for
preparing dips, sauces, soups, mayonnaise and
baby food as well as for mixing and preparing
milkshakes.
1.  Turn the blender stick on the motor unit until

it locks.

2.  Introduce the hand blender in the vessel.

Then press the ON/OFF switch or the
ON/OFF turbo switch.

3.  Turn the blender stick off the motor unit after

use.

You can use the hand blender in the measuring
beaker and as well in any other vessel. When
blending directly in the saucepan while cooking
take care to protect the hand blender from
overheating.

USE OF WHISK 

Use the whisk only for whipping cream, beating
egg whites and mixing sponges and ready-mix
dessert.
1.  Insert the whisk into the gearbox and then

turn the gearbox on the motor unit until it
locks.

2.  Place the whisk in a vessel and press the

switch to operate,

3.  Turn the gear box off the motor unit after

use. Then pull the whisk out of the gear box.
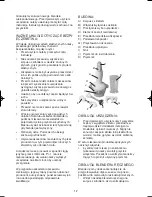
USE OF CHOPPER

The chopper is perfect for hard food such s

cheese, onions, herbs, garlic, carrots, nut and
prunes.
Do not chop extremely harm food such as
nutmeg coffee beans and grains

Before chopping

1.  Carefully remove the plastic cover from the

blade. Caution: The blade is very sharp!
Always hold it by the upper plastic part.

2.

Place the blade on the centre fin of the
chopper bowl. Chopper: press down the
blade and turn 90° to lock it. Always place
the chopper bowl on the anti slip base.

3.  Place food in the chopper bowl.

4.  Place the gearbox on the chopper bowl 

5.  Turn the motor unit on the gearbox until it

locks

6.  Press switch to operate the chopper. During

processing, hold the motor unit with one
hand and the other hand hold the chopper
bowl.

7.

After use turn the motor unit off the gearbox.

8.  Then remove the gear box 

9.  Carefully take out the blade.

10. Remove the processed food from the

chopper bowl.

CLEANING:

Clean the motor unit and the whisk gearbox with
a damp cloth only. The chopper gearbox may be
rinsed under the tap, but do not immerse in the
water.
All other parts can be cleaned in the dishwasher.
However, after processing very salty food, you
should rinse the blades right away.
When processing food with colour, the plastic
parts of the appliance may become discoloured.
Wipe these parts with vegetable oil before
placing them in the dishwasher.

THE WARRENTY DO NOT COVER:

*

If the above points have not been observed.

*

If the appliance has not been properly
maintained, if force has been used against it
or if it has been damaged in any other way.

*

If errors due to the electric supply mains
should arise. 

*

If the appliance has been repaired or
modified or changed in any way or by any
person not properly authorized.  

Owing to our constant development of our
products on both functionality and design we
reserve the right to change the product without
preceding notice.

Importer:

Adexi A/S
Adexi AB

We take reservations for printing errors.

9

GMT-32 IM_new  11/11/03  12:18  Side 9

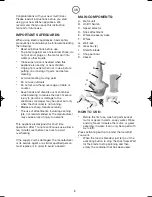
Summary of Contents for Agat GMT-032BD

Page 1: ...Agat Model GMT 032BD Art No 746 057 DK Multimixer 2 SE Multi blender 4 FI Tehosekoitin 6 UK Multi Mixer 8 DE Multimixer 10 PL BLENDER WIELOZADANIOWY 12 ...

Page 2: ...rantien Børn der befinder sig i nærheden af apparatet når dette er i brug bør holdes under opsyn Apparatet bør opbevares utilgængeligt for børn Hvis brug af forlængerledning er nødvendig bør man bruge en 10 ampere ledning Man skal være forsigtig med placeringen af forlængerledningen så man ikke snubler over denne Brug ikke apparatet hvis der er tydelige tegn på skader Brug kun apparatet indendørs ...

Page 3: ...ksen låget over skålen 5 Drej motor delen i gearboksen indtil at den låser 6 Tænd på motordelen og hold denne med den ene hånd mens De med den anden hånd holder på skålen 7 Efter brug fjernes motordelen fra gear boksen låget 8 Herefter fjernes gearboksen låget 9 Forsigtig fjernes kniven 10 Til sidst fjernes de behandlede fødevarer RENGØRING Rengør motordelen og gear boksen til piskeriset med en hå...

Page 4: ...när apparaten står stilla Knivbladen är vassa Handskas försiktigt med dem Om du använder tillbehör t ex konserveringsburkar som inte rekommenderas av tillverkaren kan det medföra risk för personskador Apparaten är utformad för användning i korta etapper Efter 1 minuts sammanhängande användning ska du låta apparaten vila några minuter för att undvika att den överhettas Om apparatens sladd blir skad...

Page 5: ...ven och vrid 90 för att låsa den Placera alltid hackskålen på ett halkfritt underlag 3 Placera livsmedlet i hackskålen 4 Placera växelhuset på hackskålen 5 Vrid på motorenheten på växelhuset tills den låser fast 6 Tryck på knappen för att starta hacktillsatsen Medan hackningen pågår ska du hålla motorenheten med ena handen och hålla hackskålen med den andra handen 7 Efter användning vrider du av m...

Page 6: ...säosia esim säilykepurkkeja joita valmistaja ei ole suositellut käytettäväksi sillä se saattaa aiheuttaa loukkaantumisen Laite on suunniteltu lyhytaikaiseen käyttöön Kun laitetta on käytetty yhtäjaksoisesti 1 minuutin ajan anna sen levätä muutama minuutti ennen kuin käytät sitä uudestaan Siten ehkäiset laitteen ylikuumenemisen Vaurioituneen virtajohdon saa vaihtaa vain valmistajan valtuuttaman huo...

Page 7: ...a terä teholeikkurin kulhon keskellä olevaan pidikkeeseen Teholeikkuri paina terää alaspäin ja käännä sitä 90 niin että se lukittuu Aseta teholeikkurin kulho aina liukumista estävälle alustalleen 3 Pane ruoka aineet teholeikkurin kulhoon 4 Pane vaihteisto teholeikkurin kulhon päälle 5 Kierrä moottori kiinni vaihteistoon siten että se lukittuu 6 Käytä teholeikkuria painamalla kytkintä Pidä käytön a...

Page 8: ...when the stickmixer is not running Blades are sharp Handle carefully The use of attachments including canning jars not recommended by the manufacturer may cause a risk of injury to persons This appliance is designed for short time operation After 1 minute continuous use allow a few minutes rest before next use to avoid overheating If the supply cord is damaged the manufacturer or its service agent...

Page 9: ...lade and turn 90 to lock it Always place the chopper bowl on the anti slip base 3 Place food in the chopper bowl 4 Place the gearbox on the chopper bowl 5 Turn the motor unit on the gearbox until it locks 6 Press switch to operate the chopper During processing hold the motor unit with one hand and the other hand hold the chopper bowl 7 After use turn the motor unit off the gearbox 8 Then remove th...

Page 10: ...nder die sich in der Nähe eines in Betrieb befindlichen Geräts aufhalten sind zu beaufsichtigen Das Gerät für Kinder unzugänglich aufbewahren Bei Bedarf einer Verlängerungsschnur ein 10 Ampere Kabel benutzen Vorsicht beim Verlegen Stolpergefahr Benutzen Sie das Gerät nicht wenn es deutliche Anzeichen von Beschädigung aufweist Benutzen Sie das Gerät nur in Innenräumen Das Gerät darf nicht gewerblic...

Page 11: ...etriebebox drehen 6 Motoreinheit einschalten und die Einheit mit einer Hand die Schüssel mit der anderen Hand halten 7 Nach dem Gebrauch die Motoreinheit von Getriebebox Deckel abnehmen 8 Getriebebox Deckel abnehmen 9 Messer vorsichtig herausnehmen 10 Die behandelten Lebensmittel zuletzt herausnehmen REINIGUNG Die Motoreinheit und die Getriebebox für den Quirl mit einem hart ausgewrungenen Tuch re...

Page 12: ...ducenta w tym pojemników roboczych stwarza ryzyko obra eƒ cia a Urzàdzenie mo e pracowaç w sposób ciàg y jedynie przez krótki czas Po 1 minucie nieprzerwanego u ywania nale y wy àczyç urzàdzenie na kilka minut aby uniknàç przegrzania W przypadku uszkodzenia przewodu sieciowego jego wymiany powinien dokonaç producent autoryzowany punkt serwisowy lub inna osoba posiadajàca odpowiednie kwalifikacje B...

Page 13: ...iowe do pojemnika rozdrabniacza 4 Za ó przek adni na pojemnik rozdrabniacza 5 Przykr ç korpus z silnikiem na przek adni a do zatrzaÊni cia 6 NaciÊnij przycisk aby uruchomiç rozdrabniacz W tym czasie jednà r ka trzymaj korpus z silnikiem a drugà pojemnik rozdrabniacza 7 Po u yciu odkr ç korpus z silnikiem od przek adni 8 Nast pnie zdejmij przek adni 9 Ostro nie wyjmij ostrze 10 Wyjmij produkty ywno...

Page 14: ...14 ...

Reviews: