background image

Touchscreen Terminal.  Rev 1.03  November 2009

Installation Manual.

5

4

1
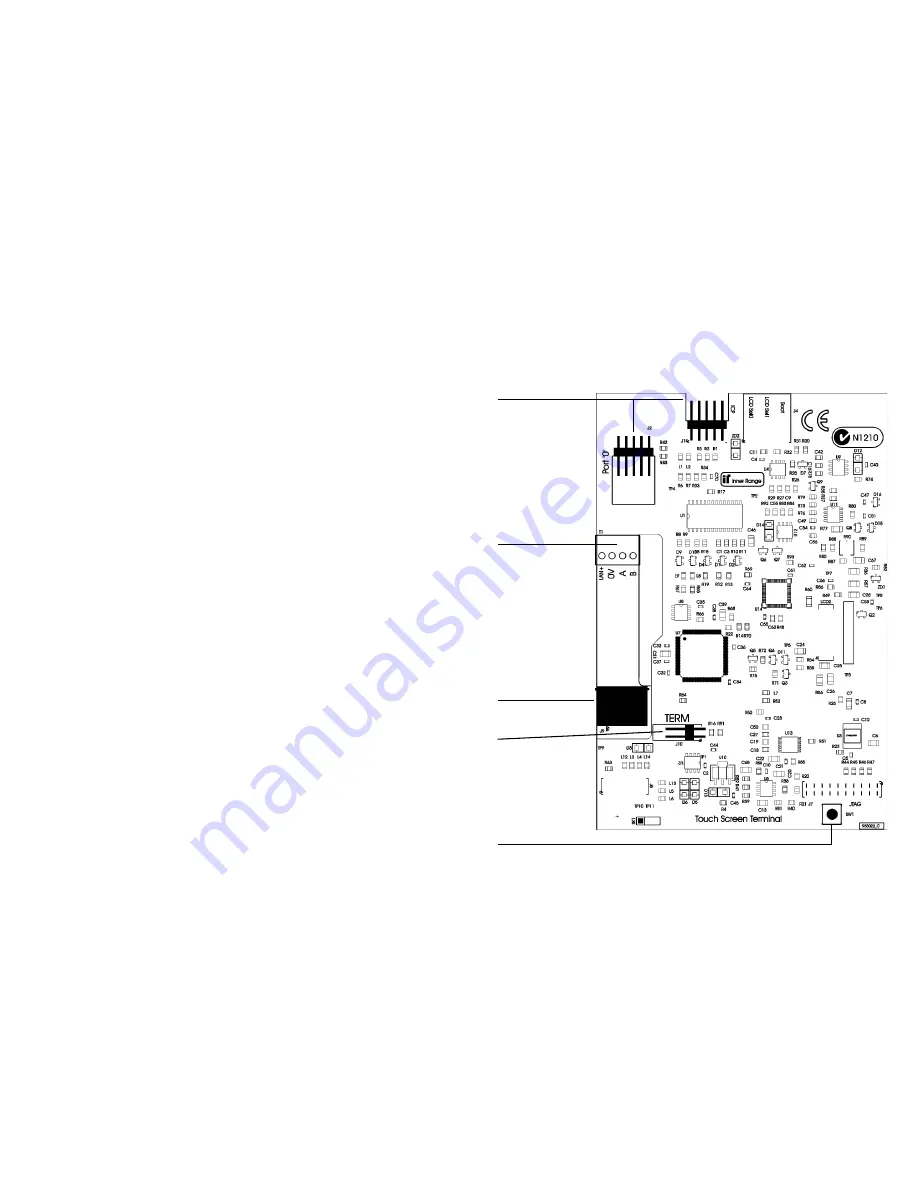
Factory only

2
LAN

3
Ethernet Port

4
LAN Termination

5
Cabinet Tamper switch

Connections & Link Options.

Layouts and Options.

Three default Touchscreen Terminal layouts are provided as described on page 7.
Layouts can only be modified and/or created with Insight V4.1 or later; or WDirect
software V6 or later.

Touchscreen Terminal options (including assigning a Layout to the Touchscreen
Terminal) are found at MENU, 7, 2, 2 and can be programmed via Upload/Download
software (Insight or WDirect) or via an LCD Terminal.

See the Programmer’s manual V6 or later for details.

When using WDirect, Touchscreen Terminal programming is found in the
Programming Menu by selecting “7-Installer”, “2-Modules”, then “2-Touch Term”.

Initialization.

When installation and programming is complete, perform the “LAN Secure” operation
(MENU, 7, 8, 1) to enable the encryption key for the new module/s and ensure that
all the relevant settings are downloaded to the Touchscreen Terminal.

Connections & Link Options.

1.

J1, J2.  Factory use only.

2.

T1.  LAN Connections.

See Pages 2 & 6 for details.

3.

J9.  Ethernet Port for field upgrades.  See Website for details.

4.

J10.  LAN Termination)

Fit the Jumper Link supplied in the accessory kit if the module is one of the two
furthest modules on the LAN.  (See “Model 3000/4000 Installation manual” or
“LAN Installation & Troubleshooting” for more details.)

Note:

  If LAN Isolators or Fibre Modems are used, each isolated section of the

LAN is treated as a separate LAN system when terminating modules.

5.

SW1.  Tamper switch.

Summary of Contents for Concept 4000

Page 1: ...or each Touchscreen used in the system e g The Areas and Diary messages to be displayed operations allowed and which of those operations require the user to log in with a PIN code This allows each Touchscreen to provide access to relevant functionality Three default display layouts are currently available each with 2 or more screens in addition to the main menu screen See page 7 for details Insigh...

Page 2: ...on the two tabs at the top of the front casing into the retaining slots at the top of the rear casing then lower the front casing onto the rear casing until it clicks into place IMPORTANT NOTES 1 CAUTION The Touchscreen Terminal draws between 200 and 300mA This is approximately 6 times that of an LCD Terminal Ensure that an adequate power supply source is available 2 CAUTION Take care not to damag...

Page 3: ...i d n o C n o i t a n a l p x E y d e m e R s w o h s y a l p s i D s s e r d d a e l u d o M h g i h o o t y r o m e m r o n o i s r e v e r a w m r i f A s e o d t a h t d e s u g n i e b s i n o i t a r u g i f n o c s l a n i m r e T n e e r c s h c u o T t r o p p u s t o n R O e b t s u m e r a w m r i f e l u d o M l o r t n o C a t e B 8 5 V r O r e t a l r o 0 6 V r o f s e l b a t n o i ...

Page 4: ...mming is found in the Programming Menu by selecting 7 Installer 2 Modules then 2 Touch Term Initialization When installation and programming is complete perform the LAN Secure operation MENU 7 8 1 to enable the encryption key for the new module s and ensure that all the relevant settings are downloaded to the Touchscreen Terminal Connections Link Options 1 J1 J2 Factory use only 2 T1 LAN Connectio...

Reviews: