background image

Buccaneer GT Range 

- Installation

19

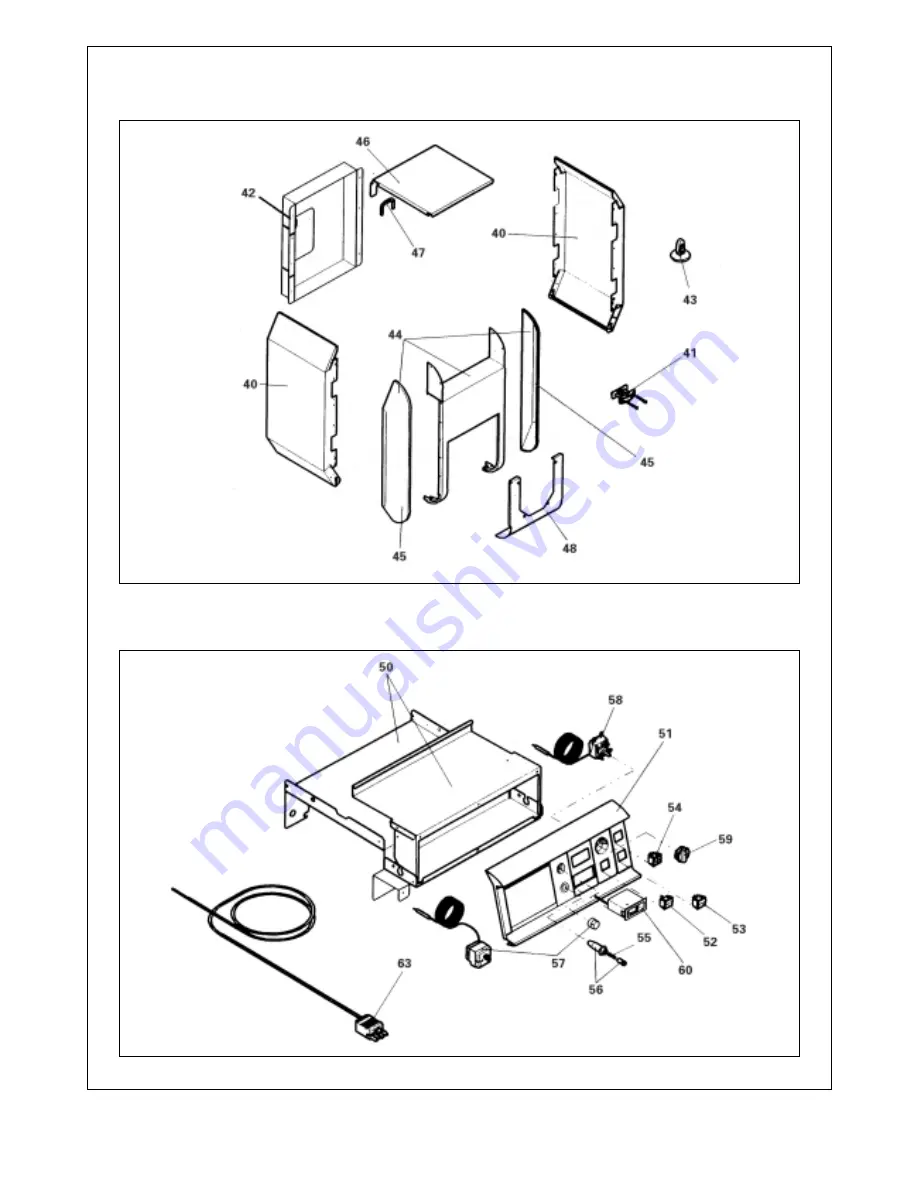
ASSEMBLY

Jacket

Control Panel

Summary of Contents for Buccaneer GT 5

Page 1: ...servicing or cleaning of this appliance care should be taken when handling edges of sheet steel components Assembly and Installation Instructions for Ideal Buccaneer GT Oil Gas or Dual Fired heating...

Page 2: ...in your own interest and that of safety to ensure the law is complied with The installation of the boiler MUST also be in accordance with the latest l E E Wiring Regulations local building regulations...

Page 3: ...Buccaneer GT Range Installation 3...

Page 4: ...C1 1 138496 7 Boiler Body 4 section IC2 1 138497 4 Boiler Body 5 section IC3 1 138498 1 Jacket pack 3 section IC4 1 138499 8 Jacket pack 4 section IC5 1 138500 1 Jacket pack 5 section IC6 1 138501 8 C...

Page 5: ...our attention to the risks of corrosion of the boilers installed in or near to rooms in which the atmosphere can be polluted by chloride or fluoride substances E G industrial buildings solvents refrig...

Page 6: ...paragraph of the instruction book 4 HYDRAULIC CONNECTION Dimensional information required WATER SYSTEM General Recommendations relating to the water system are contained in BS 5449 Pt 1 BS 5401 Pt 2 a...

Page 7: ...the chimney CHIMNEY AND FLUE CONNECTIONS Detailed recommendations relating to the design of flues for GAS fired applications are quoted in BS 6644 abd British Gas Publication No IM 11 whilst BS 5410...

Page 8: ...e fabricated in compliance with CP 331 Pt 3 and any Local Gas Board installation standards The Local Gas Board should be contacted at a stage prior to actual installation for any advice or information...

Page 9: ...lectrical drawings supplied with the control panel and the directives given hereafter Control panel All the connections will be made on the connection block provided for this purpose outside of the pa...

Page 10: ...d red to red Introduce the housing from the front and attach it with two plastic screws situated on the front of the device 1 4 turn in clockwise direction The thermostat limiter supplied with the SVR...

Page 11: ...turn in clockwise direction An alarm LED is connected to the pins 15 and 16 A flue gas thermostat is connected to the pins 13 and 14 after the existing bridge has been removed The pins are interchange...

Page 12: ...with SV matic regulation or room temperature thermostats The temperature of the boiler is regulated by the boiler thermostat 7 This position can be used to test the burner on an installation equipped...

Page 13: ...he boiler The regulation of the boiler is provided either by the boiler thermostat 7 or by the room temperature thermostat or the SV matic regulator if fitted For the boilers equipped with a room temp...

Page 14: ...emedy it without delay The good performance of the boiler depends on its degree of cleanliness Cleaning of the boiler must be carried out as often as required and at least as for the chimney once a ye...

Page 15: ...the chimney carefully swept Shut the boiler doors to avoid any air flow inside If the boiler is going to be stopped for several months we also advise removing the pipe which connects the boiler to th...

Page 16: ...max output in w g 0 06 0 08 0 08 Boiler DRY weight less burner unit kg 121 149 177 lb 267 328 390 General Data Boiler Size 3 4 5 Maximum Oil Rate l h 2 67 3 4 4 12 gal h 0 59 0 75 0 91 Maximum Flue ga...

Page 17: ...n 17 Clearances Main Dimensions Boiler Size 3 4 5 Dimension A 545 672 799 Dimension B 471 598 725 Dimension D 330 457 584 Flow and Return Tappings 11 4 11 4 11 4 Flue Outlet 125 125 125 All dimensions...

Page 18: ...18 Buccaneer GT Range Installation ASSEMBLY 11 EXPLODED VIEWS AND LIST OF SPARE PARTS Boiler Body Insulation...

Page 19: ...Buccaneer GT Range Installation 19 ASSEMBLY Jacket Control Panel...

Page 20: ...ete 43 9649 6160 Push Rivet 44 8199 8803 Front Panel 45 9755 0146 Side Piece 46 8199 8829 Head Complete 3 Elements 46 8199 8830 Head Complete 4 Elements 46 8199 8831 Head Complete 5 Elements 47 9755 0...

Page 21: ...on of opening of the burner door Take off the cast iron hinge section of the burner door by unscrewing the 2 screws A HM8 x 12 and the upper and lower hinges by unscrewing the 2 nuts B HM8 Re assemble...

Page 22: ...anel unit on the boiler body positioning it on the assembly flanges with the M8 gudgeon pins in front and the nipple in the intermediate position Fix this to the front section with 2 HM8 nuts plus 2 t...

Page 23: ...the burner cable on the side opposite to the burner door hinge according to European safety regulations and pass it through the outside of the crosspiece Fit the panel into the base and hook it onto t...

Page 24: ...el Fix the front burner door panel with the 4 black screws EC CB M6 x 12 Fitting of front panel Hook the front panel at the bottom onto the side panels and clip it onto the control panel 8199 EN 42 A...

Page 25: ...LP Neutral N DHW pump P ZEH Summer winter switch booster ZG Main switch ZT Test switch Optional RG Control TAM Room thermostat TCH Boiler thermostat TF Flue gas thermostat TL Limit thermostat TS Safet...

Page 26: ...26 Buccaneer GT Range Installation ASSEMBLY CONTROL PANEL WIRING DETAILS For standard operation connect mains supply and heating pump as shown in the above diagram...

Page 27: ......

Page 28: ...radon Plumbing Limited Technical Training Centre offers a series of first class training courses for domestic commercial and industrial heating installers engineers and system specifiers For details o...

Reviews: