background image

34


Installation and Servicing

SECTION 2 - INSTALLATION

2.21  REPLACING PRE-FITTED MAINS CABLE

If it is necessary to use an alternative mains cable to the one pre-fitted then use 

the following guide.

Replacement wiring should comply with notes in Section 2.18 and be caried out 

by a qualified person to avoid a hazard.

1.

  Isolate the mains supply to the boiler.

2.

  Remove the front panel.  Refer to Section 3.2.

3. 

Swing the control box down into the service position, remove retaining screw, and 
remove the installer wiring cover.  Refer to Section 3.3.

4. 

Unplug the mains connector and release the cable from strain relief.

5. 

Unscrew the L N & E connections & remove wires from connector.

6.

  Remove the mains cable by pulling back through the grommet .

7.

  Route the replacement cable through the grommet and re-fit in reverse order.

8. 

Refit the installer wiring cover ensuring that it is located correctly and that the 

cable is retained into the strain relief as shown.

9.

  Swing the control box back up into the operating position and re-fit the front 

panel ensuring a good seal is made.

NOTE. 

When making the mains electrical connections to the boiler it is important 

that the wires are prepared in such a way that the earth conductor is longer than 

the current carrying conductors, such that if the cord anchorage should slip, the 

current carrying conductors become taut before the earthing conductor.

2.20  EXTERNAL WIRING

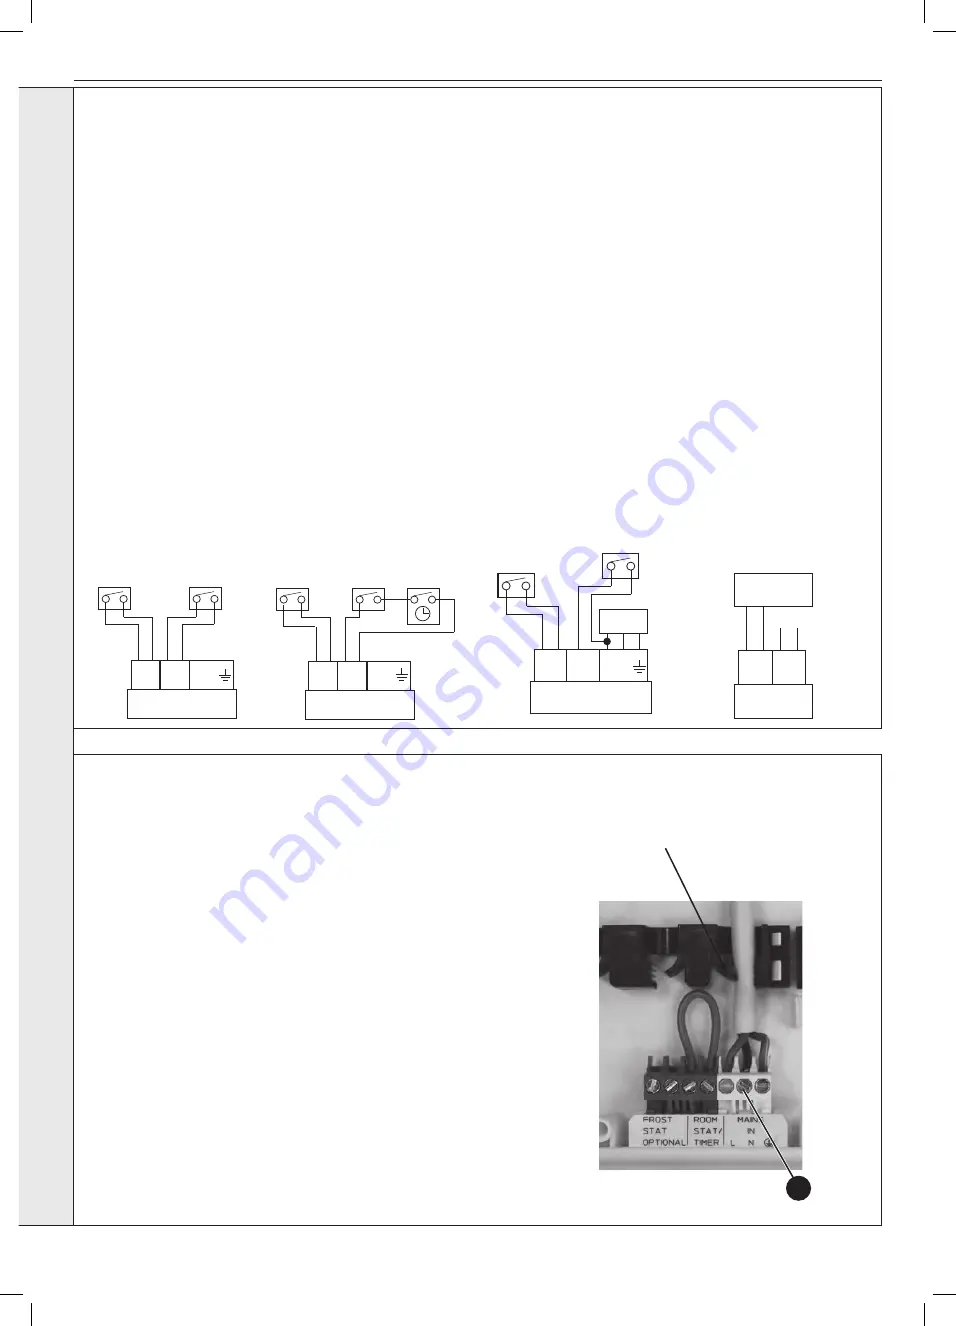
DIAGRAM A: 

DIAGRAM B:  

Room Stat with External Timer


Programmable Room Stat or 

Room Stat with Internal Timer

Optional 

Room Stat or 

Optional 

Frost 

Programmable 

Frost 

Stat

Room Stat

Stat

Room Stat

Timer

Frost    

Room 

Frost    

Room 

Stat  

Stat/ 

L  N 

Stat  

Stat/ 

L  N 

(Optional)


Timer 

(Optional)


Timer 

DIAGRAM C:

Use of General Live for Room Stat

Optional 

Room Stat

Frost 

Stat

Mains In

Frost    

Room 

Stat  

Stat/ 

L  N 

(Optional)


Timer 

DIAGRAM D:


OpenTherm Device

DO NOT CONNECT 230V TO THESE

TERMINALS OR THE BOILER ELECTRONICS

WILL BE DAMAGED

Outside

Sensor

Open

Therm  

OpenTherm Device

E.G. Honeywell OT

Bridge R8810

Strain Relief

External Controls – 230V 50Hz

Wiring a 230V 50Hz Room Thermostat, 

Diagram A (with optional timer, Diagram 
B)

1.  Remove the link wire from the room 

stat/timer plug.

2.  Connect the external cable from 

the room stat/timer across these 
two connections, if a general live 
connection is used for the room stat 
or timer then connect this to the 
fused spur, on the load side (see 
Diagram C)

3.  If the room thermostat has 

compensation and requires a neutral 
connection, make this connection to 
the fused spur, on the load side.

Optional External Controls – Extra Low 

Voltage

Wiring OpenTherm Room Control or other 
OpenTherm Master Device, Diagram D.

1. 

Locate the OpenTherm connection on 
the right hand side of the boiler installer 
connections area, remove the violet link 
wire and connect the 2 core cable from 
the OpenTherm device.

Frost Protection

If parts of the pipework run outside the 
house or if the boiler will be left off for more 
than a day or so then a frost thermostat 
should be wired into the system.

This is usually done at the programmer, in 
which case the programmer selector switches 
are set to OFF and all the other controls 
MUST be left in the running position.

The frost thermostat should be sited in a 
cold place but where it can sense heat 
from the system.

Wiring a system frost thermostat, see 
digarams A, B and C.  Wire the frost 
thermostat across the two connections as 
shown.

Note

.

  If the boiler is installed in a garage it 

may be necessary to fit a pipe thermostat, 

preferably on the return pipework.

4

INST

ALLA

TION

Summary of Contents for VOGUE MAX COMBI 26

Page 1: ...ire Do not use reconditioned or copy parts that have not been clearly authorised by Ideal Boilers For the very latest copy of literature for specification and maintenance practices visit our website i...

Page 2: ...P1 kW 5 9 8 5 10 4 Auxiliary Electricity Consumption Full Load elmax kW 0 047 0 063 0 044 Part Load elmin kW 0 014 0 011 0 01 Standby PSB kW 0 003 0 003 0 003 Seasonal Space Heating Energy Efficiency...

Page 3: ...lass VI Class VII Class VIII 1 2 1 5 2 3 4 3 5 5 PRODUCT FICHE The energy efficiency of the package of products provided for in this document may not correspond to its actual energy efficiency once in...

Page 4: ...4 Installation and Servicing...

Page 5: ...Boilers reserve the right to vary specification without notice NOTE BOILER RESTART PROCEDURE To restart the boiler press RESTART button on the control panel The boiler will repeat the ignition sequen...

Page 6: ...6 Installation and Servicing...

Page 7: ...val Replacement 49 3 3 Lowering the Controls Panel 49 3 4 Fan Venturi Assembly Removal Cleaning 50 3 5 Removal of Injector 50 3 6 Burner Removal Cleaning 51 3 7 Cleaning the Condensate Trap Siphon 51...

Page 8: ...83 0 472 0 590 Boiler Output Non Condensing kW 18 0 26 0 32 0 3 7 4 6 5 7 70o C Mean Water temp Condensing kW 19 3 27 9 34 3 4 0 4 9 6 1 40o C Mean Water temp Seasonal efficiency SEDBUK 2005 91 0 91 1...

Page 9: ...ure record Cold water inlet temp measure record Hot water outlet temp measure record Water flow rate at max setting measure record For condensing boilers only Condensate drain 25 26 For all boilers co...

Page 10: ...wn off or periodically for a few seconds without any DHW draw off in order to maintain the DHW calorifier in a heated condition This only occurs if pre heat is selected from the menu When there is a d...

Page 11: ...ances of rated input not exceeding 70 kW BSEN 12828 Heating Systems in buildings Design for water based heating systems BSEN 12831 Heating Systems in buildings Method for calculation of the design hea...

Page 12: ...hat the terminal is exposed to external air 2 It is important that the position of the terminal allows the free passage of air across it at all times 3 Minimum acceptable spacing from the terminal to...

Page 13: ...perature in a space served by radiators not fitted with such a valve When thermostatic radiator valves are used the space heating temperature control over a living dining area or hallway having a heat...

Page 14: ...cupboard is 5mm from the cupboard door but 450mm overall clearance is still required with the cupboard door open to allow for servicing Bottom clearance Bottom clearance after installation can be redu...

Page 15: ...stem may be filled by the following method Where the mains pressure is excessive a pressure reducing valve must be used to facilitate filling Notes a The method of filling refilling topping up or flus...

Page 16: ...mains water can exceed 200ppm Total Hardness as defined by BS 7593 Table 2 a scale reducing device should be fitted into the boiler cold supply within the requirements of the local water company Wate...

Page 17: ...dge 125 Water Pressure Switch 127 Pressure Gauge 203 Pipe Gas Inlet 204 Gas Valve 205 Injector Gas 207 Venturi 208 Fan 209 Gasket Fan Venturi 210 Fan Adaptor 211 Venturi Deflector 212 Condensate Hose...

Page 18: ...C A D F G B E H Boiler Guarantee I Gas Valve Pack HARDWARE PACK CONTENTS Gas Valve Pack 1 Pipe Gas Inlet 2 Washer Gas blue 3 Gas Cock Filling Loop Pack 1 3 8 Top Hat Washer 2 Valve Filling Loop 3 Pipe...

Page 19: ...D B C E UNPACKING CONT D INSTALLATION Note This flue system incorporates a removable flue outlet nose that utilises a push fit location system This enables the installation of deflector high level or...

Page 20: ...a 5 core boring tool ensuring that the hole is square to the wall Both wall faces immediately around the cut hole should be flat 2 Drill 2 mounting holes marked from template with a 7 5mm 8mm masonry...

Page 21: ...ted in accordance to the installation instructions provided with them The TURRET supplied in the B Pack has an upper combustion sample point with a screw cap seal and a lower air sample point with an...

Page 22: ...escopic Horizontal Flue Terminal 1000mm long B Pack Telescopic Cut 75mm Minimum Maximum Minimum Maximum Minimum Maximum Minimum Maximum B Pack Standard 233 602 340 553 652 869 577 794 Plus 1 1m D pack...

Page 23: ...3 Check that both flue seams are at the top and the outlet terminal is upper most 4 Drill a 3 5mm hole through one of the 2 outer side holes into the inserted outer flue Take care not to pierce the in...

Page 24: ...m its mounting and will need to be refitted 9 When 1st mark is in line with the wall whilst holding the flue firmly push the white wall sealing flange to the wall until the 2nd of the two marks is jus...

Page 25: ...d by the boiler or pump manufacturer should be used terminating into a suitable internal foul water discharge point such as an internal soil and vent stack or internal kitchen or bathroom waste pipe e...

Page 26: ...pipe Water Weather proof insulation Max 3m external pipework Limestone chippings 500 300 25 2 rows of three 12mm holes 25mm centres 50mm from the bottom of the tube facing away from the house Minimum...

Page 27: ...g a separately supplied vertical connector WEATHER PROOFING Where the flue passes through the roof line an adequate seal must be made This is achieved by using either Flat roof weather collar or Unive...

Page 28: ...enetrate the shaded area of the roof Note The equivalent flue length resistance of the elbow kits are 90o elbow kit 1m 45o elbow kit 0 6m If chimney penetrates dotted area such that A is less than 300...

Page 29: ...with the instructions provided with the vertical connector kit 3 Secure the vertical connector by applying downward pressure on the connector 4 Position the clamp on the top face of the flue manifold...

Page 30: ...e and copper tail to the threaded boss connection ensuring the seal provided is correctly located 2 Fit the DHW outlet pipe tail to DHW outlet connection ensuring the seal provided is correctly locate...

Page 31: ...valve and fit the grey cap to the open end 8 Fit the Plug to the free end of the filling loop Note Open all DHW taps to ensure water is flowing freely Once satisfied close all taps Top Up 1 Ensure fi...

Page 32: ...lations 2 17 INSTALLER WIRING MAINS The Vogue Max Combi boiler comes pre fitted with 1 8m of mains cable This must be connected to a permanent live supply and NOT switched by thermostats programmers I...

Page 33: ...mbi boiler comes pre fitted with a link wire between the Room Thermostat Timer connections on the terminal strip This creates a permanent call for heat and must be removed when adding a Room Thermosta...

Page 34: ...onal Timer Optional Timer DIAGRAM C Use of General Live for Room Stat Optional Room Stat Frost Stat Mains In Frost Room Stat Stat L N Optional Timer DIAGRAM A DIAGRAM B Room Stat with External Timer P...

Page 35: ...IP COM BUS RX NC CHIP COM BUS GND CHIP COM BUS 5V CHIP COM BUS TX CHIP COM BUS RX CHIP COM BUS 24V CHIP COM BUS GND CHIP COM BUS 5V CHIP COM BUS RX MAINS LIVE MAINS NEUTRAL AUXILIARY LIVE IONISATION 2...

Page 36: ...valve Having checked That the boiler has been installed in accordance with these instructions The integrity of the flue system and the flue seals as described in the Flue Installation section Proceed...

Page 37: ...that the DHW Temperature Control Knob E is turned fully anti clockwise into the off position 8 Check that the gas service cock I is OPEN 9 Slacken the screw in the inlet pressure test point H and con...

Page 38: ...check the gas rate at the gas meter with no other appliances in use Refer to Section 1 8 for gas rates Ensure that with the boiler operating the dynamic gas pressure is able to obtain maximum output R...

Page 39: ...d Off CH Demand Off Preheat enabled MENU READY PREHEAT ON READY TIMER OR ROOM THERMOSTAT OFF DHW Demand On CH Demand On MENU ON HOT WATER PRIORITY ON 60 C Pre heat Demand On MENU READY TIMER OR ROOM T...

Page 40: ...O C OFF SELECT MAXIMUM RADIATOR TEMPERATURE To switch the CH function OFF Rotate the CH Temperature Control Knob fully anti clockwise the screen below will be shown EXIT OFF 80 O C 30 O C OFF SELECT M...

Page 41: ...n will be displayed EXIT SELECT MENU HOT WATER PREHEAT ON OFF SERVICE COMPANY NAME SHOW EFFICIENCY LEVEL Press MENU SHOW EFFICIENCY LEVEL HOT WATER PREHEAT ON OFF SERVICE COMPANY PHONE NUMBER SERVICE...

Page 42: ...en is displayed EXIT SELECT MENU FAULT HELP VENT SYSTEM FAULT HISTORY CHANGE SERVICE INTERVAL Press SELECT and a screen similar to the following will be displayed EXIT NEXT PREV FAULT HISTORY LOW WATE...

Page 43: ...MENU and the following screen will be displayed EXIT SELECT MENU HOT WATER PREHEAT ON OFF SERVICE COMPANY NAME SHOW EFFICIENCY LEVEL Press MENU SHOW EFFICIENCY LEVEL HOT WATER PREHEAT ON OFF SERVICE C...

Page 44: ...VICE COMPANY PHONE NUMBER SERVICE COMPANY NAME MAX OFF MAX OFF SELECT EXIT until the following screen is displayed EXIT SELECT MENU PUMP MODULATION PLOT GRAPHS SERVICE MODE MAXIMUM FLOW TEMPERATURE Pr...

Page 45: ...L HOT WATER PREHEAT ON OFF SERVICE COMPANY PHONE NUMBER SERVICE COMPANY NAME MAX OFF MAX OFF SELECT EXIT until the following screen is displayed EXIT SELECT MENU PLOT GRAPHS 3 WAY VALVE MIDPOSITION SE...

Page 46: ...Y NAME MAX OFF MAX OFF SELECT EXIT until the following screen will be displayed EXIT SELECT MENU PUMP MODULATION 3 WAY VALVE MIDPOSITION PLOT GRAPHS Press SELECT and the following screen will be displ...

Page 47: ...es 3 The operation of the boiler and the use and adjustment of all system controls should be fully explained to the householder to ensure the greatest possible fuel economy consistent with the househo...

Page 48: ...all gas valve connections are gas tight with a gas soundness check up to the gas control valve 7 When work is complete the front panel MUST be correctly refitted ensuring that a good seal is made Do N...

Page 49: ...panel back into position engaging the securing screws 4 Re tighten the securing screws 3 3 LOWERING THE CONTROLS PANEL ACCESSING MAINS WIRING 3b 1 1 Once the front panel has been removed the controls...

Page 50: ...To remove the fan first remove the venturi as above and release the 3 screws securing the fan to the burner Note a mounting spacer is fitted to the fan outlet on 40 model only 10 Remove the fan from...

Page 51: ...ater 5 Refit in reverse order making sure the trap is engaged with the outlet connection 6 Re position CH water pressure switch 2 1 Refer to Sections 3 2 3 3 2 To remove Fan Burner and Venturi Assembl...

Page 52: ...he heat exchanger connected 3 Refit the fan to the burner assembly Refer to Section 3 4 4 Refit the venturi to the fan and burner assembly Refer to Section 3 4 5 Refit the burner fan venturi assembly...

Page 53: ...fit the venturi checking the sealing gasket is undamaged or replace as necessary and secure with the 2 screws Note a noise damper is fitted to the venturi inlet on 40kW and 32kW models Note a mounting...

Page 54: ...move the fan leads 5 Remove the 4 securing nuts retaining the burner door fan assembly 6 Remove the assembly from the heat exchanger 7 To remove the venturi release the 2 securing screws 8 To remove t...

Page 55: ...rner door assembly and secure with the 2 screws ensuring correct orientation 7 Reconnect the ignition lead and earth 8 Check the operation of the boiler Refer to Sections 2 24 to 2 27 1 Refer to Secti...

Page 56: ...boiler Refer to Sections 2 24 to 2 27 1 Refer to Sections 3 2 3 3 2 Remove the gas inlet pipe Refer to Section 3 4 3 Unplug the electrical connection 4 Disconnect the gas service cock refer to Sectio...

Page 57: ...of the valve body 6 Fit the new motor ensuring the arm is correctly engaged in the metal fork and re assemble in reverse order 7 Check the operation of the boiler Refer to Sections 2 24 to 2 27 3 20...

Page 58: ...order 8 Turn power on and follow the on screen instrucitons as shown Installer Initialise PCB YES Press YES Installer Switch mains off wait 5s then switch mains on Installer Processing Select boiler m...

Page 59: ...during replacement of components 3 After replacing any component on the boiler open the DHW inlet isolating valve and vent the DHW system by opening all hot taps and ensuring water flows from each tap...

Page 60: ...drawing the capillary carefully through the rubber grommet and out of the boiler 8 Refit in reverse order Refill the CH system Refer to Section 2 15 9 Check the operation of the boiler Refer to Secti...

Page 61: ...ed screwdriver in the diverter valve motor body slot provided and ease out the motor Refer to Section 3 19 6 Remove the return thermistor electrical connection Refer to Section 3 14 7 Remove the pump...

Page 62: ...ecessary Refer to Section 2 15 10 Check the operation of the boiler Refer to Sections 2 24 to 2 27 1 Refer to Sections 3 2 3 3 2 Close the isolating service valves and drain the CH boiler Refer to Sec...

Page 63: ...gulator 5 Clean or replace filter as necessary 6 Reassemble in reverse order 7 Refill the boiler Refer to Section 2 15 8 Check the operation of the boiler Refer to Sections 2 25 to 2 27 1 Refer to Sec...

Page 64: ...e lead 8 Remove the horseshoe bracket and lift up the flue turret 9 Remove the securing screws and disconnect the flue outlet 10 Remove the 4 screws securing the heat exchanger fixing brackets 11 Remo...

Page 65: ...ng valves and refill the CH system Refer to Section 2 15 9 Check the operation of the boiler Refer to Sections 2 25 to 2 24 3 3 36 BOILER SEALING PANEL REPLACEMENT 1 Refer to Sections 3 2 3 3 2 Remove...

Page 66: ...4 13 No Connection to Primary PCB 5 Restarts within 15 minutes Turn power off and on Go to Section 4 6 Flame On before Gas Valve On Go to Section 4 7 Flow Thermistor Fault Go to Section 4 8 Outside S...

Page 67: ...n 3 17 Are these functioning correctly Check Ignition Electrode and associated Harness for continuity visual condition and position refer to Section 3 15 Are these functioning correctly Check Syphon a...

Page 68: ...sociated Harness for continuity visual condition and position Check if the Condensate Pipe is blocked Check if the Flue is blocked Replace as necessary Check Gas Supply and rectify fault Check wiring...

Page 69: ...Flame Sense Electrode Is there continuity between the Electrode and earth Is there continuity in the wiring from the primary PCB to the Thermistor 8 way connector connections 3 and 4 black and pink D...

Page 70: ...r connections 5 and 4 black and red Is there 230Vac at the blue and brown connections to the 3 way connection on the Fan Does the wiring from the Water Pressure Switch to the PCB have continuity and i...

Page 71: ...ault disappear Are the Radiator Valves open Is an Ideal Electronic Programmable Room Stat connected Is there 230Vac at A Check wiring from PCB to Diverter Valve Replace Diverter Valve No No No Yes No...

Page 72: ...rature rise and check filter fitted in turbine is not blocked with debris Replace or reconnect as appropriate Re engage diverter valve head and secure clip to waterset Is there 230Vac to the boiler at...

Page 73: ...ils of approved Ideal Parts Distributors are available on www idealparts com Our Parts team are also available to help with your Ideal Spare Parts enquiries on 01482 498665 When calling and to ensure...

Page 74: ......

Page 75: ...ommissioning checklist completed in full To instigate the boiler guarantee the boiler needs to be registered with the manufacturer within one month of the installation To maintain the boiler guarantee...

Page 76: ...priate Building Regulations and then handed to the customer to keep for future reference GAS BOILER SYSTEM COMMISSIONING CHECKLIST CONTROLS Programmable room thermostat Optimum start control Combinati...

Page 77: ...larly and that the appropriate Service Interval Record is completed Service Provider SERVICE RECORD SERVICE 01 AND Where Possible AND Signature SERVICE 02 AND Where Possible AND Signature SERVICE 03 A...

Page 78: ...ITTED BY PERSONS OTHER THAN THE BOILER INSTALLER visually check the integrity of the whole flue system to confirm that all components are correctly assembled fixed and supported Check that maximum flu...

Page 79: ...bled fixed and supported as per instructions Check that flue and flue terminal are not obstructed Check that no seals e g Those on flue extensions have been displaced during installation Rectify if ne...

Page 80: ...he code of practice for the installation commissioning servicing of central heating systems Ideal Boilers Ltd PO Box 103 National Avenue Kingston Upon Hull HU5 4JN Tel 01482 492251 Fax 01482 448858 Re...

Reviews: