background image

19 

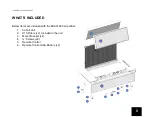
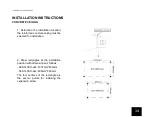
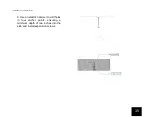
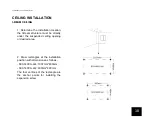
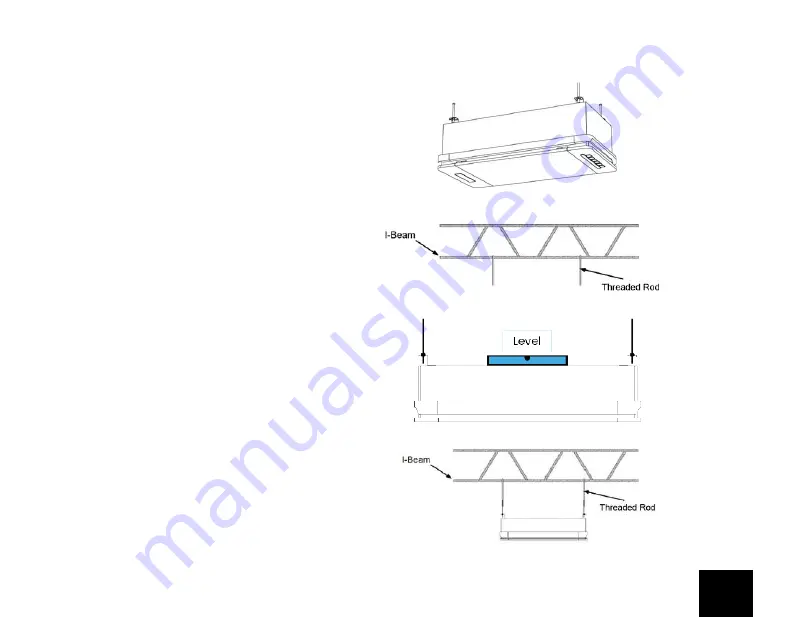
3. Load all the four cabinet hangers into 
nut 3.

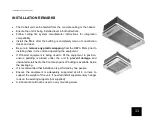
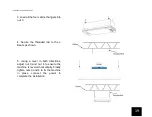
4. Secure the threaded rod  to the I-
Beam as shown.

5. Using a level in both directions,
adjust nut 3 and nut 4 to ensure the
machine is leveled horizontally. Finally
tighten nuts 3 and 4 to fix the machine
in place, connect the power to
complete the installation.

SCA14000 Cobalt Installation Guide 

Summary of Contents for COBALT

Page 1: ...COBALT SCA14000 INSTALLATION MANUAL Read the manual thoroughly before operation and retain for future reference REV SCA14000 IM 01...

Page 2: ...IONS 7 WHAT S INCLUDED 8 INSTALLATION BOM LIST 9 INSTALLATION REMARKS 10 12 ELECTRICAL SUPPLY REMARKS 13 INSTALLATION INSTRUCTIONS 14 19 CONCRETE CEILING 14 17 I BEAM CEILING 18 19 CARE AND MAINTENANC...

Page 3: ...ctly abide by these safety precautions and instructions The product s user is always totally responsible for adhering to any local safety laws and regulations that may be in effect INTENDED USE The SC...

Page 4: ...f electric shock this equipment has a grounding type plug that has a third grounding pin This plug will only fit into a grounding type power outlet If the plug does not fit into the outlet contact qua...

Page 5: ...keep the manual in the vicinity of the product DO NOT insert fingers or foreign objects into the intake or air outlet Keep hair loose clothing fingers and all parts of your body away from openings and...

Page 6: ...ners cannot be substituted TO REDUCE THE RISK OF PERSONAL INJURY DO NOT bend the blade brackets when installing the brackets balancing the blades or cleaning the fan DO NOT insert foreign objects in b...

Page 7: ...r filter hostile vapors or sharp particles RISK OF ELECTRIC SHOCK These servicing instructions are for use by qualified personnel only DO NOT perform any servicing other than that contained in the ope...

Page 8: ...Requirement 120V 60 Hz Rated Power 250 W 2 1A Fan Motor 310 VDC 0 98 A 113 W Dimensions L 1245 0 mm x W 636 0 mm x H 360 0 mm Weight 45 kg Model No SCA14000 2x2 Power Requirement 120V 60 Hz Rated Pow...

Page 9: ...low items are included with the SCA14000 air purifier 1 Cobalt Unit 2 H13 Filters x2 included in the unit 3 Mount Bracket x4 4 Screws x8 5 Remote Control 6 Remote Control AAA Battery x2 SCA14000 Cobal...

Page 10: ...00 lbs rated Concrete Ceiling I Beam Ceiling 3 Washer 4 Fender Washer Concrete Ceiling I Beam Ceiling 4 Rubber Washer 4 Rubber Washer Concrete Ceiling I Beam Ceiling 5 Nut 4 Nut Lock Nut Recommended C...

Page 11: ...dance with the Canadian Electric Code C22 1 latest edition Provincial and Municipal codes and or local codes UNPACKING While unpacking the product please follow the instructions and markings on the pa...

Page 12: ...talling them in the unit and operating the equipment If lift assist equipment is being used to lift the equipment to position ensure padding is placed under the unit to prevent damage and unwanted scr...

Page 13: ...room not the fresh air supplied by the HVAC system Likewise the position of the exhaust side of the unit should be away from the return ducts of the HVAC system This is to ensure that the clean air c...

Page 14: ...luding but not limited to ANSI NFPA 70 and Canadian Electric Code C22 1 The receptacle shall be accessible and connected to an electrical supply circuit with a fuse or breaker rated for 15 0 Amps Rece...

Page 15: ...ncrete ceiling must be selected for installation 2 Draw rectangles at the installation position with dimensions as follows SCA14000 2x4 1037mm 490mm SCA14000 2x2 490mm 490mm The four vertices of the r...

Page 16: ...15 3 Use an electric hammer to drill holes in four anchor points ensuring a minimum depth of two inches into the slab and install expansion screws SCA14000 Cobalt Installation Guide...

Page 17: ...in the threaded rod and then screw in the four Nuts where nut 3 is next to nut 4 The position of each screw should be at the same height from the ceiling 5 Load all the four cabinet hangers into nut...

Page 18: ...oth directions adjust nut 3 and nut 4 to ensure the machine is leveled horizontally Finally tighten nuts 3 and 4 to fix the machine in place connect the power to complete the installation SCA14000 Cob...

Page 19: ...ectly under the suspended ceiling opening or desired area 2 Draw rectangles at the installation position with dimensions as follows SCA14000 2x4 1037mm 490mm SCA14000 2x2 490mm 490mm The four vertices...

Page 20: ...rod to the I Beam as shown 5 Using a level in both directions adjust nut 3 and nut 4 to ensure the machine is leveled horizontally Finally tighten nuts 3 and 4 to fix the machine in place connect the...

Page 21: ...d properly before operating the unit When conducting maintenance on the unit be sure the unit is turned off and the plug is disconnected from the outlet Never handle the plug with wet hands If so elec...

Page 22: ...hardwired correctly Refer to Electrical Wiring Instructions and confirm proper hardwiring Wires disconnected from mains or soft set Refer to Electrical Wiring Instructions and confirm proper hardwirin...

Page 23: ...D flashing Filter change cycle timer expired Replace HEPA filters and reset the timer 4 Remote Control is inoperable Battery nearly exhausted Replace batteries Unit s display panel is covered Confirm...

Page 24: ...Ontario Ohio California Tel 1 866 828 6737 www idealwarehouse com info idealwarehouse com...

Reviews: