background image


#61-844


ND-7043-3 


Page 6 of 22 


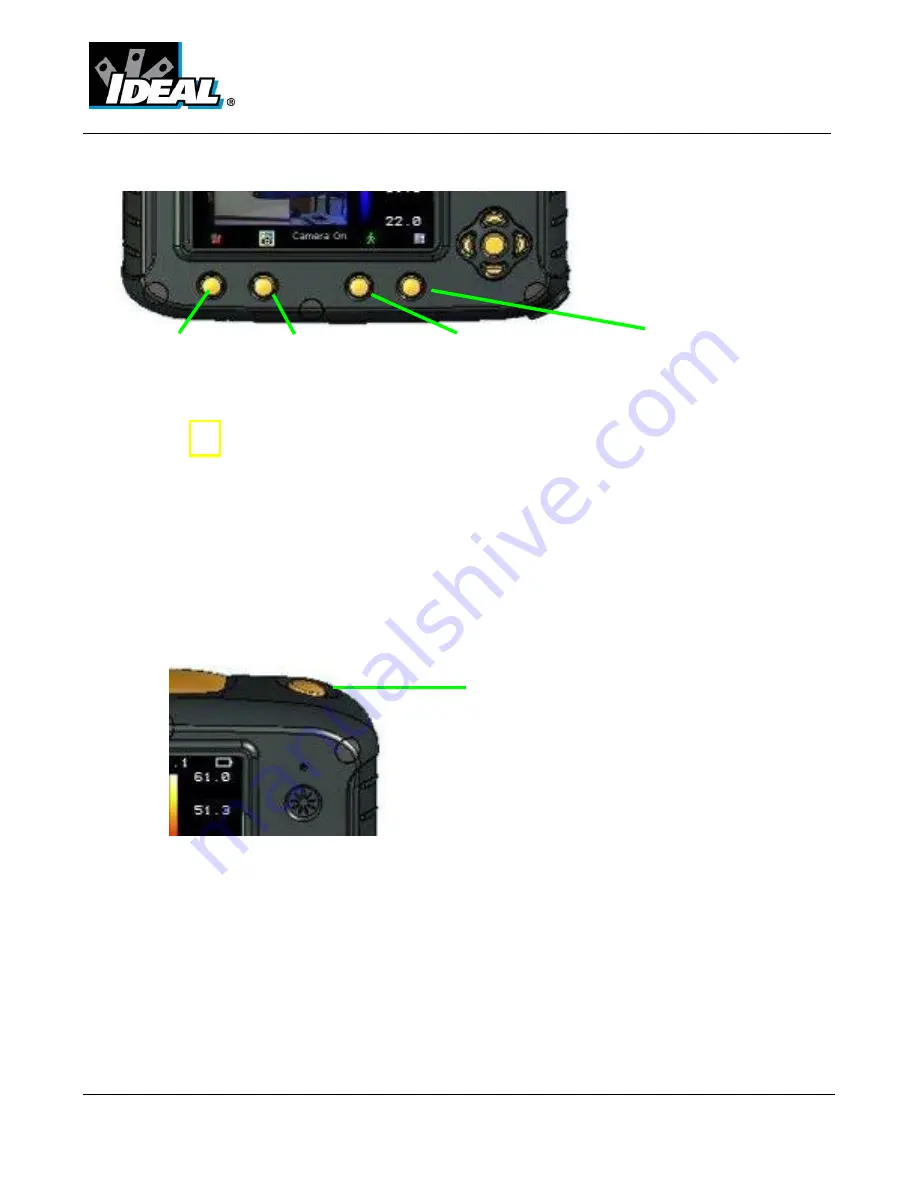
Function Key Buttons 


Icons  or  text  displayed  on  the  screen  above  the  Function  Keys  describe  the  actions.    These 

functions vary according to the options chosen by the user.  

A yellow box 

 around the icon for Function Key 1 or Function Key 2 indicates that this option 

is selected and this defines the operation of the navigation and toggle buttons.   
In  normal  imaging  mode,  Function  Key  3  may  be  used  to  freeze  the  image;  pressing  it  again 

returns  the camera  to live  operation.    Function  Key 4 is  used  to enter  and  exit  the  menu.  See 
appendix A2 for a full icon list. 


d)


Menu 

Function Key 4 selects the Menu. Use the Navigation buttons to move around and use 
Function Key 3 to select a menu function. Full details of menus are listed in section 5. 


e)


Saving an Image 


To  save  a  live  or  frozen  image,  press  the  Capture  Button  once.    If  Caption  Mode  or  Voice 
Annotation has been turned on, a text caption or voice annotation can be attached to the image 
(see section 6)


      Function Key 1 

Function Key 2 

Function Key 3             Function Key 4. 

Capture Button 

Summary of Contents for 61-844 HeatSeeker

Page 1: ...cument may result in hazardous laser radiation exposure 2009 No part of this publication may be reproduced without prior permission in writing from IDEAL Whilst IDEAL will endeavor to ensure that any data contained in this product information is correct IDEAL does not warrant its accuracy or accept liability for any reliance on it IDEAL reserves the right to change the specification of the product...

Page 2: ...Menu Structure 9 5 1 Infrared Settings 10 5 2 Measurement Options 11 5 3 Camera Settings 12 5 4 Audio Settings 13 5 5 Image Browser 14 5 6 Date Time Settings 14 5 7 Language Selection 15 6 Adding Captions when Saving Images 16 6 1 Voice message 16 6 2 Text Captions 17 APPENDIX 18 A1 Emissivity Look up tables 18 A2 Full Icon list 19 A3 Technical Specification 20 ...

Page 3: ... 61 844 ND 7043 3 Page 3 of 22 1 Contents of the Case 1 Case 2 Camera 3 PSU and International adaptors 4 CD User manual and Software 5 USB cable camera to PC 6 Handle 7 Quick Start Guide ...

Page 4: ...of 22 2 Main Features and Controls Laser Button Capture Button Microphone Speaker Power Button Navigation Keys Function Key 4 Function Key 3 Function Key 2 Function Key 1 Capture Button Laser Light Visible Camera Infrared Lens ...

Page 5: ...ss the Power Button to switch the camera on Press and hold for a few seconds to switch the camera off Gently rotate the lens clockwise and counter clockwise to focus the image Remember to remove the lens cap The camera s built in battery is charged via the charging port A fully charged battery will last approximately 6 hours A green LED indicates charging which turns red when the battery is charge...

Page 6: ...to freeze the image pressing it again returns the camera to live operation Function Key 4 is used to enter and exit the menu See appendix A2 for a full icon list d Menu Function Key 4 selects the Menu Use the Navigation buttons to move around and use Function Key 3 to select a menu function Full details of menus are listed in section 5 e Saving an Image To save a live or frozen image press the Cap...

Page 7: ...s menu see section 5 A scale on the right hand side of the display indicates the temperature range within the scene 4 Thermal and Visible Image Blending The camera can show a thermal image or a visible image of the scene or a mixed blend of both or a Thermal image within the visible also known as Picture in Picture PiP a 100 Thermal only b 100 Visible only c 50 Thermal and 50 Visible Function Key ...

Page 8: ...e the center navigation key to turn the camera option on 2 Press Function Key 1 to toggle through to the alignment option 3 Press center navigation key again to select the closes preset alignment distances 4 Use the up down and left right navigation keys to fine tune the alignment of thermal and visible images 5 The alignment facility is only available when the camera is on and in live mode Note t...

Page 9: ...up down buttons to move in the selected list and select the required item d Use the left right keys to change values and options for the specific item e Press Function Key 4 to exit or Function Key 1 to go back to the previous menu Measurement Options Infrared Settings Image Browser Date Time Settings Audio Settings Language Selection Camera Settings Function Key 1 Function Key2 Function Key 3 Fun...

Page 10: ...tte Display in image using different color palettes 1 Ironbow 5 High Contrast 2 Rainbow 6 Rainbow 16 3 Isotherm Style 7 Black Hot 4 Hot Metal 8 White Hot Reflected Temp Usually set to the ambient temperature or room temperature Applies only when emissivity of less than 1 is selected Temp units Choose between C and F Integration Chose an integration period from 1 fast to 9 slow This determines the ...

Page 11: ...d Three different area size boxes can be selected via Function Key 1 Note that the above three items are mutually exclusive i e when one is turned on the other two are disabled Isotherms Select High Low or High Low in order to highlight areas of the scene with temperatures within one or two temperature bands The temperature bands are adjustable by means of Function Key 1 and the navigation Keys Te...

Page 12: ...der to save power Camera Reset Select with Function Key 3 to restore the factory settings Sequence record This option allows the user to save images to the Micro SD card When sequence recording is selected It gives a choice of saving images every 10 seconds 20 seconds 30 seconds 1 minute 2 minutes 5 minutes 10 minutes 20 minutes 30 minutes and 1 hour or on alarm condition When Alarm is selected as...

Page 13: ...ession to add a common voice message at the start of a set of images and add additional comments for each image Voice Playback Select Speaker or Headset for the desired method of audible outputs Volume Select the volume of the audible outputs from 0 to 9 If session is selected the voice message is recorded in the audio settings by pressing Function Key 3 Pressing Function Key 3 again stops recordi...

Page 14: ...image press Function Key 3 To delete the selected image press Function Key 2 to confirm deletion press Function Key 3 When a stored image is displayed press Function Key 3 to return to live imaging 5 6 Date Time Settings a Use the left right keys to navigate in this menu the item that can be changed is highlighted in red In the picture above the day DD 14 is highlighted b Use the up down keys to c...

Page 15: ...en the language is highlighted shown by a yellow box around it press Function Key 3 to select The language selection is a combination of the country flag and the language in its native alphabet French German Italian Spanish Portuguese Chinese Korean Japanese ...

Page 16: ...ey 2 for no Function Key 3 for yes b Start voice recording Function Key 3 for yes c Stop Recording Function Key 3 to stop d Option to Re record the voice message Function Key 2 for Yes Function Key 3 for No e If caption mode is selected this option will now be offered to save a text caption See 6 2 f Image with voice message is being saved Playback The voice recording can be played back when viewi...

Page 17: ...e viewed using the ThermalVision software a Do you wish to attach a text caption message to this image Function Key 2 for No Function Key 3 for Yes 1 Use the up down arrow keys to cycle through letters and numbers until the one required appears The available symbols are ABCDEFGHIJKLMNOPQRSTUVWXYZabcdefg hijklmnopqrstuvwxyz0123456789 2 Use the left right arrow keys to move to the next space and rep...

Page 18: ...0 88 Glazed Silica 0 87 Cuprous Oxide at 38 C 0 86 Emery Corundum 0 85 Snow 0 85 Stainless oxidized at 800 C 0 84 Oxidized Iron at 500 C 0 83 Cuprous Oxide at 260 C 0 82 Snow fine particles 0 81 Brass unoxidized 0 80 Glass convex D 0 79 Steel oxidized 0 78 Copper heavily oxidized 0 77 Cotton cloth 0 76 Sand 0 75 Unglazed silica 0 74 Oxidized iron at 100 C 0 73 Coating No C20A 0 72 Basalt 0 71 Grap...

Page 19: ...al Profile vertical Alarm high Alarm low Playback Function Key Two Camera off Camera on Auto temperature range Manual temperature range Light off Light on No Yes Function Key Three Live Freeze No Yes Function Key Four Menus Abort Other Icons Level Down Level Up Level Maximum Level Minimum No Memory Card Span Out Span In Span Maximum Span Minimum Not saved ...

Page 20: ...ence 0 2mrad Maximum Output 1mW Measurement Temperature range 14 F to 660 F 10 C to 350 C Radiometry Two moveable temperature measurement cursors Temperature difference measurement Emissivity Correction User selectable 0 10 to 1 00 in steps of 0 01 with reflected ambient temperature compensation Accuracy The greater of 2 C or 2 of reading in C Imager Power Supply Battery Lithium ion field recharge...

Page 21: ...5 0 PiP Simple operation Multiple temperature measurement Image browser Battery Charge indicator Lightweight Laser Pointer Auto hot cold seeker Nine Languages 61 844 Includes IR Camera Handle Battery AC Adaptor Quick start guide Carrying Case CD with user manual and software Analysis and report writer Computer Requirements for PC software PC IBM compatible PC with a minimum of 1 gGHz processor MS ...

Page 22: ...of the sale of an IDEAL product including but not limited to implied warranties of merchantability and fitness for a particular purpose are limited to the above The manufacturer hall not be liable for loss of use of the instrument or other incidental or consequential damages expenses or economic loss or for any claim or claims for such damage expenses or economic loss State laws vary so the above ...

Reviews: