background image

21

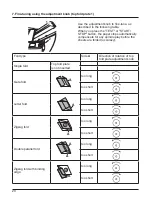
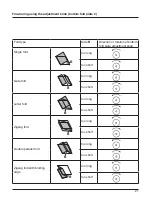
Fold type

Side 

B

Direction of rotation of bottom 

fold plate adjustment knob

Single fold

too long

too short

Gate fold

too long

too short

Letter fold

too long

too short

Zigzag fold

too long

too short

Double parallel fold

too long

too short

Zigzag fold with binding 

edge

too long

too short

Fine-tuning using the adjustment knob (bottom fold plate 2)

B

B

B

B

B

B

Summary of Contents for 8354

Page 1: ...www krug priester com IDEAL 8345 Paper Folder EN Operating Instructions...

Page 2: ...uned fold positions 22 9 Deleting finely tuned fold positions 23 10 Saving a special fold position 24 11 Retrieving saved fold patterns 25 12 Deleting fold patterns 26 13 Total counter 27 14 Preset co...

Page 3: ...machine and please follow the safety instructions The operating instructions must be kept available at all times Do not use the device if the power cable or mains plug is damaged or if the connection...

Page 4: ...4 Do not reach into the machine Long hair can become entangled in cutting head Take care of ties and other loose pieces of clothing Safety instructions Remove any paper clips...

Page 5: ...5 8345 8345 8345 Safety instructions All components which may endanger the operator are covered Connect the power cord 220 240V 10A Ensure free access to mains...

Page 6: ...structions Protect mains cable against heat and sharp edges Disconnect from the mains if not used for a longer period Cover the machine Remove the plug before cleaing the machine Do not perform any re...

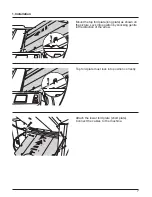
Page 7: ...top fold plate long plate as shown on the picture Lock into position by knocking gentle in the direction of the arrow Top fold plate must lock into position correctly Attach the lower fold plate shor...

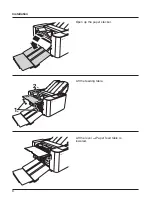
Page 8: ...8 8345 8345 1 2 8345 Installation Lift the feeding table Lift the lever Paper feed table is lowered Open up the paper stacker...

Page 9: ...ation Open the paper guides by loosening the 2 screws and push to the sides Do not fold newly copied or newly printed paper The paper must be cold and the toner dry Wait at least 24 hours for offset p...

Page 10: ...paper feed table in the middle Push the paper as far as possible Make sure the paper lies square and touches the front buffer Gently secure the paper left and right using the paper guides Tighten the...

Page 11: ...11 8345 A 8345 8345 Operation Press the lever down paper feed table returns to the top position The paper must be exactly stacked Apply the side guides A when using a large paper size...

Page 12: ...12 8345 B 8345 Operation Position the paper ejection rollers B at the lowest position when folding large sizes Plug into the mains Switch on the power switch Circuit breaker Power switch...

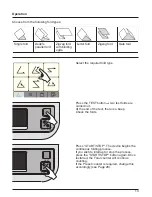
Page 13: ...button two test folds are carried out At the end of the test there is a beep Check the folds Press START STOP The device begins the continuous folding process If you wish to interrupt or stop the proc...

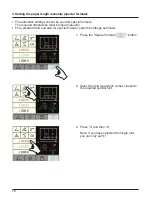
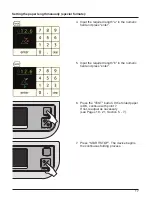
Page 14: ...input the measured length in the numeric field and press Enter 3 Press the Paper length button 2 Press the Special formats button 1 Measure the paper length mm 3 Setting the paper length manually sta...

Page 15: ...r length manually standard fold 5 Select the fold type 6 Press the TEST button If the folded paper is OK continue with point 7 If not readjust as necessary see Pages 18 21 Section 5 7 7 Press START ST...

Page 16: ...he required dimensions must be input manually For a standard fold and also for special formats enter the settings as follows 1 Press the Special formats button 2 Select the fold type which comes close...

Page 17: ...ngth a in the numeric field and press enter 5 Input the required length b in the numeric field and press enter 6 Press the TEST button If the folded paper is OK continue with point 7 If not readjust a...

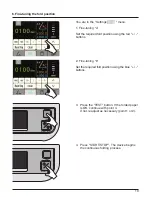
Page 18: ...ment knob Turn the adjustment knob to the right 1 if the rear side is travelling to the right Turn the adjustment knob to the left 2 if the rear side is travelling to the left The pin at the mark leve...

Page 19: ...g a Set the required fold position using the red buttons 2 Fine tuning b Set the required fold position using the blue buttons 3 Press the TEST button If the folded paper is OK continue with point 4 I...

Page 20: ...er stops automatically compensate for any spindle play before the sheets are folded accuracy A A A A A A A A Fold type Side A Direction of rotation of top fold plate adjustment knob Single fold Top fo...

Page 21: ...ingle fold too long too short Gate fold too long too short Letter fold too long too short Zigzag fold too long too short Double parallel fold too long too short Zigzag fold with binding edge too long...

Page 22: ...22 8 Saving finely tuned fold positions 1 In the Settings menu press the button 2 Press Memorize Fold Pos Adj 3 Press Yes to save the finely tuned fold position...

Page 23: ...23 3 Press Yes to delete the finely tuned fold position 2 Press Delete Fold Pos Adj 1 In the Settings menu press the button 9 Deleting finely tuned fold positions...

Page 24: ...ttings menu press the button 2 Press Fold Pattern Memory 3 Select the number that you want to save Use the and buttons to scroll between the fold patterns You can save up to 12 4 Press and hold down t...

Page 25: ...oll between the saved fold patterns Select the required number and press OK 3 Check whether the paper size fold type speed and memory number are correct 4 Press the TEST button If the folded paper is...

Page 26: ...Settings menu 1 Press the button 2 Press Fold Pattern Memory Use the and buttons to scroll between the fold patterns 3 Select the memory number that you wish to delete 4 Press and hold down the Delet...

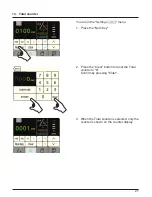
Page 27: ...2 Press the Clear button to reset the Total counter to 0 Confirm by pressing Enter You are in the Settings menu 1 Press the Num Key 3 When the Total counter is selected only the counter is shown on t...

Page 28: ...ou are in the Settings menu 1 Press the Num Key 2 Use the number keys to input the number of sheets to be folded and press Enter 3 While Preset counter mode is activated counter and sub are displayed...

Page 29: ...3 Press the Set up Sheets button Once you have input the required number confirm by pressing Enter Repeat the same process for Set Interval Second and Set up Sets 4 When the interval mode is activated...

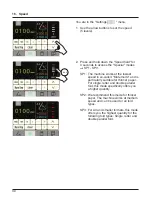
Page 30: ...eed in so called Mute mode and is particularly suitable for thinner paper For single letter and double parallel fold this mode specifically offers you a higher quantity SP2 We recommend this mode for...

Page 31: ...On the machine saves the speed paper size and fold pattern if the machine is stopped during an operation and switched off at the mains Preset and Total counter is not saved Cleaning Alert On Off After...

Page 32: ...lding before starting actual operation 2 Start folding operation as usual When the machine stops based on double feed detection error error code E 52 E 53 1 Remove the paper ejected by double feed 2 P...

Page 33: ...t factory settings can also be changed in this menu Other changes should only be made by expert personnel or the IDEAL customer service 1 In the Settings menu press the button 2 Press Version 3 Press...

Page 34: ...o select the following languages French English German or Japanese In field B use the arrow buttons to select mm or inch 6 Use the Cbutton to save the modified data Press and hold down the Cbutton unt...

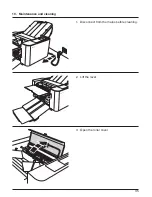
Page 35: ...35 8345 8345 1 Disconnect from the mains before cleaning 19 Maintenance und cleaning 2 Lift the lever 3 Open the roller cover...

Page 36: ...36 1 2 Maintenance und cleaning 4 Remove the paper feed roller 5 Wipe the surface on the feeding rollers Cleanser Order No 9000 632 6 Wipe the paper separator Cleanser Order No 9000 632...

Page 37: ...they are worn No 8330 001 8 Remove both fold plates and any paper debris Remove paper debris from the machine making sure no debris is left in the paper guides Pay attention to the cables 9 Wipe the r...

Page 38: ...nsors The paper feed roller and both fold plates are already removed as described on the previous pages 1 Unlock the two locking levers left and right 20 Maintaining and replacing the folding rollers...

Page 39: ...moved see Page 38 Section 20 Maintaining and replacing the folding rollers Clean sensors with a cotton bud Open the roller cover Clean the sensors with a lint free cloth or cotton bud 21 Cleaning sens...

Page 40: ...the paper feed sensor see Page 39 E 05 Paper jam occurred near the paper feed sensor Remove the paper and restart the operation E 10 Paper jam in the top or bottom fold plate Take out both fold plate...

Page 41: ...fed in Check the loaded paper Fan out the stack of paper and start again E 70 Motor has stopped Paper jam occurred near the folding rollers Remove the jammed paper E 90 EEPROM error Switch the machine...

Page 42: ...s The paper is cut at an angle Correct this using the adjustment knob Paper is thin or curled up Replace or turn the paper if possible Paper jam occurs frequently The folding rollers are dirty Clean t...

Page 43: ...grain paper is being used or the paper is not stiff enough Reduce the speed 16 Speed The paper used is outside the specifications Use suitable paper Paper is thin or curled up Replace or turn the pap...

Page 44: ...se suitable paper The paper separator is dirty Clean the separator 19 Maintenance and cleaning Double feed occurs frequently The paper separator is worn Replace the roller set incl separator Order no...

Page 45: ...andard tool kit All joining points are easily accessible and as such clearly visible Paper size B7 A3 Min 91 mm x 128 mm Max 300 mm x 432 mm for single fold Paper quality 50 160 g m up to 230 g m for...

Page 46: ...ster has the following certifications Quality management system according to DIN EN ISO 9001 2015 Environmental management system according to DIN EN ISO 14001 2009 Energy management system according...

Page 47: ...ation Datum Krug Priester GmbH u Co KG Simon Schweitzer Str 34 D 72336 Balingen Germany The unit is CE compliant and adheres to the following guidelines 2014 35 EU for electric safety 2014 30 EU for e...

Page 48: ...IDEAL 01 2017 22 12 2017 zm Krug Priester GmbH Co KG Simon Schweitzer Str 34 D 72336 Balingen Germany Document Shredders Trimmers and Guillotines...

Reviews: