7.
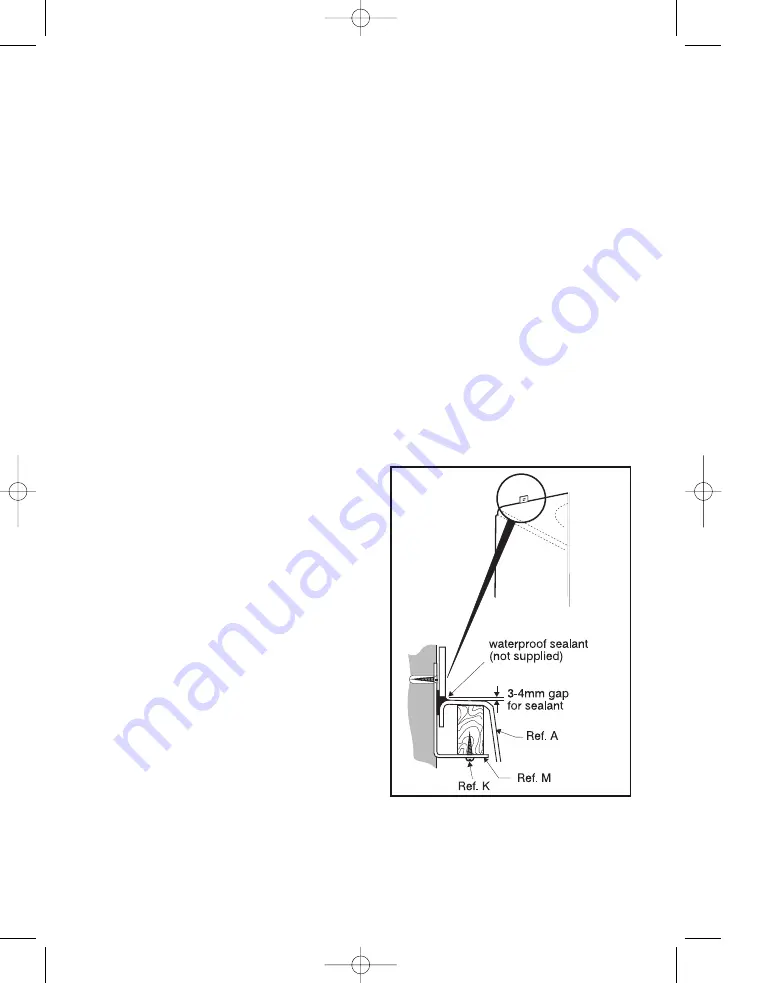
Fix the two wall fixing brackets, (Ref. M)
to bath frame as indicated in Fig. 4 and Fig. 1. Pilot
drill holes in frame before fixing brackets.
8.
Fix bath to wall, Fig. 4.
9.
Fix bath to floor, ensuring that all nuts are tight and
that the bath is level. Re-adjust if necessary. Trial fit
the panel(s) to verify height is correct.
Note:
Untrimmed panel fitment requires the
maximum height adjustment (C max Fig. 1),
Vue- 510mm from trimmed edge of bath to floor.
Senses- 512 from trimmed edge of bath to floor.
Remember to allow for floor covering thicknesses.
10. Connect services, test for satisfactory operation of
fittings and ensure there are no leaks.
11. Tile down to the height of the bath rim leaving
a 3-4mm gap for waterproof sealant, see Fig. 4.
An extruded sealing strip can be used for the bath
to wall joint as an alternative to waterproof sealant.
Protect bath during tiling.
Fig. 4
INSTALLATION
1.
Lay bath face down and remove legs and bags containing feet etc. Discard the 4 black packing
screws securing the legs.
2.
Locate leg adjusters, (Ref. G) on bath frame and mark positions for the fixing screws.
See Fig 1 for dimensions. Pilot drill the holes in the bath frame and fix leg adjusters to frame.
3.
Locate bath legs in leg adjusters, (Ref. G) and mark positions for the fixing screws on the base
board. Pilot drill the holes in the baseboard, to a depth of 6mm maximum. Position legs in leg
adjusters and on base board and secure using screws, (Ref. L). Locate pan head self tapping
screws (Ref. H) into leg adjusters and tighten.
DO NOT OVER TIGHTEN.
4.
Locate centre support bracket, (Ref. C), centrally on the base board. Mark screw hole positions,
pilot drill holes in baseboard, to a depth of 6mm maximum, and secure bracket using screws
(Ref. J).
5.
Attach the feet and adjust to give floor to top of rim height of C Max. Stand the bath on its feet.
6.
Fit tap and waste fittings. If the bath is to be installed with a monoblock mixer, a special hole(s)
will be required to accommodate it and will have to be cut by the installer in an appropriate
position on the rim of a no tap hole bath to suit. Full details or a template for cutting the hole(s)
is supplied with monoblock fittings. A template for cutting two tap holes in a no tap hole bath is
supplied with the bath. Cut tap holes, and fit tap fittings, waste, overflow and trap. When using a
monoblock fitting, the area directly behind the pop-up waste mechanism should be avoided.
4950 Baths:Layout 1 09/03/2013 04:54 Page 5


