CONTACT INSERTION
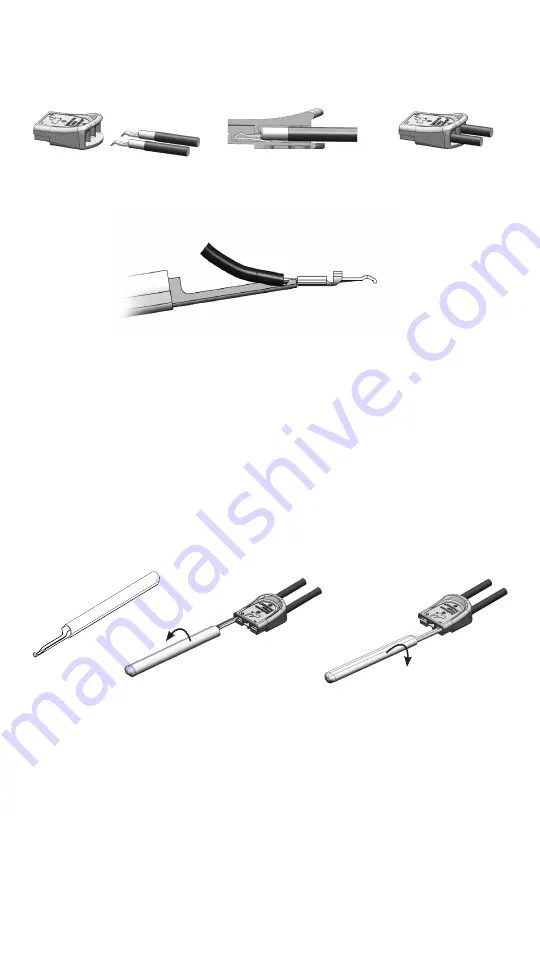
Insert contact and wire into the housing from the rear. With the curved top side of the housing facing
up, position contact as shown, hook down & crimp seam up (See Figure 3) and push forward so contact
slips under the barrier and snaps over the end of the retaining spring (See Figure 4). A click will be
heard and felt when the contact is properly inserted. Tug slightly to make sure contact is locked in place
(See Figure 5).
Figure 3 Figure 4 Figure 5
For small gage wire such as 18 AWG the insertion/extraction tool, part number 111038G2, should be
used. The curve at the front of the tool would be placed around the exposed wire between the contact
and the insulation (See Figure 6). This allows insertion force to be applied to the contact instead of the wire.
Figure 6
CONTACT REMOVAL
1. Switch off the power.
2. Position the connector with the Anderson Power Products logo facing up.
3. To remove the left contact, insert the extraction tool, part number 111038G2, (Figure 7a) on the left
side of the connector, placing one of the forward prongs between the contact and the spring.
a. Rotate the tool to the left while pulling on the wires until the prongs cause the disengagement of
the contact from the spring. (See Figure 7b)
4. To remove the right contact, insert the extraction tool, part number 111038G2, on the right side of the
connector, placing one of forward prongs between the contact and the spring.
a. Rotate the tool to the right while pulling on the wires until the prongs cause the disengagement of
the contact from the spring. (See Figure 7c)
5. Caution: If contacts are damage during extraction, replace the old contact with new contact.
Figure 7a Figure 7b Figure 7c
CONNECTOR USAGE
1. Do not disconnect under load. Not for interrupting current.
2. Do not disconnect by pulling on the wires.
3. For use only in equipment where the acceptability of the combination is determined by
UL / CSA or other applicable certification agencies and installed by a qualified electrician.
PATENT & TRADEMARK INFORMATION
Patent information can be found on our website.“© 2015 Anderson Power Products, Inc. All rights
reserved. APP® and the APP Logo are registered trademarks of Anderson Power Products, Inc.”.
www.andersonpower.com
1S6651
REV 0


