Fixing the bath panel
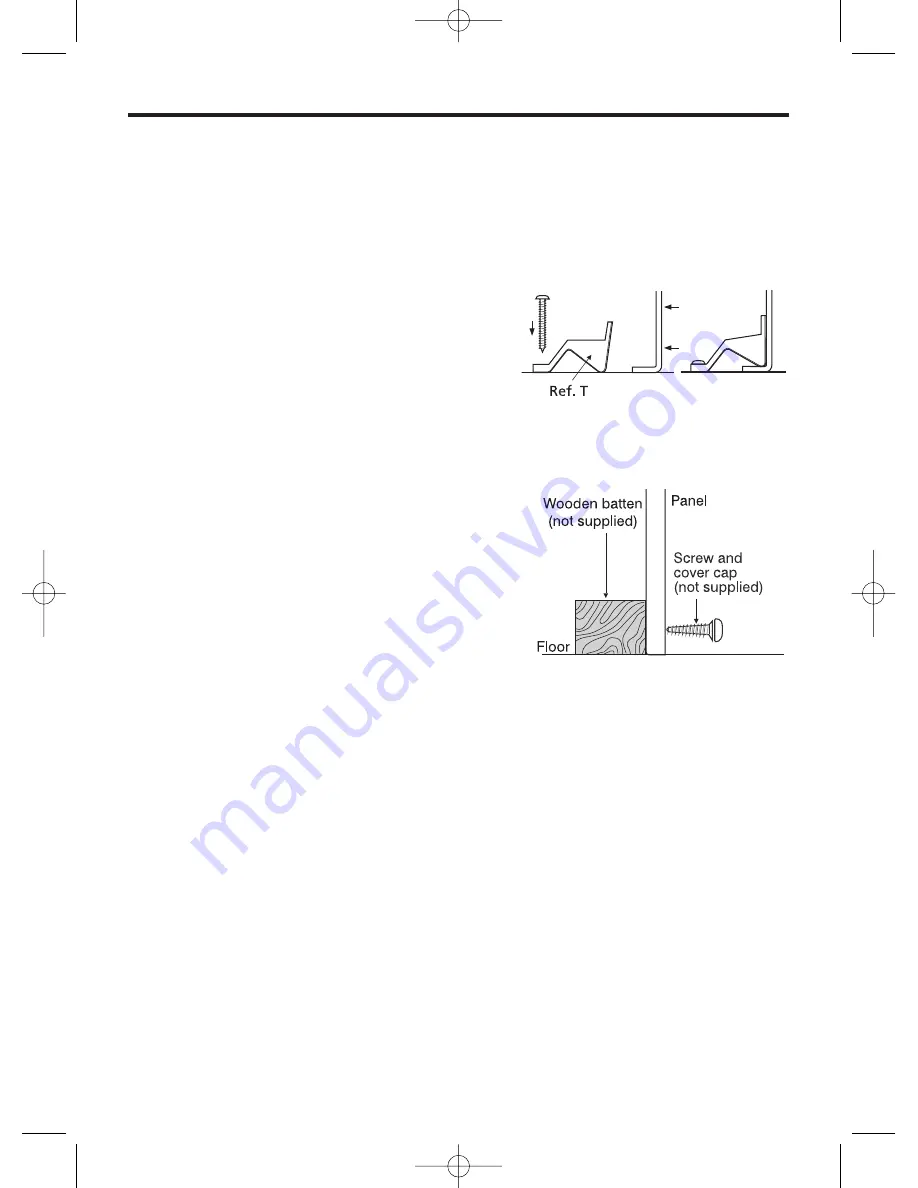
15. Pre fit front panel ensuring that the ends of the panel are vertical. Mark a line along the
front of the panel on the floor. Remove panel and fix the plastic panel clips (Ref. T)
onto the floor/wall(s) (Figure 7). The front of the block at the floor should be 3mm back
from the marked line.
Note: The front panel may touch the support leg
foot, (Ref. N), depending on its position. Remedy
this by removing a small amount of material from
the panel return.
16. Fit the end panel by using a wooden batten along
the floor for support and engaging the top of the
panel in front of the spring clips, (Ref. Y)
secured with screws (Ref. Z).
17. Fit front bath panel in position and press the
edges into the panel clips until fully engaged.
Note: Fit end panel before front panel. If the front
panel does not easily insert under the panel clips,
then release the screws by a quarter of a turn
and retry.
Note: if the front panel has had the returns trimmed
off, then the plastic panel clips will not grip the
panel base. In this instance, use wooden blocks
(not supplied) to secure the panel to the floor/wall.
Screws with cover caps are supplied for this
method of fixing.
CONCEPT ACRYLIC SHOWER BATH
Fig. 7
Fig. 8
4994 Concept Shower Bath:Layout 1 02/10/2017 09:54 Page 8
Summary of Contents for CONCEPT
Page 3: ...Fig 2 CONCEPT ACRYLIC SHOWER BATH 4994 Concept Shower Bath Layout 1 02 10 2017 09 54 Page 3 ...
Page 4: ...CONCEPT ACRYLIC SHOWER BATH Fig 3 4994 Concept Shower Bath Layout 1 02 10 2017 09 54 Page 4 ...
Page 11: ...CONCEPT ACRYLIC SHOWER BATH 4994 Concept Shower Bath Layout 1 02 10 2017 09 54 Page 11 ...


