background image

8

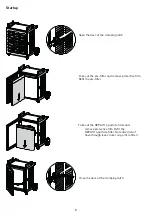
Startup

Open the door at the clamping latch

Take out the pre-filter and remove protective


film. 

Refit the pre-filter

Take out the HEPA H14 particle filter and

remove protective film. Refit the

HEPA H14 particle filter. Note direction of

flow-through (see sticker on particle filter).

Close the door at the clamping latch

Summary of Contents for Hercules H14

Page 1: ...Air Purifier IDEAL Hercules H14 www idealhealthstore com EN Operating Instructions ...

Page 2: ...r oder Polierpaste Diese könnten die Geräteoberfläche beschädigen Setzen Sie das Gerät auf keinen Fall Regen Wasser Nässe oder hoher Luftfeuchtigkeit aus stellen Sie es nicht im Badezimmer oder in der Küche neben einem Wasch oder Spülbecken auf Es dürfen keine Fremdkörper in die Ein und Auslassgitter gelangen Offenes Feuer und Funken sind zu vermeiden Für die Beseitigung schädlicher Gase Kohlenmon...

Page 3: ...y volatile liquids petroleum kerosene paint thinner or polishing paste to clean the device Such liquids may damage the surface of the device Do not expose the device to rain water moisture or high humidity and do not set it up in a bathroom or kitchen next to a sink Make sure that no foreign objects get into the inlet and outlet grilles Do not use near an open fire or sparks The device is not suit...

Page 4: ...onnect the mains plug prior to Carrying out maintenance work or cleaning Moving the device Changing the filter Safety Instructions Danger Do not use any spray cans with flammable content near to the Air Purifier Danger Do not use any flammable cleaning agents ...

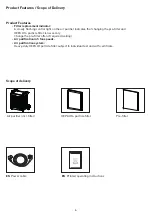
Page 5: ...N Printed operating instructions Product Features Scope of Delivery Product Features Filter replacement indicator A slowly flashing control light on the air purifier indicates that changing the pre filter and HEPA H14 particle filter is necessary Change the pre filter often if required soiling Air purification in 5 fan speeds Air purification system Heavy duty HEPA H1 particle filter subject to in...

Page 6: ...st 10 cm away from the wall Make sure that furniture fabrics or other objects do not come into contact with the air intake outlet or block them Place the device on a stable even surface and make sure there is sufficient air circulation Remove all clips Lift off the cardboard box Cut the plastic belt ...

Page 7: ...e pre filter and remove protective film Refit the pre filter Take out the HEPA H14 particle filter and remove protective film Refit the HEPA H14 particle filter Note direction of flow through see sticker on particle filter Close the door at the clamping latch ...

Page 8: ...9 Startup Pressing the button releases the hinged grip When locking unlocking the hinged grip keep hold of it until it has clicked into place Mobile deployment ...

Page 9: ...10 Startup Flexible operation The air purifier can be operated without difficulty in both the upright and horizontal positions Connect the power cable to the device first then to the socket ...

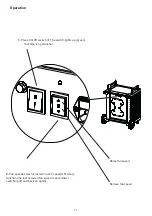
Page 10: ...f switch I The switch lights up green machine is operational 2 Fan speeds selector selection of 5 speeds Memory function the last selected fan speed is saved after switching off and back on again Reduce fan speed Raise fan speed ...

Page 11: ...Note Use only original IDEAL pre filters and IDEAL HEPA H14 particle filters order in www ideal de see Page 15 No tools are needed to replace the pre filters and HEPA H14 particle filters Filter replacement indicator Control light flashes slowly CAUTION Disconnect the mains plug Open the door at the clamping latch ...

Page 12: ...r Fit new HEPA H14 particle filter remove protective film beforehand Note direction of flow through see arrow direction sticker on the particle filter Remove the pre filter Fit new pre filter remove protective film beforehand Filter Change ...

Page 13: ...ent indicator Press the fan speeds selector for approx 3 seconds until the filter replacement indicator goes out Connect the power cable to the device first then to the socket Close the door at the clamping latch Filter Change ...

Page 14: ... on the running time Regularly check the pre filter and change as required Clean the air purifier housing with a lint free cloth lightly wetted in a soap solution Clean the inside of the air purifier with a vacuum cleaner Do not use any solvents These could damage the surface of thedevice Protect the air purifier from water Cleaning and Maintenance Accessories Accessories EN You can acquire access...

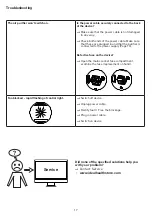
Page 15: ...he power cable is not damaged in any way Check both ends of the power cable Make sure that these are plugged in and that the purifier is connected to the power supply Page 10 Defective fuse on the device Open the mains socket fuse compartment examine the fuse replacement on hand Fan blocked rapid flashing of control light Switch off device Unplug power cable Rectify fault Free the blockage Plug in...

Page 16: ...pply 220 240V 50 60Hz 100 120V 50 60Hz Power consumption 170W 220 240V 145W 100 120V Air flow rate max 810 m3 h Dimensions H W D 625 522 399 mm Weight approx 28 kg Noise level 29 65 5 dB A Subject to technical changes Technical Data ...

Page 17: ...ected to a power supply that does not comply with the rating plate data Storage We recommend storing the air purifier in its original packaging in a cool dry place Spare parts and accessories You can source spare parts via your dealer or at www ideal de Only use the manufacturer s original parts Repairs Repairs must only be carried out by qualified experts or the customer service department This a...

Page 18: ...iester has the following certifications Quality management system according to DIN EN ISO 9001 2015 Environmental management system according to DIN EN ISO 14001 2015 Energy management system according to DIN EN ISO 50001 2018 ...

Page 19: ...al changes EC declaration of conformity Herewith we declare that 220 240V 100 120V IDENT Nr IDENT Nr IDEAL Hercules H14 Made in Germany 11732002 10732002 complies with the following provisons applying to it 2014 35 EU Low voltage directive 2011 65 EU 2015 863 EU RoHS directive 2014 30 EG EMV Electromagnetic compatibility directive Applied harmonised standards in particular EN 60335 2 65 EN 60335 1...

Page 20: ......

Reviews: