background image

18 

MSC-6KLP 

Sep 2022 


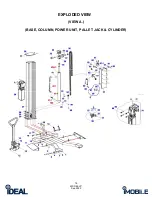
EXPLODED VIEW   

(VIEW A.) 


(BASE, COLUMN, POWER UNIT, PALLET JACK & CYLINDER) 


Summary of Contents for MSC-6KLP

Page 1: ...Sep 2022 MSC 6KLP Low Profile Mobile Single Column Lift 6 000 lb Capacity 1 500 lbs Max Capacity per Arm Installation Operation Manual ...

Page 2: ...ite Selection Surface Condition Operating Condition Main Lift Components INSTALLATION INSTRUCTIONS Required Tools Unloading Lift Un banding Lift Moving Lift Components Lift Assembly OPERATION INSTRUCTIONS Lift Vehicle Positioning Lifting Lowering Inspection Maintenance Cleaning Trouble Shooting Guide POWER UNIT PRIMING PROCEDURE 115V POWER UNIT ELECTRICAL DIAGRAM EXPLODED VIEWS PARTS LIST LIMITED ...

Page 3: ...cle or environment Do not perform any procedures until you have read and understood the warning instructions Important Information 1 Read this manual thoroughly before installing operating or maintaining the lift 2 This lift is designed for indoor use only and should not be positioned or operated in a pit or depression The lift is only to be operated on a flat level concrete surface 3 The lift has...

Page 4: ...ft daily The lift should never be operated if it has damaged components or is malfunctioning Only qualified technicians should service the lift Replace damaged components with manufacturer s parts or equivalent 10 Keep the area around the lift clear of obstacles 11 Never override the self returning lift controls 12 Avoid excessive rocking of the vehicle when it is on the lift 13 To reduce the risk...

Page 5: ...most vehicles making it ideal for pre service inspections or maintenance while also providing outer vehicle access around most vehicles for wheel service repairs Due to the unique design and portability feature the iMOBILE MSC 6KLP is the perfect solution for a homeowner with limited space or a shop looking to improve work flow or gain additional revenue from previously unusable space Specificatio...

Page 6: ...6 MSC 6KLP Sep 2022 Dimensions MM INCH Fig 1 ...

Page 7: ...soft surface Ensure lift is placed on a dry oil grease free level concrete surface capable of supporting the weight of the Lift with a vehicle Do not use Lift on concrete expansion seams or cracked defective concrete Failure to accomplish the foundation requirement may cause lift instability which could result in personal injury Operating Condition Lift is not intended for outdoor use and has an o...

Page 8: ...ive or Ratchet 5 6mm Hex Wrench 6 1 2 Wrench 7 11 16 Wrench 8 Adjustable Wrench 9 Small Crowbar 10 Large Screwdriver Aligning Bolt Holes 11 Pliers 12 Flat Blade Screwdriver 13 Tin Snips 14 Gloves 15 Safety Glasses Unloading the Lift You will need a forklift that can handle about 2 000 to 2 300 pounds and operates on a smooth surface Un banding the Lift The steel bands which secure the lift parts t...

Page 9: ...ly stand the column upright align the bolt holes and secure to base plate with bolts Fig 4 STEP 3 Position the lifting frame to the front of the base plate Then connect the lifting frame to carriage with bolts Fig 5 Fig 5 Fig 6 STEP 4 Mount the hydraulic motor pump on the column with bolts and nuts Fig 6 Connect the hose fitting and hose from pump to cylinder Figs 7 8 9 Fig 7 Fig 8 Fig 9 ...

Page 10: ...g 10 Fig 11 Insert the ram into the hole of the base plate Fig 12 Lock the ram by threaded pin Fig 13 Adjust the length of the ram Fig 14 15 Fig 12 Fig 13 Fig 14 Put the slot of the bearing into the bracket Fig 16 then lock it by bolt Fig 17 18 Fig 15 Fig 16 Fig 17 Fig 18 The Base Plate with Pallet Jack Assembly is now Complete ...

Page 11: ...site column side arm restraint components Fig 19 Assemble offside arm restraints inside the lifting frame s end Figs 20 23 Fig 19 Fig 20 Fig 21 Fig 22 Fig 23 STEP 7 Assemble the off side arms handles to the end of lifting frame Figs 24 25 Fig 24 Fig 25 ...

Page 12: ...arts of Non Detergent Non Foaming Hydraulic Oil SAE 10 AW 32 or equivalent Add hydraulic oil to the fill line on the front side of reservoir tank See Fig 29 next page STEP 11 Connect 115VAC electrical power to the Power Unit s three prong electrical plug Ensure to use proper size extension cord and plug type for 20 Amps Also ensure power supply incorporates 20 Amp breaker service for safety If the...

Page 13: ...ng frame and carriage s safety latch will rest on the latch stop inside the column Fig 29 Fig 29 To Lower first you need to depress the power switch button a second or two to raise the lift up a little Then pull the safety latch release cable to disengage the safety latch to fully lower After that press down the release handle again and hold Fig 30 The weight of the vehicle will cause the lift to ...

Page 14: ...P UNDER STATIONARY VEHICLE Ensure the Vehicle to be raised is positioned on a flat level surface able to properly support being raised by the lift Maneuver the Lift in the portable configuration to the desired side of the vehicle ensuring the Lift is close to being centered to the vehicle Position the Swing Arms so that the swing arms will clear the inside of both the front back wheels as well as ...

Page 15: ...ompressed air or vacuum remove all dirt and debris from the Lift Also use a detergent or mild solvent to remove oil and grease from the unit Then use a premium quality machine oil to lubricate all moving parts MONTHLY With the lift fully lowered check the level of hydraulic oil in the Reservoir Tank is close to the Max Fill Line If not remove the Fill Cap and add premium quality hydraulic oil unti...

Page 16: ...nd Will Not Run A Lift overloaded Remove excessive weight from lift B Bad capacitor Call electrician C Low voltage Call electrician D Faulty wiring Call electrician 6 Lift Jerks Up and Down A Air in hydraulic system Raise lift all the way to top and return to floor Repeat 4 6 times with intervals at least 2 minutes apart Ensure NOT to overheat the power unit 7 Oil Leaks A Power unit If the power u...

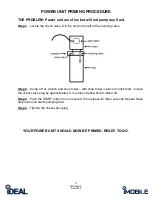
Page 17: ...ng valve Step 2 Using a Hex wrench and shop towel with shop towel in place to catch fluid loosen the check valve plug by approximately 2 turns and allow fluid to bleed off Step 3 Push the START button for one second then release for three seconds Repeat these steps until unit starts pumping fluid Step 4 Tighten the check valve plug YOUR POWER UNIT SHOULD NOW BE PRIMED READY TO GO ...

Page 18: ...18 MSC 6KLP Sep 2022 EXPLODED VIEW VIEW A BASE COLUMN POWER UNIT PALLET JACK CYLINDER ...

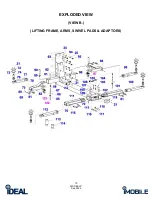
Page 19: ...19 MSC 6KLP Sep 2022 EXPLODED VIEW VIEW B LIFTING FRAME ARMS SWIVEL PADS ADAPTORS ...

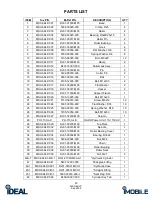
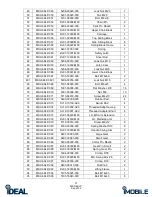
Page 20: ...0 Support Frame 1 20 MSC 6KLP 020 5105 10025 000 Bolt M10x25 1 21 MSC 6KLP 021 5110 06012 000 Screw M6x12 12 24 MSC 6KLP 024 5301 00016 000 Flat Washer D16 19 25 MSC 6KLP 025 5303 00016 000 Spring Washer D16 19 26 MSC 6KLP 026 5105 16050 000 Bolt M16x50 10 27 MSC 6KLP 027 DJ01 02000 M00 Column 1 28 PU 110V L K PU 110V L K DURO Power Unit 110 115VAC 1 29 MSC 6KLP 029 DJ01 00005 M00 Top Plate 1 32 M...

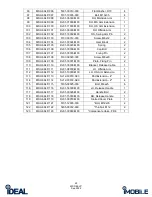
Page 21: ...x25 4 69 MSC 6KLP 069 5301 00008 000 Flat Washer D8 16 70 MSC 6KLP 070 5201 00008 000 Nut M8 10 71 MSC 6KLP 071 5110 04010 000 Screw M4x10 24 72 MSC 6KLP 072 SJ03 00008 000 Rubber Pad 4 73 MSC 6KLP 073 SJ12 10100 A00 Swivel Pad 4 74 MSC 6KLP 074 SJ12 10002 A00 Threaded Adaptor Long 4 76 MSC 6KLP 076 SJ12 10001 A00 Threaded Adaptor Short 4 77 MSC 6KLP 077 DJ01 06000 M00 LH MS Arm Extension 1 78 MSC...

Page 22: ...35 M00 Fixing Pin 2 108 MSC 6KLP 108 5107 08020 000 Screw M8x20 2 109 MSC 6KLP 109 DJ01 16001 M00 Plate Fixing Pin 2 110 MSC 6KLP 110 DJ01 00008 M00 Bracket Release Cable 1 111 MSC 6KLP 111 DJ01 08000 M00 LH Offside Arm 1 112 MSC 6KLP 112 DJ01 10000 M00 LH OS Arm Extension 1 113 MSC 6KLP 113 SJ12 00019 A00 Pad Extension 4 4 114 MSC 6KLP 114 SJ12 00018 A00 Pad Extension 2 4 115 MSC 6KLP 115 5105 08...

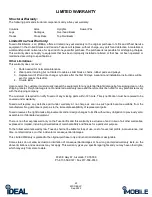
Page 23: ... considered a warranty issue and therefore must be noted for any potential recovery with the shipping company The customer is required to notify Tuxedo of any missing parts within 72 hours Timely notification must be received to be covered under warranty Tuxedo will replace any defective part under warranty at no charge as soon as such parts become available from the manufacturer No guarantee is g...

Reviews: