background image


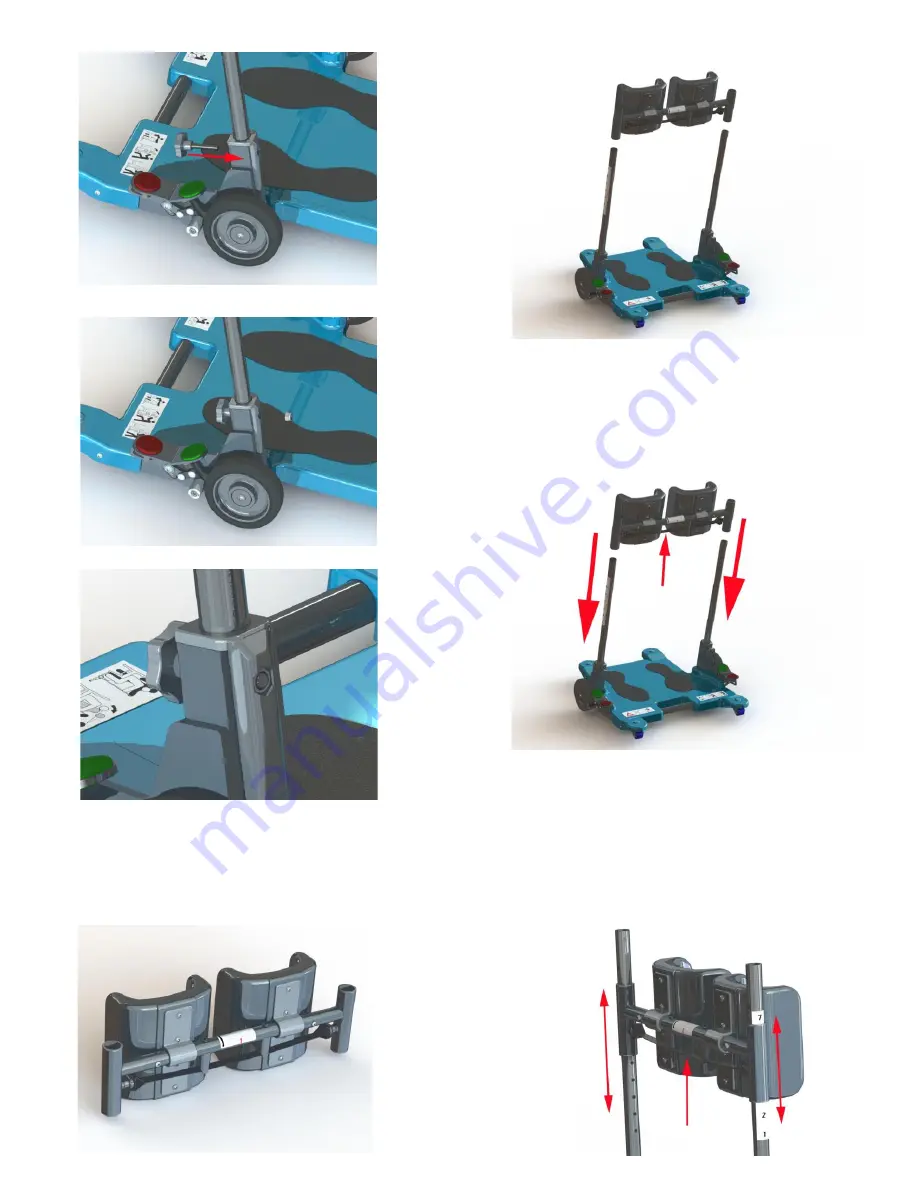
7.  When both sides of the lower leg frame are 
securely fastened to the base, position the 
lower leg support assembly over the top of the 
tubes.


8. Pull the adjustment tape upwards to 
release the internal pins. This will allow the 
lower leg support to move down the tube 
until the pins reach the first positioning 
hole.


9. Move the lower leg support to the height 
level required for the service user by 
pulling the adjustment tape upwards until 
the lower leg support reaches the correct 
position, as shown by the numbers on the 
outside of the tube.


Summary of Contents for 815198

Page 1: ...Pt No 815198 Assist User Manual...

Page 2: ...General Page 3 2 Risk Assessment Page 3 3 Labels and Symbols Page 3 4 Description of parts Page 4 5 Technical Data Page 4 6 Assembly Instructions Page 5 7 User Instructions Page 7 8 Maintenance Page...

Page 3: ...ual risk assessment and ensure the Patient Transfer Assist has been tested with the service user ands for the intended transfer You as the carer are responsible for the safety of the service user Only...

Page 4: ...arness Anchor 15 Adjustment Tape 16 Lower Frame Tube L H 17 Lower Frame Mount Technical Data Safe Working Load SWL 150Kg 330lbs Weight of Unit 14 5Kgs Material Powder Coated Aluminium plastic steel Ex...

Page 5: ...me tube into the lower frame mounts making sure that the numbered side of the tube is facing outwards 4 Position the lower frame and the lower frame mount into the baseplate mount 5 Place a nyloc nut...

Page 6: ...pwards to release the internal pins This will allow the lower leg support to move down the tube until the pins reach the first positioning hole 9 Move the lower leg support to the height level require...

Page 7: ...The lower legs should be in a comfortable position cushioned by the lower leg supports To facilitate a comfortable position adjust the height of the lower leg supports so the upper most part is appro...

Page 8: ...site side or on the central post when using the harness 10 Release the brake pedal with one foot 11 Check the surroundings and safely manoeuvre the Patient Transfer Assist to point B The transfer from...

Page 9: ...ral purpose neutral detergent along with warm water Warranty The Patient Transfer Assist is supplied with a 24 month manufacturer s warranty for manufacturing defects This warranty does not include ac...

Reviews: