background image


NOT-AD-06 Septembre 2020 ( Version 1.1)          


11 


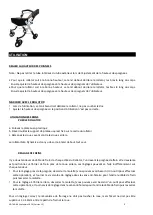
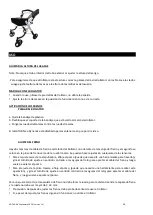
WALKING WITH THE ROLLATOR   


When using, stand upright behind the rollator, do not bend your back.   


Adjust the height of the handles if the position of use is not correct. 


USE OF BRAKES  


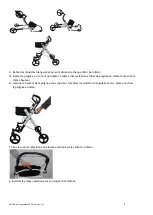
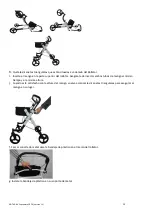
FOLD THE ROLLATOR  

 
a. Remove the plastic tray  
b. Unlock the tray holder that is attached to the rollator frame.  
c. Bring the front wheels back against the rear wheels.  
 
The Neo Dynamic rollator is designed to stand on its own.   
 

  BRAKE ADJUSTMENT  

 
There are two brake cable adjusters on each side of the Rollator, one in front of the brake handle and the 

second is positioned on the brake lever near the rear wheel. Adjustments can be made to either binder.  


To adjust near the handle, loosen the knob (you may need a tool to do this), and turn the adjusting 
screw counterclockwise to tighten the brake cable and then tighten the knob again. 


For rear brake caliper adjustment, loosen the adjustment knob, (you may need a tool to perform this 
operation), and turn the adjustment screw counterclockwise to tighten the brake cable, and then 
tighten the adjustment knob again.  

   
For correct adjustment, the brake mechanism should not touch the wheel, but the distance between the 

brake pad and the wheel should not be more than 3 to 4mm.  


Caution : After adjusting the brakes, you must test them before using the rollator.  


If, despite the adjustment, the brakes still do not work, do not use the rollator. 


CARE AND MAINTENANCE


Failure to care for and monitor your product may result in the risk of serious injury. 


Clean the rollator regularly with warm water and a soft cloth. Do not use abrasive products, 
detergents or solvents.   


Dry with a clean, dry soft cloth.  


Make sure there is no accumulation of dirt or debris around the axle, brakes or wheels.   


Do not use cleaning products containing phenol or chlorine, as this could damage aluminium and 
polyamide materials.  


Lubricate the wheels with a little oil if they squeak.   


Periodically check the wear and strength of all screws and bolts. Replace all broken, damaged or worn 
parts immediately.  


Check that the brakes are working before each use. 


Check the parking brakes by pushing the handles into the locked position, then trying to push the 
rollator. 


If there is a malfunction, do not repair the rollator yourself. Consult an authorized dealer. 

Summary of Contents for NEO DYNAMIC

Page 1: ...NOT AD 06 Septembre 2020 Version 1 1 1 ROLLATOR NEO DYNAMIC ROLLATOR NEO DYNAMIC ROLLATOR NEO DYNAMIC REF 826003...

Page 2: ...TE OU DANS LA NOTICE D UTILISATION Adresse du fabricant Poids maximum de l utilisateur Date de fabrication Invitation consulter le manuel d utilisation Num ro de lot Respecter les consignes de s curit...

Page 3: ...z les freins de parking pour toutes actions Toutes les roues doivent toujours tre en contact avec le sol Lorsque le rollator est en position stationnaire les freins doivent tre verrouill s Ne pas tent...

Page 4: ...t du rollator Veillez ins rer les deux tubes de poign e en m me temps et la m me hauteur e Lorsque la hauteur de la poign e vous convient remettez les molettes triangulaires leur place pour fixer la p...

Page 5: ...port de plateau qui est fix sur le cadre du rollator c Ramenez les roues avant contre les roues arri re Le rollator N o Dynamic est con u de sorte tenir debout tout seul REGLAGE DE FREINS Il y a deux...

Page 6: ...rifiez les freins de stationnement en poussant les poign es dans la position verrouill e puis en essayant de pousser le rollator En cas de dysfonctionnement ne pas r parer le rollator soi m me Consult...

Page 7: ...deux ans partir de la date d achat par l utilisateur IDENTIT S fournira des pi ces de rechange pour toute pi ce qui a cass en raison d un d faut de fabrication de conception ou de mat riau Contactez l...

Page 8: ...stairs or escalators Only use accessories and parts supplied by the manufacturer The rollator is a walking aid It is not a wheelchair It is not designed to carry a person sitting on it Such use may da...

Page 9: ...it rests on the back of the frame and the rear wheels b Insert the front wheels into the frame The wheels are securely attached when you hear an audible click c Remove the triangular wheels that are...

Page 10: ...er tube from the outer tube when adjusting the height of the handles For the rollator to be at the correct height stand behind the rollator with your arms at your side Then adjust the height of the ha...

Page 11: ...hen tighten the adjustment knob again For correct adjustment the brake mechanism should not touch the wheel but the distance between the brake pad and the wheel should not be more than 3 to 4mm Cautio...

Page 12: ...f sparks Observe the conditions for storing and stowing your rollators In a dry and temperate place Protect your rollator by packaging it from dust corrosion e g abrasive elements sand sea water salty...

Page 13: ...ofesional de la salud antes de usar un andador l o ella le aconsejar e informar sobre la t cnica de caminar m s apropiada para usted Distribuidor este manual debe ser entregado a los usuarios de este...

Page 14: ...e que los frenos funcionan correctamente antes de usarlos Durante el uso bloquee los frenos de estacionamiento para todas las acciones Todas las ruedas deben estar siempre en contacto con el suelo Cua...

Page 15: ...r del rollator Aseg rate de insertar ambos tubos de mango al mismo tiempo y a la misma altura j Cuando est satisfecho con la altura del mango vuelva a colocar las manetas triangulares para asegurar el...

Page 16: ...tensores de cable de freno a cada lado del Rollator uno delante de la manija del freno y el segundo se coloca en la pinza de freno cerca de la rueda trasera Se pueden hacer ajustes en cualquiera de l...

Page 17: ...as normas de higiene Al transferir el rollator recuerde dar todos los documentos t cnicos necesarios al nuevo usuario El producto debe ser inspeccionado primero por un especialista autorizado RECICLAJ...

Page 18: ...st en buenas condiciones GARANT A Este producto tiene una garant a de dos a os a partir de la fecha de compra por parte del usuario IDENTIT S proporcionar piezas de repuesto para cualquier pieza que s...

Reviews: