background image

30

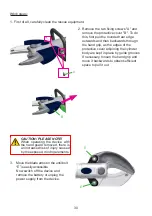
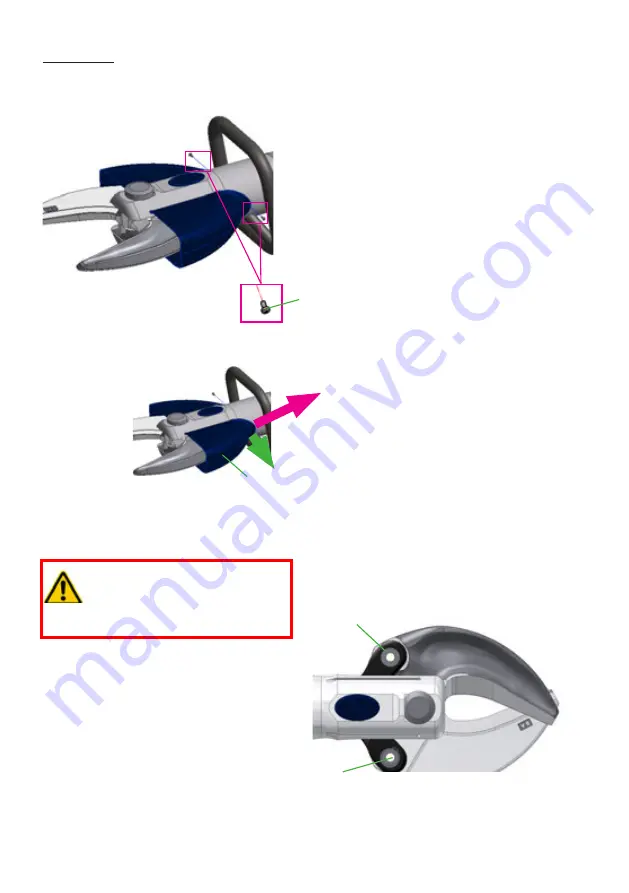
2.  Remove the two fixing screws "A" and 

remove the protective cover "B". To do 

this, first pull the rounded rear edge 

outwards and then backwards through 

the hand grip, as the edges of the 

protective cover adjoining the cylinder 

body are kept in place by guide grooves. 

If necessary, loosen the hand grip and 

move it backwards to obtain sufficient 

space to pull it out.

3.  Move the blade arms on the until bolt 

“E” is easily accessible.


Now switch off the device and 

remove the battery or unplug the 

power supply from the device.

Work steps:

1.  First of all, carefully clean the rescue equipment.

CAUTION / PLEASE NOTE!

When  operating  the  device  with 

the hand guard removed, there is 

an increased risk of injury caused 

by the exposed, moving elements.

E

E

B

A

Summary of Contents for HURST eDRAULIC SC 258 E2

Page 1: ...Instruction manual for rescue equipment 273023085 EN Original instruction manual replaces 07 2019 Edition 09 2019 eDRAULIC combi tools SC 258 E2 SC 358 E2 SC 757 E2 SC 758 E2...

Page 2: ...DRAULIC device 13 5 2 Operating the star grip 14 6 Cutting spreading pulling squeezing 15 6 1 Safety notes 15 6 2 Cutting 16 6 3 Spreading 18 6 4 Pulling 20 6 5 Squeezing 24 7 Dismantling the equipmen...

Page 3: ...EN ISO 3744 38 11 3 Operating and storage temperature ranges 38 11 4 Oscillation vibration 38 11 5 Torques for central bolts 38 11 6 Cutting performance 39 12 Accessories 40 12 1 Batteries 40 12 2 Bat...

Page 4: ...danger and the possible consequences 1 Danger classifications Pictogram Damage injury to Keyword Definition Consequences Persons DANGER Immediate danger Death or severe injury WARNING Potentially dang...

Page 5: ...or maintain the equipment including any accessories unless you have a qualified trainer show you how to safely and properly use this equipment The use and operation of the HURST Rescue equipment which...

Page 6: ...e and in a legible condition Any mode of operation which compromises the safety and or stability of the device is forbidden Repairs to the equipment may only be carried out by a trained service techni...

Page 7: ...t always ensure that the accessories are positioned in such a way that they cannot cause an accident Always keep these operating instructions easily accessible at the place of operation Ensure the pro...

Page 8: ...tate Do not expose the Akku Power GmbH lithium ion battery to water oil or moisture or liquid of any kind as this could lead to a battery malfunction resulting in fire causing personal injury or death...

Page 9: ...red against unintentional shifting by using strong supports or underpinning WARNING CAUTION PLEASE NOTE The HURST eDRAULIC devices and the Akku Power GmbH lithium ion batteries ARE NOT suitable for un...

Page 10: ...excluded that the device could trigger an explosion that working with the device could trigger an explosion e g sparks may result from cutting an object The responsibility for explosion prevention or...

Page 11: ...e body of the tool They are then automatically locked into position You can extend the operating time of your eDRAULIC device by using several batteries The batteries can be recharged after use using...

Page 12: ...nge battery or power supply 4 Release button for bat tery and power supply 5 Handle 6 Ventilation slots 7 Blade arms 8 Pivot bolt with secured nut 9 Plastic housing 10 Tool body 11 Protective cover 12...

Page 13: ...power supply for eDRAULIC device 5 Operation Commissioning Before initial operation the battery where used of the rescue device must be fully loaded using the external charger 4 3 Hydraulic circuit d...

Page 14: ...arged or new battery into the eDRAULIC device until it reaches the stop The battery or power supply will be automatically locked when correctly oper ated Connection slot Open the device Turn the star...

Page 15: ...for avoiding explosions must be observed without restriction The following are to be worn when working with the rescue equipment protective clothing safety helmet with visor or protective goggles prot...

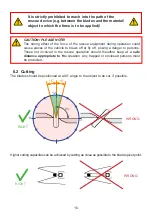
Page 16: ...s of the vehicle to break off or fly off posing a danger to persons Those not involved in the rescue operation should therefore keep at a safe distance appropriate to the situation Any trapped or encl...

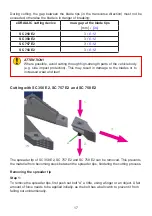
Page 17: ...he blade tips mm in SC 258 E2 3 0 12 SC 358 E2 3 0 12 SC 757 E2 3 0 12 SC 758 E2 3 0 12 Cutting with SC 358 E2 SC 757 E2 and SC 758 E2 The spreader tip of SC 358 E2 SC 757 E2 and SC 758 E2 can be remo...

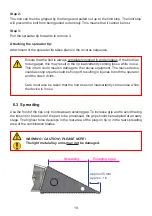
Page 18: ...d out up to the limit stop The limit stop will prevent the bolt from being pulled out entirely This means that it cannot be lost Step 3 Pull the spreader tip forwards to remove it Attaching the spread...

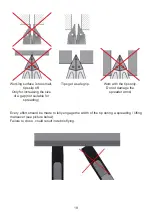
Page 19: ...a gap not suitable for spreading Tips get a safe grip Work with the tips only Do not damage the spreader arms Every effort should be made to fully engage the width of the tip during a spreading lifti...

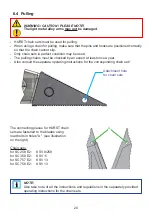
Page 20: ...must be checked by an expert at least once a year Also consult the separate operating instructions for the corresponding chain set Attachment hole for chain sets A The connecting pieces for HURST chai...

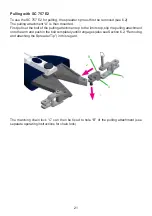
Page 21: ...the bolt of the pulling attachment up to the limit stop slip the pulling attachment onto the arm and push in the bolt completely until it engages also see Section 6 2 Removing and attaching the Spread...

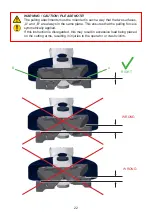
Page 22: ...he two surfaces A and B are always in the same plane This ensures that the pulling force is symmetrically applied If this instruction is disregarded this may result in excessive load being placed on t...

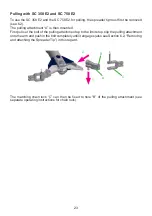
Page 23: ...First pull out the bolt of the pulling attachment up to the limit stop slip the pulling attachment onto the arm and push in the bolt completely until it engages also see Section 6 2 Removing and atta...

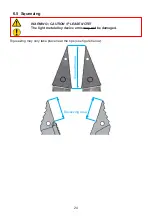
Page 24: ...24 Squeezing may only take place near the tips see figure below Squeezing area 6 5 Squeezing WARNING CAUTION PLEASE NOTE The light metal alloy device arms may not be damaged Squeezing area...

Page 25: ...out every six months These inspections enable the early detection of wear and tear which means that punctual replacement of these wearing parts prevents breakage Regularly check the torque of the piv...

Page 26: ...cal contact surfaces clean and undamaged Cable undamaged Battery ies fully charged when used Charging state display of lithium ion battery or batteries fully functional The battery has not been expose...

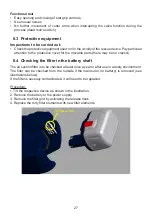
Page 27: ...or battery is removed see illustrations below If the filter is severely contaminated it will need to be replaced Procedure 1 Tilt the respective device as shown in the illustration 2 Remove the batter...

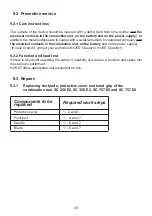
Page 28: ...ll components are particularly clean as dirt can damage the rescue equipment WARNING CAUTION PLEASE NOTE Protective clothes must be worn when repairs are being carried out as the devices may also be p...

Page 29: ...e battery and on the power supply In case of doubt contact your authorized HURST dealer or HURST directly 9 2 2 Function and load test If there is any doubt regarding the safety or reliability of a de...

Page 30: ...ecessary loosen the hand grip and move it backwards to obtain sufficient space to pull it out 3 Move the blade arms on the until bolt E is easily accessible Now switch off the device and remove the ba...

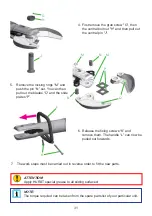
Page 31: ...led out forwards NOTE The torque required can be taken from the spare parts list of your particular unit 7 The work steps must be carried out in reverse order to fit the new parts 5 Remove the locking...

Page 32: ...must be replaced Procedure 1 Remove damaged and or illegible decals 2 Clean surfaces with industrial alcohol 3 Affix new decals Take care to affix the labels in the correct positions If this is no lo...

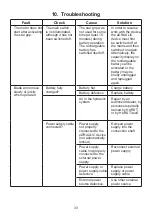
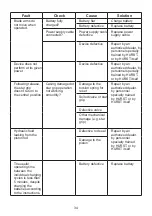
Page 33: ...the battery may be briefly unplugged and replugged again Blade arms move slowly or jerkily when operated Battery fully charged Battery flat Charge battery Battery defective Replace battery Air in the...

Page 34: ...ollowing release the star grip doesn t return to the central position Casing damaged or star grip operation not working smoothly Damage to the torsion spring for reset Repair by an authorized dealer b...

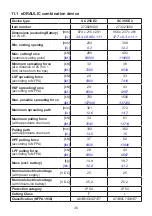
Page 35: ...ex com 11 Technical data NOTE The following tables contain only the technical data necessary for operation and storage Further information about your device is available directly from HURST Since all...

Page 36: ...spreading force according to NFPA kN 29 43 lbf 6500 9667 Max possible spreading force kN 700 1500 lbf 157000 337230 Maximum spreading path mm 321 372 in 12 6 14 7 Maximum pulling force with approbiate...

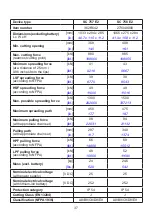
Page 37: ...g to NFPA kN 49 49 lbf 11000 11016 Max possible spreading force kN 1300 1500 lbf 292000 337213 Maximum spreading path mm 450 475 in 17 7 18 7 Maximum pulling force with approbiate chain set kN 98 94 l...

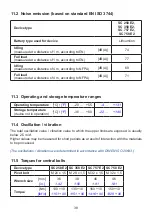
Page 38: ...e C F 20 55 4 131 Storage temperature device not in operation C F 30 60 22 140 11 4 Oscillation vibration The total oscillation value vibration value to which the upper limbs are exposed is usually be...

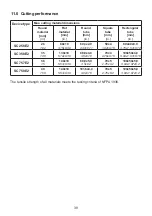
Page 39: ...0 16 80x40x3 0 3 15x1 57x0 12 SC 358 E2 35 1 38 130x10 5 12x0 39 88 9x4 0 3 5x0 16 70x4 2 76x0 16 100x50x4 0 3 94x1 97x0 16 SC 757 E2 38 1 5 140x10 5 51x0 39 88 9x5 0 3 5x0 2 70x5 2 76x0 2 100x50x5 0...

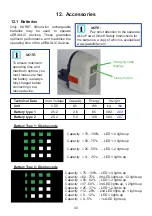
Page 40: ...ED 1 3 lights up Capacity 37 50 3rd LED lights up 1 2 lights up Capacity 25 37 LED 1 2 lights up Capacity 12 25 2nd LED lights up 1 lights up Capacity 5 12 LED 1 lights up Capacity 0 5 1st LED lights...

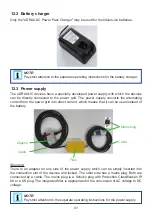
Page 41: ...irectly connected to the power grid The power supply converts the alternating current from the power grid into direct current which means that it can be used instead of the battery Structure There is...

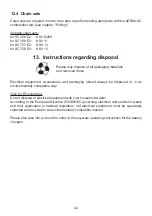
Page 42: ...n national legislation old electrical equipment must be separately collected and recycled in an environmentally compatible manner Please also take into account the notes in the separate operating inst...

Page 43: ...43 14 Notes...
Page 44: ...LIFE INC A Unit of IDEX Corporation 711 N Post Road Shelby NC 28150 USA Phone 704 487 6961 Fax 704 487 7271 e mail contacthurst idexcorp com Copyright 2019 Hurst Jaws of Life INC Subject to change Ple...

Reviews: