P
P
a
a
g
g
e
e
4
4
1
1
4.3.3 RTP20 Mechanical Seal.
-
Remove the front cover dome nuts, front cover, rotor retainer and rotor as
per section 4.1.1
-
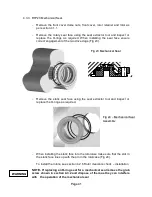
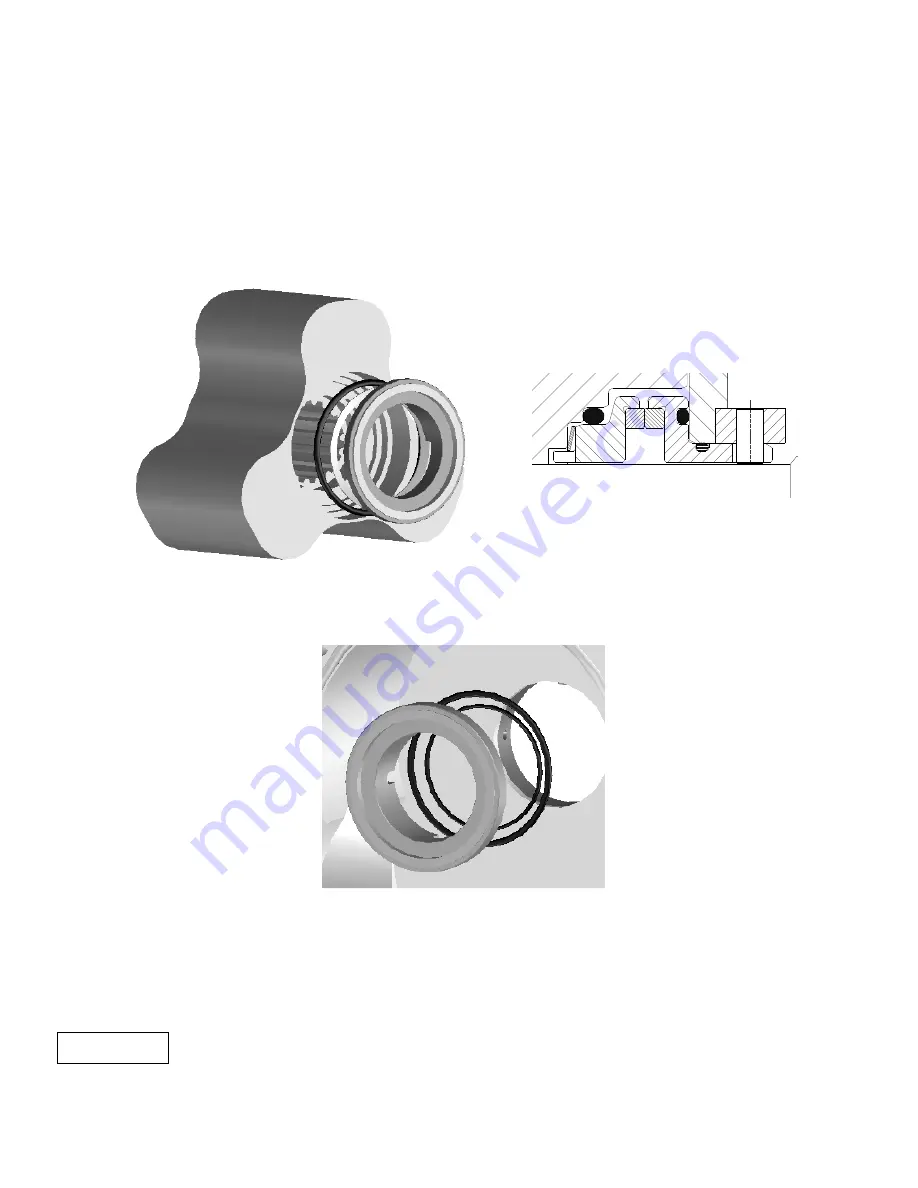
Remove the rotary seal face using the seal extractor tool and inspect or
replace the O-rings as required. When installing the seal face ensure
correct engagement of the two drive dogs (Fig 23).
-
Remove the static seal face using the seal extractor tool and inspect or
replace the O-rings as required.
-
When installing the static face into the rotorcase make sure that the slot in
the static face lines up with the pin in the rotorcase (Fig 24).
-
To install the rotors, see section 4.2.6 Rotor clearance check – installation
NOTE:- If replacing an O-ring seal for a mechanical seal remove the grub
screw shown in section 4.3.2 and dispose of them as they can interfere
with the operation of the mechanical seal
W
W
A
A
R
R
N
N
I
I
N
N
G
G
F
F
i
i
g
g
2
2
3
3
M
M
e
e
c
c
h
h
a
a
n
n
i
i
c
c
a
a
l
l
S
S
e
e
a
a
l
l
F
F
i
i
g
g
2
2
4
4
–
–
M
M
e
e
c
c
h
h
a
a
n
n
i
i
c
c
a
a
l
l
S
S
e
e
a
a
l
l
A
A
s
s
s
s
e
e
m
m
b
b
l
l
y
y
Summary of Contents for Wright Flow Technologies RTP Series
Page 1: ...P Pa ag ge e 0 0 INSTALLATION OPERATION AND MAINTENANCE MANUAL FOR THE RANGE OF PUMPS...
Page 47: ...P Pa ag ge e 4 46 6 5 0 Specifications 5 1 Clearance Chart B A C Radial D C Radial...
Page 54: ...P Pa ag ge e 5 53 3 5 6 Typical Basic Pump Build RTP20 Shown...
Page 56: ...P Pa ag ge e 5 55 5 5 8 RTPTM Service History Pump Serial No Date Comments...

