background image

Powered by 

Network

Video

Recorder

Operation Manual

DR-1304P 

DR-1308P

DR-1304PC

Summary of Contents for DirectIP DR-1304P

Page 1: ...Powered by Network Video Recorder Operation Manual DR 1304P DR 1308P DR 1304PC...

Page 2: ...and use If you need to disassemble the product for functionality expansion or repair purposes you must contact your retailer and seek professional assistance Both retailers and users should be aware...

Page 3: ...ting instructions adjust only those controls that are covered by the operating instructions as an improper adjustment of other controls may result in damage and will often require extensive work by a...

Page 4: ...INTERFERENCE AT THEIR OWN EXPENSE WARNING CHANGES OR MODIFICATIONS NOT EXPRESSLY APPROVED BY THE PARTY RESPONSIBLE FOR COMPLIANCE COULD VOID THE USER S AUTHORITY TO OPERATE THE EQUIPMENT THIS CLASS O...

Page 5: ...We are not responsible for any problems resulting from the use thereof The information contained herein is subject to change without notice Revisions or new editions to this publication may be issued...

Page 6: ...0 Diagnosis Process 21 Camera Registration Mode 21 Login 22 Live Menu 24 Zoom 26 PTZ Control 26 Dewarping Control Camera 28 Event Monitoring 28 Covert Camera 28 Context Menu Access 28 Edit Group 29 Vi...

Page 7: ...ule 52 Pre Event 54 Event Setup 55 System_Event 55 Camera System 56 Camera System_Video Loss 56 Camera System_Recording Fail 57 Video Analytics 57 Video Analytics_Motion 57 Video Analytics_Trip Zone 5...

Page 8: ...tor 70 Status Setup 70 Camera 70 Device 71 System 71 Storage 72 Network 73 Part 3 Search 75 Time Lapse Search 75 Search Menu 75 Context Menu 77 Motion Search 77 Clip Copy 78 Event Log Search 79 Overla...

Page 9: ...he question mark button on the bottom left corner and refer to the instruction on setting up a password An email address and UPR files are required to find the password Otherwise you may not be able t...

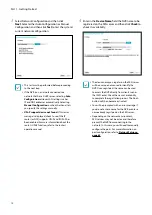
Page 10: ...settings refer to the Date Time section under System Setup on page 32 3 Choose the desired Recording Method and click Next 4 Choose the desired Recording Quality and click Next Higher recording qualit...

Page 11: ...Continuous Profile 1 Motion Profile 3 Continuous Profile 2 Motion Profile 4 Continuous Profile 3 Motion Continuous Profile 1 Profile 2 Profile 4 5 Choose the desired codec and click Next 6 Click Fini...

Page 12: ...e router s UPnP function refer to the router s operation manual 4 Enter in the Device Name field the NVR name to be registered on the FEN server and then click Check to check its availability The devi...

Page 13: ...mouse and select Camera Registration to run the Camera Registration mode It allows you to scan for the cameras connected to the NVR 1 2 3 4 5 1 Camera Scan Button 2 Camera View Menus 3 Camera List Are...

Page 14: ...a camera The NVR scans for the camera matching the specified address If you enter IP address s range the NVR scans for cameras falling under the specified address s range By specifying an IP address...

Page 15: ...es an IP address automatically in the range of 10 10 0 128 to 10 10 254 254 by using DHCP to the camera connected to the NVR s VIDEO IN port On DHCP Server Video In Network is connected between NVR an...

Page 16: ...mera list depending on the search scope such as specified IP address range Screen Auto Assign Assigns the detected cameras on the video display area Camera list By using the camera information file cs...

Page 17: ...indow to change the bitrate allocation for each channel When registering the camera you can set the stream as much as the performance bitrate assigned to the channel If high performance bitrate is not...

Page 18: ...ation Status Identifies the camera s position in the video display area A blue background indicates a camera that is available for registration A gray background indicates an already registered camera...

Page 19: ...re logins This option is inactive for IDIS protocol only if the password is set Video Display Area Left click on the video display area to toggle between split screen and single screen modes Drag the...

Page 20: ...g up the camera menu Remove Camera Removes the registered camera Remove Device Removes the registered encoder Color Control Adjusts the camera s color settings Information Displays the camera s basic...

Page 21: ...new registered and changed cameras If Self diagnosis is processing Diagnosis Processing message will be displayed If Self diagnosis is failed Diagnosis Requirement message will be displayed In this c...

Page 22: ...formation on using the virtual keyboard refer to the Text Input via Virtual Keyboard on page 31 3 To log out bring up the Live menu and click on Log out using the mouse Find Password If you do not kno...

Page 23: ...e must be saved in advance For more information on saving the UPR file refer to User on page 34 You can reset the password using an encrypted UPR User Password Reset filename extension upr file It can...

Page 24: ...lay the optimized video of the camera when using the camera s pivot feature This is particularly effective when monitoring hallways passages and other confined spaces 1 5 1 7 and 3x3 screen format are...

Page 25: ...r on the system status area on the upper right part of the screen next to the Sequence icon If using the Cameo Sequence setting pages are skipped under the following circumstances If all cameras inclu...

Page 26: ...is on the status bar located on the upper right corner of the system In Full Screen mode activating Zoom automatically selects the current channel To restore the channel to normal size press the Zoom...

Page 27: ...d PTZ screen as shown below This menu lists Speed Auto Pan and other advanced PTZ camera control options available for the camera Also selecting Point Move button moves PTZ camera to the point that th...

Page 28: ...ked Time After that the NVR will return to the previous screen if a new event does not take place Pressing the Layout or a Camera button before the end of the Linked Time reverts the system to Live mo...

Page 29: ...Panic Recording select the Panic Recording icon again If the Panic Recording Duration option under Record Setup General has been configured Panic Recording will automatically terminate after the spec...

Page 30: ...on to access the setup menu is needed to access and make changes to the Setup menu When using Use 2FA feature registered mobile device must be authenticated before entering the setup menu For more inf...

Page 31: ...Certain table format menus such as the shown in the Camera Setup on page 40 allow you to change the title value In this case changing the title value simultaneously changes all other entry values on...

Page 32: ...2FA on page 37 Setup Exports current NVR settings or imports existing settings Import Decide whether to import network settings as well If you do not wish to change the current network settings do not...

Page 33: ...nerate reports for troubleshooting Date Time Date Used to change the system s date setting Time Used to change the system s time setting Date Format Time Format Used to change the system s date and ti...

Page 34: ...s option to register users and assign permissions 1 Select Group and enter a group name A group name can be up to 15 characters in length 2 Specify the group s permission settings For more information...

Page 35: ...ge 31 To delete a registered user or group select the icon on the right of the corresponding user group Group Administrator and User admin cannot be deleted Select the icon next to Group User on the t...

Page 36: ...all its initial factory settings Search Clip Copy The user who has permission for Clip Copy can perform Clip Copy If the user does not have permission Clip Copy is not allowed but only search is allow...

Page 37: ...ster the following message will appear 2FA device registration is supported only via IDIS Mobile app Only the administrator account user can configure this option The maximum number of device that can...

Page 38: ...s to export Time Displays when you started the self diagnosis View a Report Briefly displays whether the report is Good or Bad Click the icon at the bottom left corner of the screen to run the self di...

Page 39: ...s you can see the brief results of the self diagnosis for the target device The NVR self diagnostic report can only be viewed in text form This feature is also supported when connected to the NVR from...

Page 40: ...n about supported network devices and models contact your retailer The supported scan modes may vary depending on protocol selected Mode Select the scan mode Auto Scan LAN Lists any cameras in a LAN e...

Page 41: ...vice and to display the Authentication window of the next network device For IDIS cameras a user and password may not be required Set Camera Password For IDIS protocol cameras that support changing an...

Page 42: ...sure Configuration options may differ depending on the camera model Privacy Masking Enable disable and configure privacy masking for the camera SSL Set the camera s security level as Unavailable Stand...

Page 43: ...ts At least two presets must be available in order to use the scan feature Set Used to set up a scan profile Name Enter a name for the scan profile Start Stop Specify which presets to use as start and...

Page 44: ...displays a popup screen that indicates whether the profile has been set up successfully 5 PTZ Reset Reboots the camera s panning tilting and zoom settings 6 Home Position Specify the camera s home pos...

Page 45: ...light Compensation Enable disable Backlight Compensation If enabled objects are exposed brighter in backlit situations Auto Adjust Selecting Auto allows the system to assess the lighting conditions an...

Page 46: ...s brightness level Select a brightness level manually between 0 darkest and 100 brightest Selecting Auto Smart IR allows the system to control the IR LEd s brigtness level automatically Smart IR Help...

Page 47: ...rk due to backlighting conditions and on images containing over exposed sections Greater the value clearer the image e g Dark parking lot entrances and gas station entrances at night Local Exposure co...

Page 48: ...automatically Manual Use txhe slider to select the desired shutter speed Select the most suitable minimum and maximum shutter speeds for the lighting conditions in the area where the camera is locate...

Page 49: ...lect Very High High Standard Basic or Manual You can assign different Quality settings to different cameras VBR CBR Select VBR or CBR Transmitted data size varies depending on the amount of movements...

Page 50: ...function is active the associated VA device may not work properly It is recommended that you do not use the MAT function of the associated camera to increase the accuracy of the image analysis Some c...

Page 51: ...ecording is designated as an event triggered action recording takes place for the duration specified under this setting Auto Deletion Configure this option to delete recording data automatically after...

Page 52: ...cording automatically Select between 5 mins and 1 hr If you do not wish to disable the feature automatically select No Limit Video Profile Select a recording profile value for Panic Recording Schedule...

Page 53: ...in progress or the and icons appear when an event occurs and recording is in progress Time Event The icon appears on the upper left corner of the screen and recording commences as per the video profi...

Page 54: ...s If multiple events take place on a specific channel and different Video Profile and Dwell Time settings apply highest settings apply to all event linked recordings Pre Event When an event occurs ena...

Page 55: ...ons Check Recording The system will assume an error if the system has been scheduled to record normally but recording does not take place during scheduled intervals Select Schedule On and then configu...

Page 56: ...considered as an event Actions Specify which actions to take when a Video Loss event occurs Record Specify which cameras to begin linked recording on when an event occurs If the schedule is set to Eve...

Page 57: ...event occurs Notify Configure to be notified of events by Mail LAN1 through 5 Push and or Alert Window PTZ Moves the PTZ camera to a specific preset position when an event occurs Event Monitoring Sel...

Page 58: ...g the changes Min Blocks Motion needs to be detected in more than the specified number of blocks in order to trigger a Motion Detection event You may select a value between 1 and the number of blocks...

Page 59: ...tup Specify when daytime starts and ends Adjust the time frame in 15 minute increments Times outside the specified range will be assumed as nighttime by the system Video Analytics_Trip Zone No Select...

Page 60: ...cord Specify which cameras to begin linked recording on when an event occurs If the schedule is set to Event or Time Event mode the selected cameras will begin linked recording when an event occurs No...

Page 61: ...during the specified time frame Video Analytics_PIR This event occurs when the PIR sensor mounted on the camera is used to sense motion Since the PIR sensor detects the temperature of the human it ca...

Page 62: ...cking The larger the object size is set the larger the object will be displayed on the screen This setting is enabled only when the Zoom function is on Wait Time After Trace After the object tracking...

Page 63: ...all remote connections to the NVR in order to apply the change This product contains content developed by OpenSSL Project for use in Open SSL Toolkit http www openssl org Network Bandwidth Limit Confi...

Page 64: ...ervice the IP router or NAT must support UPnP port forwarding and have the relevant options enabled Port number cannot be changed with Use UPnP selected Status Indicates the number of the port forward...

Page 65: ...the Check button next to the NVR Name field and check the entered name s availability You will be prompted with an error message if you do not enter NVR name or enter a name already registered to the...

Page 66: ...the ethernet interface It refers to a WAN Network Client or VIN Video In Mac Address If the rule is set to MAC address enter the sending MAC address IP If the type of the rule is set to IPv4 or withi...

Page 67: ...er right corner of the screen to configure Callback Retry Policy Retry Policy Configure a policy to retry a callback event Retry Number of times to retry a callback event Dwell Wait time in seconds be...

Page 68: ...he icon to remove the account and added group SMTP Setup Select SMTP Setup at the bottom right corner of the screen to configure an SMTP server 1 Select the SMTP server Type 2 Enter the SMTP Server s...

Page 69: ...Setup menus OSD Show OSD On Screen Display information on the bottom of the screen Status Date and Time Displays the date and time Camera No Displays the camera number on the upper left corner of the...

Page 70: ...e top of the camera screen linking event monitoring when an event occurs Supported resolutions may be restricted depending on the monitor We recommend using 1920 x 1080 resolution If you use a VGA mon...

Page 71: ...sed on current Panic Record status Check Recording Displays event status based on System Monitoring settings For more information refer to the Self Diagnosis on page 38 Disk Almost Full Disk Full If t...

Page 72: ...as designated by the user Generates a system event Temperature N A Unable to detect the disk s temperature Good Operating within normal temperature range Bad Disk temperature higher than as designated...

Page 73: ...plays the camera s channel number Clicking the image displays status information of the device connected to the NVR Video Encoder indicates a video encoder is connected to the LAN port and shows how m...

Page 74: ...dicates at least one client is connected indicates no client is connected Network Connection Info Indicates network connection statuses connected connecting disconnected and connection error using fol...

Page 75: ...icon to add a bookmark to the current playback position Select a bookmark from the Bookmark setup window on the right side of the Time Lapse Search mode screen to move to the registered playback posit...

Page 76: ...indicator line on Record Table indicates the current playback position Alternatively use the mouse to jump to the desired playback position Farther back the data is on the record table the more recent...

Page 77: ...movements no matter how long they persist will not be recognized In contrast Museum Search looks for changes in the specified area by using the From frame as a reference Museum Search therefore recogn...

Page 78: ...u can select Cancel to cancel the process or select Close to allow the window to run in the background Selecting Close does not cancel Clip Copy Once the process is complete you will be prompted with...

Page 79: ...clock has been changed and the designated From or To point exists at more than one location you will have to choose one Only the events that took place between the selected From and To points will be...

Page 80: ...00 6 00 Segment 1 Segment 2 When searching overlapped video recordings you can choose a specific point in time or a time frame If you use the Go to the Date Time option and select a point within the...

Page 81: ...Part 3 Search 81 Memo V6 1...

Page 82: ...IDIS Co Ltd For more information please visit at www idisglobal com...

Reviews: