Part 2 - Configuration
73
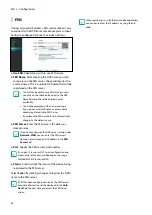
●
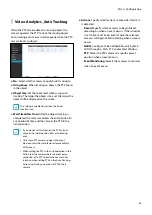
Address
: Enter the address of HTTP notifications.
●
Path
: Enter the path of HTTP server address.
●
User / Password
: Enter the user and password to
access the HTTP site.
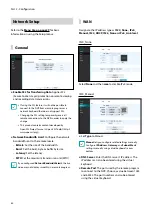
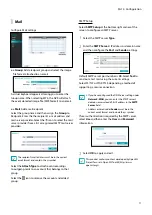
HTTP Notification Setup
An attribute and parameters must be included when
sending the http requests. Click the
Setup
... icon at a
bottom right corner of the window. When the following
window appears, click the
+
button to set the HTTP
attributes such as the type, name and value.
●
HTTP Request Parameters
: Set a specific response
to an HTTP request.
–
Timeout
: Set the maximum time allowed for
connection.
–
Retry
: Set the number of times to reconnect when
a connection fails.
–
Delay Time (Retry)
: Configure the time interval
between each retry attempt (initial delay between
retry attempts)
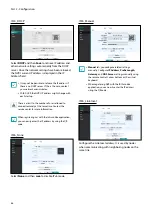
HTTP Notification Attribute
●
Type
: Select the corresponding type such as BOOL,
INT32, FLOAT32 and STRING.
●
Name
: Enter the name of HTTP notification attribute.
●
Value
: Enter the value of HTTP notification attribute.
Display Setup
Refer to the
for basic
information on using the Setup menus.
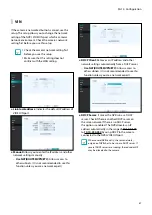
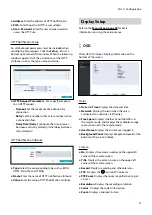
OSD
Show OSD (On Screen Display) information on the
bottom of the screen.
Status
●
Date
and
Time
: Displays the date and time.
●
Network
: Displays the icon when the unit is
connected to a network via Ethernet.
●
Free Space
: Displays whether or not the NVR is in
the recycle mode, and displays the available storage
space when not in the recycle mode.
●
User Name
: Displays the current user logged in.
●
Background Panel
: Displays background panel at the
bottom of the screen in black.
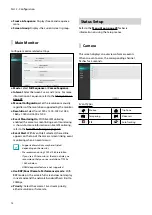
Camera
●
No.
: Displays the camera number on the upper left
corner of the camera screen.
●
Title
: Displays the camera name on the upper left
corner of the camera screen.
●
Record
: Displays recording and schedule icons.
●
PTZ
: Displays the
icon on PTZ cameras.
●
PTZ Zoom
: Displays the zoom magnification (e.g. x2,
x3, etc.)
●
Resolution
: Displays the recording resolution.
●
Codec
: Displays the codec information.
●
Zoom
: Displays a zoomed in state.


