5
FIRST ArcSAR SETUP
IDS GeoRadar S.r.l.
Confidential Information - Do Not Distribute
MNG/2017/0016 Rev 1.0 53/ 78
5.16
ArcSAR Positioner first set up
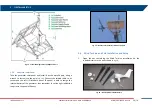
On the Control module of the PSU, turn on the POSITIONER AND GPS
switches. The corresponding LEDs on the positioner will lit up in blue (Fig.
119)
Fig. 112 – Positioner LEDs
The communication between the Positioner and IBIS Controller application is
provided using serial connection. The default port is COM7
MIND YOUR HEAD
Positioner is automatically controlled by IBIS Controller and it is able to rotate
by itself. Pay attention while working under the Positioner to the tack
movement. Every movement of the Positioner is pointed out by an intermittent
acoustic sound and a blinking yellow lamp.
5.17
ArcSAR Laptop first setup
1.
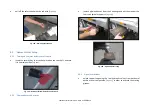
open the Laptop sliding drawer placed under the PSU modules. To
extract the Laptop PC drawer unscrew the knob on the right (red)
and using the handle (green), pull out the drawer (
Fig. 113 – Unscrewing PC drawer black knob
2.
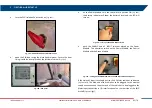
On the drawer the following connection cables are present: Laptop
supply, radar sensor Ethernet, system Ethernet, USB and serial port
cable (
Fig. 114 – Connections on the PC drawer
3.
the Laptop PC is provided in its own cardboard box, together with the
Laptop Power Supply cable, the Laptop Manual and Recovery Disc;
4.
place the Laptop on the drawer: two plastic pivots are present to
ensure the fastening of the machine. Insert the two pivots into the


