※
FINGER006 SERIES QUICK INSTALLATION GUIDE
15
7.2 How to Enter the Setup Menu
For a setup or FINGER006 setting adjustment, you have to enter the SETUP MENU, first. To do so, press the <0> key
8 times for Master ID (Default “00000000”) and the user can get into the SETUP MENU. There are 4 main SETUP
MENUs and you first get into [SETUP MENU F1]. You can move to other SETUP MENUs by pressing <F1> key for
[SETUP MENU F1], <F2> key for [SETUP MENU F2], <F3> key for [SETUP MENU F3], and <F4> key for [SETUP
MENU F4]. There are several SUB MENUs for each main SETUP MENU and you can scroll up and down the SUB
MENU by pressing <4> and <6> key in the main SETUP MENU. You can press the <ESC> key to exit the SETUP
MENU and return to the normal operation. You can also change the Master ID in the [SETUP MENU F1]. The Master
ID for FINGER006SR is a 10-digit number (Default “0000000000”).
7.3 Time / Date Setting
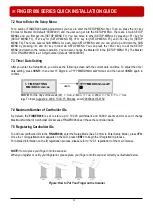
After you enter the Setup Mode, you will see the following screen with the current date and time. To adjust the time /
date setting, press
<ENT>
, then enter 15 Digits in a YYYYMMDDhhmmssW format, and then enter
<ENT>
again to
confirm.
NOTE:
For the days of the week (W), 1 : Sun, 2 : Mon, 3 : Tue, 4 : Wed, 5 : Thu, 6 : Fri, 7 : Sat.
e.g.
To input August 24, 2009, 13:30:15, Monday, enter 200908241330152.
7.4 Maximum Number of Cardholder IDs
By default, the
FINGER006
is set to store up to 10,000 cardholders and 50,000 events
and User can’t change
Maximum Number of Cardholder IDs because FINGER006 doesn’t have the controller inside.
7.5 Registering Cardholder IDs
To add new cardholder IDs to the
FINGER006
, enter the Setup Mode (See 7.2 How to Enter Setup Mode), press
<F3>
.
Once the 1.ID registration item appears on the LCD, press
<ENT>
to begin the ID registration process.
For detailed information on the ID registration process, please refer to “12.3.1 registration” of the main manual.
NOTE:
How to place your finger onto the scanner:
When you register or verify your fingerprint, please place your finger onto the scanner correctly as illustrated below.
Figure: How to Put Your Finger on the Scanner
1. TIME SETTING
MM/DD hh:mm:ss
YYYYMMDDhhmmssW
■
<ENT>


