background image

p.2

3.

Do not connect multiple controllers to a single adapter. Exceeding the capacity may cau

se abnormal heat generation or fire.

4.

Securely plug the power cord into the power receptacle. Insecure connection may caus

e fire.

5.

When installing the controller, fasten it securely and firmly. The fall of controller may ca

use personal injury.

6.

Do not place conductive objects (e.g. screwdrivers, coins, metal parts, etc.) or container

s filled with water on top of the controller. Doing so may cause personal injury due to fi

re, electric shock, or falling objects.

7.

Do not install the unit in humid, dusty, or sooty locations. Doing so may cause fire or el

ectric shock.

8.

If any unusual smells or smoke come from the unit, stop using the product. In such case,

immediately disconnect the power source and contact the service center. Continued us

e in such a condition may cause fire or electric shock.

9.

If this product fails to operate normally, contact the nearest service center. Never disass

emble or modify this product in any way. (SAMSUNG is not liable for problems caused

by unauthorized modifications or attempted repair.)

10.

When cleaning, do not spray water directly onto parts of the product. Doing so may ca

use fire or electric shock.

CAUTION

1.

Do not drop objects on the product or apply strong blows to it. Keep away from a locat

ion subject to excessive vibration or magnetic interference.

2.

Do not install in a location subject to high temperature (over 50°C), low temperature (b

elow -30°C), or high humidity. Doing so may cause fire or electric shock.

3.

If you want to relocate the already installed product, be sure to turn off the power and

then move or reinstall it.

4.

Remove the power plug from the outlet when there is a lighting storm. Neglecting to d

o so may cause fire or damage to the product.

5.

Keep out of direct sunlight and heat radiation sources. It may cause fire.

6.

Install it in a place with good ventilation.

7.

Avoid aiming the controller directly towards extremely bright objects such as sun.

8.

Apparatus shall not be exposed to dripping or splashing and no objects filled with liqui

ds, such as vases, shall be placed on the apparatus.

9.

The Mains plug is used as a disconnect device and shall stay readily operable at any tim

e.

Summary of Contents for IPK101

Page 1: ......

Page 2: ... Color Table of the Reader 8 Wire Connection to Access Controller 9 Operation 1 Output Format Setting 2 Output Mode Setting 3 Operation 3 1 Basic Operation 3 2 Advanced Operation Optional 10 Output Format 1 26bit Wiegand output format 1 1 Data format 1 2 Timing diagram 2 4 8bit Burst output format for PIN 2 1 Data format ii 1 3 4 5 6 7 8 9 10 12 12 13 13 13 14 16 16 16 16 17 17 ...

Page 3: ...p iii 2 2 Timing diagram 3 RS 232 output format 3 1 Data format Baud rate 9600bps 3 2 Data structure 11 FCC REGISTRATION INFORMATION 12 RMA Request 17 18 18 18 19 20 ...

Page 4: ...he user to the presence of importa nt operating and maintenance servicing instructions in the literature accompanying the ap pliance WARNING To reduce the risk of fire or electric shock do not expose this appliance to rain or moisture WARNING 1 Be sure to use only the standard adapter that is specified in the specification sheet Usin g any other adapter could cause fire electrical shock or damage ...

Page 5: ...way SAMSUNG is not liable for problems caused by unauthorized modifications or attempted repair 10 When cleaning do not spray water directly onto parts of the product Doing so may ca use fire or electric shock CAUTION 1 Do not drop objects on the product or apply strong blows to it Keep away from a locat ion subject to excessive vibration or magnetic interference 2 Do not install in a location sub...

Page 6: ...fety If the provided plug does not fit into your outlet consult an electrician for repla cement of the obsolete outlet 10 Protect the power cord from being walked on or pinched particularly at plugs convenie nce receptacles and the point where they exit from the apparatus 11 Only use attachments accessories specified by the manufacturer 12 Use only with cart stand tripod bracket or table specified...

Page 7: ...r RFK101 iPASS IPK101 has backlighting on the Key pad that ensures you successful operation even at night The Star RFK101 iPASS IPK101 all ows you to access the door with proximity card and PIN numbers Three LEDs of green yellow and red colors and the built in Piezo buzzer sound will guarante e you accurate and reliable system operations ...

Page 8: ...26bit Wiegand and RS232 default Keypad 8bit burst default 26bit Wiegand selectable or 4bit burst selectable 12 Key Numeric Keypad with Back Lighting External LED Control External Buzzer Control Tamper Switch Wall Mount US EU Asian Gang Box Size Reverse Polarity Protection Options Supervisory Signal Compatible Controller iCON100 iTDC iMDC Standalone Controller Third Party Contro ller ...

Page 9: ...Identifying Supplied Parts 4 p 6 Please unpack and check the contents of the box ...

Page 10: ...it Wiegand and RS232 default Keypad 8bit burst default 26bit Wiegand selectable or 4bit bu rst selectable Keypad 12 Key Numeric Keypad with Back Lighting LED Indicator 3 Array LED Indicators Red Green and Yellow Beeper 1 Buzzer Operating Temperature 35 to 65C 31 to 149F Operating Humidity 10 to 90 relative humidity non condensing Color Dark Pearl Gray Material Polycarbonate Dimension W x H x T 87m...

Page 11: ...e two holes If you have installed electric gang box then skip this step 2 Using two 6 32 or M3 screws install wall mount to the wall 3 Insert 5 O rings to the wall mount as indicated then route the cable of the main unit th rough the center hole and push the main unit to wall mount to lock the main unit and make sure that the main unit is locked with wall mount ...

Page 12: ...nect Orange RS 232 TX TX OUT Purple Not Connect Not Connect Brown RS 232 GND GND Black 8PIN J3 Tamper Out INPUT Tamper Switch IN Green with White stripe Tamper Out GND Tamper Switch GND Gray LED Control In RED Control White with Red stripe LED Control In GRN Control Yellow LED Control In YEL Control Blue with White stripe Buzzer Control In Buzzer Control Blue Not Connect Not Connect Pink Not Conne...

Page 13: ...of Power to Black wire of RFK101 IPK101 Wiegand Data Out Connect Green wire of RFK101 IPK101 to Wiegand D0 input port of the Controller Connect White wire of RFK101 IPK101 to Wiegand D1 input port of the Controller LED Control In If you want to control LEDs connect each LED Control wire White with re d stripe Yellow Blue with White stripe wire of RFK101 IPK101 to GND o ...

Page 14: ...to control the buzzer connect Blue wire of RFK101 IPK101 to GND of controller In case of using a relay connect the NO to the Blue wir e and COM to GND RS 232 GND Connect to the COM port of the PC Connect pin 2 of the DB 9 connecto r to the purple wire connect the black wire of the 6 pin connector to pin 5 of the DB 9 connector Connection Parts Connection Method ...

Page 15: ... output format of numeric input using output format setting switches Select one between 4 8 bit Burst and 26bit Weigand format depending on the controller typ e receiving control input Output format setting switches are on the back of RFK101 IPK10 1 unit ...

Page 16: ...card data to the controller then the green LED t urns off again going back to the standby mode for the next reading 3 26bit Wiegand RS232 Output Format I If you set the output to 26bit Wiegand RS232 format and press numeric keys on the keypad you can hear a beep sound and the yellow LED turns on which indicat es PIN entry start Once you enter the PIN press ENT key to finish PIN entry The y ellow L...

Page 17: ... wire white with red str ipe to the GND II To keep the green LED turned on connect the LED control in wire yellow wire to the GND III To keep the yellow LED turned on connect the LED control in wire Blue with whit e Stripe wire to the GND For more information please refer to 8 Wire Connectio n to Access Controller on Page 9 6 Beeper Control In normal operation the reader sounds one beep when it re...

Page 18: ...Operation p 15 1 Supervisory Signal This unit sends supervisory signal through reader s output for a preset time ...

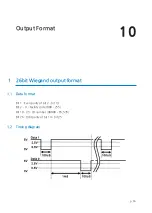
Page 19: ...ormat 10 p 16 1 26bit Wiegand output format 1 1 Data format Bit 1 Even parity of bit 2 bit 13 Bit 2 9 Facility code 000 255 Bit 10 25 ID number 00000 65 535 Bit 26 Odd parity of bit 14 bit 25 1 2 Timing diagram ...

Page 20: ...0 6 1 0001 1 7 0111 7 2 0010 2 8 1000 8 3 0011 3 9 1001 9 4 0100 4 ESC 1010 A 5 0101 5 ENT 1011 B 8bit Burst output format Keypads Binary Hexa Keypads Binary Hexa 0 11110000 F0 6 10010110 96 1 11100001 E1 7 10000111 87 2 11010010 D2 8 01111000 78 3 11000011 C3 9 01101001 69 4 10110100 B4 ESC 01011010 5A 5 10100101 A5 ENT 01001011 4B 2 2 Timing diagram ...

Page 21: ...p 18 RS 232 output format 3 RS 232 output format 3 1 Data format Baud rate 9600bps 3 2 Data structure ...

Page 22: ...e received including interference that may caus e undesired operation This equipment has been tested and found to comply with the limits for a Class A Digital De vice pursuant to Part 15 of the FCC rules These limits are designed to this equipment gener ates uses and can radiate radio frequency energy and if not installed and used in accordan ce with the instructions may cause harmful interference...

Page 23: ...g Gangseo Gu Seoul 157 030 Korea Tel 82 2 2659 0055 Fax 82 2 2659 0086 E mail webmaster idteck com Website www idteck com E Training Center http www idtecktraining com IDTECK Production Facility and RMA Center 2F 89 4Dodang Dong Weonmi Gu Bucheon Si Gyeonggi Do 420 130 Korea Tel 82 2 2659 0055 Fax 82 2 2659 0086 E mail webmaster idteck com Website www idteck com E Training Center http www idtecktr...

Reviews: